125 Physics Projects for the Evil Genius (49 page)
Read 125 Physics Projects for the Evil Genius Online
Authors: Jerry Silver

How to measure the size of a light wave
.
Light is a wave. The interference pattern created by overlapping light waves is different for different wavelengths of light. We can use this to determine this wavelength.
- diffraction grating of known separation between the lines
- laser pointer of known wavelength (low-cost red lasers are typically 650–670 nm, green lasers are in the range of 535 nm)
- apparatus used in the previous project (including a meterstick, ruler, index card, and associated clamps and holders)
- protractor
- dark room
1. Set up the apparatus used in
Project 81
.
2. Determine the spacing
between
the lines of the diffraction grating. Diffraction grating suppliers typically identify the number of lines in a given distance. For instance, if a diffraction grating has 15,000 lines per inch, the spacing from the center-to-center of the rule lines is 1 inch/15,000 lines or 0.000067 inches between lines or 0.0026 m between lines.
3. Darken the room. (Caution: As with any project involving a laser, use a low-power laser, such as a laser pointer, and be careful to avoid contact with anyone’s eyes.)
4. On either side of the central maximum, you should also find a much dimmer spot. This is called the
first order maximum
. With a pencil, mark the distance to each of the first order maxima.
5. Using the meterstick and protractor, measure the angle between the point where the laser light passes through the diffraction grating and the first order spot on the card. Measure both the angle to the right and to the left of the centerline. The angle to the left and to the right of the center spot should be very close to each other. Repeating this measurement and taking the average can give a more accurate value.
6. If the room is dark enough and everything else is working, it is likely you will be able to see the second and, possibly, the third-order maxima. Note the distance and save the data for the Other Things to Try section.
7. Repeat this using several combinations of screen distance.
8. The diffraction grating equation is

where λ (Greek letter “lambda”) is the wavelength (in meters),
n
is the order of the band = 1, 2, 3 … For the first order, n = 1, and
d
is the distance (in meters) between lines on the diffraction grating.
9. Use this data table to organize your data. Convert all your data to meters. If your measurements are in centimeters, convert them to meters by dividing by 1000.
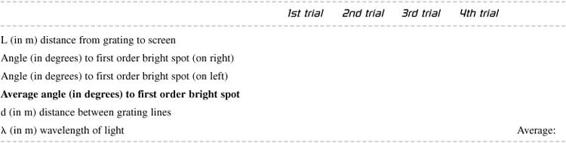
10. Compare the average wavelength you find to the expected wavelength.
Expected Results11. Note, if you really want to nail this measurement, remember the lines themselves take up some of that distance. The distance between the lines (which is what we really need) is slightly less than the center-to-center distance between lines. You can calibrate for this discrepancy by using the previous diffraction grating with a light source with a known wavelength. By measuring the distance between card and grating, the location of the first order maxima, and using the known wavelength, you can solve for
d
, the spacing
between
the lines. Although this gets you into a bit of a chicken and egg situation, it does enable the most accurate results.
For commonly used diffraction gratings, the expected wavelength can be found by measuring a bright light maximum at the following angle.
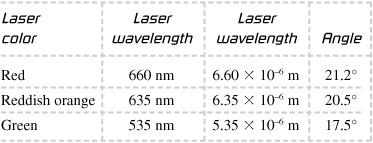
The distance between the bright spots established when light of a given frequency passes through a diffraction grating can be used to measure the wavelength of a source of light. If the spacing of the grating and the distance to the image are known, the wavelength can be determined.
For simplicity, we only used the first order maximum. You can try the previous measurement also using the second and, possibly, the third order maxima. This technique should give the same wavelength, regardless of which order is being used, so finding the same or a similar result from different orders can give you a confirmation that you are doing something right.
The spectral breakdown of light emitted by a hydrogen atom can also be detected using a high-sensitivity light sensor, such as PASCO part number PS-2176. An example of this is shown in
Project 120
.
The optical tracks on a CD or the grooves on a vinyl recording are effectively diffraction gratings. Use the diffraction grating equation to find out the spacing of the tracks on a CD or record. Basically, the reflection from the closely spaced tracks on a CD can give a similar interference pattern, such as that produced by transmission through a diffraction grating. Details can be found in an article called “Using a Laser
Pointer to Measure the Data Track Spacing on CDs and DVDs” (
www.sciencebuddies.org/science-fair-projects/project_ideas/Phys_p011.shtml?from…
).
A
diffraction grating
is a device that produces an interference pattern when a light is shined on it. If that light has one frequency (or is monochromatic), such as a laser, the interference pattern can tell us what the frequency is. This capability forms the basis of many analytical techniques that require measuring the frequency of light with great precision.
The speed of light in your kitchen. Visiting the local hot spots
.
Light is an electromagnetic wave. Because of its extremely high speed, it is difficult to measure the speed of light directly. Historically, astronomers such as O. Roemer used distances on the scale of planetary orbits to get a handle on how fast light traveled through space. In this project, you measure the speed of light right in your own kitchen. The technique is similar in principle to the approach we used in
Project 73
where we found the speed of sound by finding its resonant wavelength. Here, you use a microwave oven to establish a standing wave that can be used to
estimate
the speed of light.
- microwave oven
- sheets of sliced cheese, bars of chocolate, or about five eggs
- sheet or plate to hold above food items without rotating in the oven—some ideas include a rectangular wood or plastic cutting board, a rectangular Pyrex baking dish, a round dish that fits as close wall-to-wall as possible, or a sheet of poster board cut to size. Obviously, remember
no metal
should go in the microwave oven. - ruler
- calculator
- light, so you can see inside the oven (the oven may have an adequate light built in)
1. Microwave ovens rotate to spread out the hotspots in the oven. In this experiment, we want to detect these hot spots. So, if your microwave oven has a rotating tray, remove it from your microwave oven.
2. Put a nonrotating sheet or plate in the bottom of the microwave oven.
3. Cover the plate with the microwavable food: cheese slices or chocolate slabs. The layer should be as uniform as possible in thickness and composition. If you choose to use egg whites, pour a thin layer into a suitable dish and spread it out to form a thin, uniform layer.
4. Look through the glass window of the microwave oven and start the microwave oven on the lowest available power setting. Use a light shining from outside if that helps you observe what is going on inside the oven. If you don’t have a window, you need to cook in increments. Because microwaves differ so much in power, you need to determine an appropriate amount of time to use for this: 10 to 15 seconds is a good place to start.
5. Continue running the microwave oven until you notice the first signs of melt spots or cooking.
6. Stop the microwave oven and identify the pattern of melt spots. Unless you are sure the microwave oven has run long enough to establish a clear melt spot pattern, do not move the tray in the oven yet.
7. Measure the center-to-center distance between adjacent melts spots. An example for what you are looking for is shown in
Figure 84-1
.
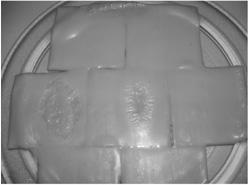
Figure 84-1
Microwave standing wave nodes are indicated by hot spots in melted cheese
.
8. Because one-half of a wavelength fits between each hot spot, the wavelengths for the microwaves in the oven are twice the center-to-center distance measured.
9. Look for a label or search online for the specific microwave frequency used in your microwave oven. If you cannot easily find this frequency, you can use 2450 MHz, which is the frequency at which most commercial microwave ovens operate.
10. When you finish, you can make grilled cheese sandwiches, s’mores, or egg-white omelets with the leftover food ingredients.
11. Calculate the speed of light using the equation:
c = λf
or speed of light = the wavelength/frequency
For λ use the wavelength (in meters) from twice the center-to-center hot spot distance.
For
f
, use 2450 MHz, which is 2,450,000,000 Hz or 2.45 × 10
9
Hz (unless otherwise indicated on the microwave oven).