Build Your Own ASP.NET 3.5 Website Using C# & VB (111 page)
Read Build Your Own ASP.NET 3.5 Website Using C# & VB Online
Authors: Cristian Darie,Zak Ruvalcaba,Wyatt Barnett
Tags: #C♯ (Computer program language), #Active server pages, #Programming Languages, #C#, #Web Page Design, #Computers, #Web site development, #internet programming, #General, #C? (Computer program language), #Internet, #Visual BASIC, #Microsoft Visual BASIC, #Application Development, #Microsoft .NET Framework

650
Build Your Own ASP.NET 3.5 Web Site Using C# & VB
Figure 15.4. Adding the ValidatorCalloutExtender control
One thing to note—the first time you added an extender to the page, you might have
seen a new
Bin
folder appear in your
Solution Explorer
. This folder contains the familiar
AjaxControlToolkit.dll
file, which is known as an
assembly
—a logical unit of code that can actually contain one or more files as a package. If you click on the file
in
Solution Explorer
and look at the
Properties
panel, you’ll notice that the value of the Auto-refresh Path property is the same as the location in which we parked
the assembly file. Once we incorporated the functionality into Dorknozzle, Visual
Web Developer added the referenced assembly to our solution for our convenience.
Visual Web Developer also registered the assembly on the Help Desk page. If we
switch to
Source
mode, we’ll see the following new code near the beginning of our
file:
<%@ Register assembly="AjaxControlToolkit"
namespace="AjaxControlToolkit" tagprefix="cc1" %>
And, if we look at the first ValidatorCalloutExtender extender we added, we’ll
see the following code:
ID="stationNumReq_ValidatorCalloutExtender"
runat="server" Enabled="True"
TargetControlID="stationNumReq">
That snippet of code tells the compiler and Visual Web Developer to look for tags
from the
AjaxControlToolkit.dll
when we add an element with the prefix cc1. Now,
let’s run the page and see how it looks when we input some invalid data. Click on
the
Submit Request
button and you should see a validation message like the one
displayed in
Figure 15.5
.
Licensed to [email protected]

ASP.NET AJAX
651
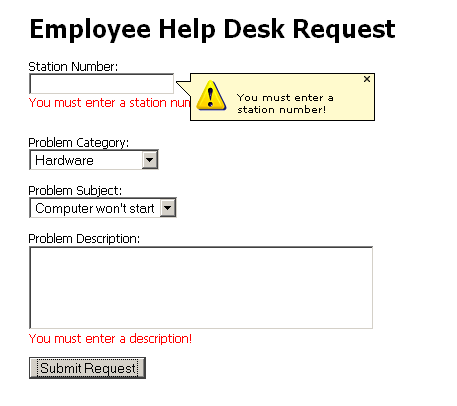
This isn’t quite what we wanted. First, why are those red error messages appearing?
Second, how can we highlight the fields in error?
Figure 15.5. Both validation messages displaying
Let’s tackle the redundant validation text first. When we first built the page in
Chapter 6
, we used the validation controls’ dynamic rendering functionality to improve the usability of the page. Now, since we’re going to use callouts to highlight the fields in error, this dynamically generated error message is interfering with our
much prettier callouts. To eliminate this problem, we could hunt down each of the
four validator controls on the page and set their Display properties to None. Alternatively, we can take advantage of Visual Web Developer’s find-and-replace functionality: 1. Open
HelpDesk.aspx
in
Source
view.
2. Open the
Quick Replace
dialog by pressing
Ctrl
+
h
.
3. Make absolutely certain that
Look in
is set to
Current Document
.
4. Enter
Display=”Dynamic”
into
Find What
.
5. Enter
Display=”None”
into
Replace With
.
6. Click
Replace All
.
7. You should see four replacements made.
Our next task is to enable some kind of highlight on the fields that have errors.
Conveniently, the ValidationCalloutExtender extender has a property just for
Licensed to [email protected]
652
Build Your Own ASP.NET 3.5 Web Site Using C# & VB
this purpose: HighlightCssClass. This class is applied via JavaScript manipulation
when a field is in error. To use it, we need to add the following piece of CSS to our
Dorknozzle CSS file:
Dorknozzle\VB\07_Dorknozzle.css
(excerpt)
.fieldError {
background-color: pink;
color: White;
}
Next, add the HighlightCssClass attribute to each of the four
ValidatorCalloutExtender extenders you added to the page, and give each instance
the value fieldError. If you’re using
Design
view, the extenders can be very hard
to find—the only way is to grab them from the drop-down list in the
Properties
panel. In
Source
view, on the other hand, you can just type the code directly into
the relevant tag. Each of your ValidatorCalloutExtender extenders should have
a new attribute like the one below:
Dorknozzle\VB\08_HelpDesk.aspx
(excerpt)
ID="stationNumReq_ValidatorCalloutExtender"
runat="server" Enabled="True" TargetControlID="stationNumReq"
HighlightCssClass="fieldError"
>
View the page in your browser again, and click
Submit Request
without entering any
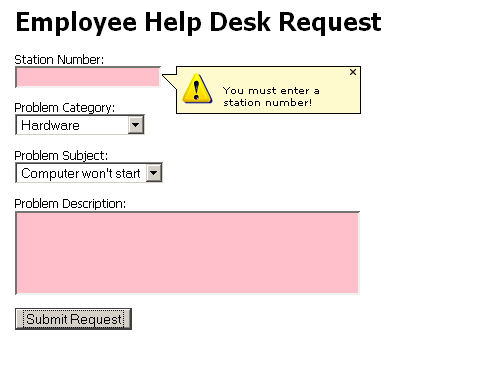
data. The red error messages should have been replaced with pink highlights and
yellow validation callouts like the ones in Figure 15.6.
Licensed to [email protected]

ASP.NET AJAX
653
Figure 15.6. The completed validation display
Getting Started with Animation
ValidatorCalloutExtender extenders are fun, but we all know that the marketing
department is always demanding the kind of pop and pizzaz that’s powered by animation.
We’re going to take our old
Departments.aspx
page and spice it up—we’ll use some
animation to indicate that it’s updating, rather than relying on a plain old
UpdateProgress control. However, before we get started on this, we’re going to have
to enable the AJAX Control Toolkit to be used project-wide. Open the Dorknozzle
Web.config
file, find the
Dorknozzle\VB\09_web.config
(excerpt)
⋮
assembly="AjaxControlToolkit" />
You might notice that this is quite similar to the @Register directive that was created
in the
HelpDesk.aspx
file when we dragged the ValidationCalloutExtender extender
Licensed to [email protected]
654
Build Your Own ASP.NET 3.5 Web Site Using C# & VB
onto the design canvas. However, rather than applying only to a single page, as the
directive does, this configuration applies to the entire project. This is a handy way
to globally enable a library that you plan to use liberally throughout your project.
Now that we’ve registered the library, we can add our animation. Open the
Depart-
ments.aspx
page in
Source
view and remove the UpdateProgress control we added
previously. If you didn’t remove the ScriptManager control earlier, do that now—it
will conflict with the global ScriptManager control we added to
Dorknozzle.master
file.
Next, make the following changes to your
Departments.aspx
file:
Dorknozzle\VB\10_Departments.aspx
(excerpt)
AllowPaging="True" PageSize="4" AllowSorting="True" onpageindexchanging="departmentsGrid_PageIndexChanging" onsorting="departmentsGrid_Sorting"> Grid rendered at <%= DateTime.Now.ToLongTimeString() %>
s
ID="UpdatePanelAnimationExtender1" runat="server"
TargetControlID="DepartmentsUpdatePanel"
BehaviorID="Animation">
minimumOpacity=".2" />
minimumOpacity=".2" />
Licensed to [email protected]
ASP.NET AJAX
655
In this code, we first wrapped the grid in a div element, which is required for the
animation. Then we added an UpdatePanelAnimationExtender extender targeting
the DepartmentsUpdatePanel. The extender handles two events—OnUpdating and
OnUpdated. We specify a fade-out animation to appear while the page is updating,
and a fade-in animation to appear when it’s finished updating. Execute the page in
your browser and click on a few of the paging and sorting controls to enjoy the effect.
Animations can be far more complex than this simple example, but this should be
enough to get you going.
Summary
In this chapter, we started out by learning a bit about Ajax technology, and what
ASP.NET AJAX has to offer. We used the UpdatePanel and the UpdateProgress
controls on our Departments GridView to improve the user experience. We then
employed AsyncPostBackTriggers and multiple UpdatePanels in our Address
Book page to explore a more advanced, multi-UpdatePanel scenario.
Shifting gears, we examined the ASP.NET AJAX Control Toolkit and added it to
Visual Web Developer. We then added some ValidationCallout control extenders
to our Help Desk form before going on a short foray into the wonderful world of
animation. While we didn’t have the space here to fully examine every feature of
ASP.NET AJAX or the ASP.NET AJAX Control Toolkit, you should now have the
knowledge to start employing them in your own projects.
Licensed to [email protected]
Licensed to [email protected]
Appendix A: Web Control Reference
The following reference includes a list of important properties, methods, and events
for some of the useful controls you’ll find in the Visual Web Developer Toolbox.
I’ve grouped the lists of controls on the basis of their locations within the Toolbox:
■ standard controls
■ validation controls
■ navigation controls
■ Ajax controls
As well as the controls listed below, don’t forget that any HTML element can be
used with a runat=”server” attribute value to access server-side features. We
covered this capability in
the section called “HTML Server Controls” in Chapter 4.
As almost all the web controls listed here are based on (or, more specifically, derived
from) the WebControl class, they inherit its properties and methods. First up, let’s
review the more useful of these, which can be used with any of the web controls.
The WebControl Class
Properties
AccessKey
specifies a shortcut key that quickly selects a control
without the user needing to use a mouse; the shortcut
command is usually
Alt
plus a letter or number
Attributes
allows the accessing and manipulation of the attributes
of the HTML code rendered by the control
BackColor
the control’s current background color
BorderColor
color for the border
BorderStyle
style of border drawn around the web control; default is
NotSet; other values are None, Solid, Double, Groove,
Ridge, Dotted, Dashed, Inset, and Outset
Licensed to [email protected]
658
Build Your Own ASP.NET 3.5 Web Site Using C# & VB
BorderWidth
width of the border