Build Your Own ASP.NET 3.5 Website Using C# & VB (80 page)
Read Build Your Own ASP.NET 3.5 Website Using C# & VB Online
Authors: Cristian Darie,Zak Ruvalcaba,Wyatt Barnett
Tags: #C♯ (Computer program language), #Active server pages, #Programming Languages, #C#, #Web Page Design, #Computers, #Web site development, #internet programming, #General, #C? (Computer program language), #Internet, #Visual BASIC, #Microsoft Visual BASIC, #Application Development, #Microsoft .NET Framework


Managing Content Using Grid View and Details View
459
HyperLinkField
Use the HyperLinkField to display a clickable link within the GridView. This
link simply acts as a hyperlink to a URL; it raises no server-side events.
ImageField
This control displays an image inside your grid.
TemplateField
Use the TemplateField to display markup within the GridView.
If you’re using Visual Web Developer, you can quickly and easily add a new column
to your table in Design view. Click the GridView’s smart tag, and click the
Add New
Column...
item, as shown in Figure 11.6.
Figure 11.6. Adding a new GridView column
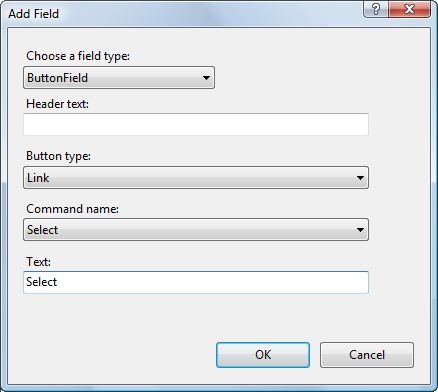
In the dialog that appears, change the field type to
ButtonField
, the command name
to
Select
, and set the
Text
field to
Select
, so the dialog appears as it does in
Fig-
Figure 11.7. Adding a new field
Licensed to [email protected]

460
Build Your Own ASP.NET 3.5 Web Site Using C# & VB
After clicking
OK
, your brand-new column shows up in Design view. If you switch
to Source view, you can see it there, too:
Dorknozzle\VB\06_AddressBook.aspx
(excerpt)
AutoGenerateColumns="false">
HeaderText="Mobile Phone" />
If you execute the project now, and click the new button, the row will become
highlighted, as Figure 11.8 indicates. Y
ou’ll have noticed that we didn’t write any code to implement this feature. We’re relying on the functionality provided by the
ButtonField control when it’s CommandName property is set to Select, combined
with the style settings you set earlier, to produce this functionality.
Figure 11.8. Highlighting the selected field in the Address Book
Licensed to [email protected]


Managing Content Using Grid View and Details View
461
We usually want extra work—in addition to the row highlighting—to be performed
when a user selects a row in the address book. When the Select button is pressed,
the GridView fires the SelectedIndexChanged event, which we handle if we need
to do any further processing. We can generate the GridView’s SelectedIndexChanged
event handler simply by double-clicking the GridView in the Visual Web Developer
designer.
Generating Default Event Handlers
Double-clicking a control in the designer causes Visual Web Developer to generate
the handler of the control’s default event. The default event of the GridView is
SelectedIndexChanged, which explains why it’s so easy to generate its signature.
Remember that you can use the Properties window to have Visual Web Developer
generate handlers for other events—just click the lightning icon in the Properties
window, then double-click on any of the listed events.
Before we handle the SelectedIndexChanged event, let’s add just below the GridView
control in
AddressBook.aspx
a label that we can use to display some details of the
selected record. You can use Visual Web Developer’s designer to add the control,
or you can write the code manually:
Dorknozzle\VB\07_AddressBook.aspx
(excerpt)
⋮
AutoGenerateColumns="False">
⋮
Now, generate the SelectedIndexChanged event handler by double-clicking the
GridView control in Design view, then update the event handler to display a short
message about the selected record:
Licensed to [email protected]
462
Build Your Own ASP.NET 3.5 Web Site Using C# & VB
Visual Basic
Dorknozzle\VB\08_AddressBook.aspx.vb
(excerpt)
Protected Sub grid_SelectedIndexChanged(ByVal sender As Object,
➥ ByVal e As System.EventArgs) Handles grid.SelectedIndexChanged
Dim selectedRowIndex As Integer
selectedRowIndex = grid.SelectedIndex
Dim row As GridViewRow = grid.Rows(selectedRowIndex)
Dim name As String = row.Cells(0).Text
detailsLabel.Text = "You selected " & name & "."
End Sub
C#
Dorknozzle\CS\08_AddressBook.aspx.cs
(excerpt)
protected void grid_SelectedIndexChanged(object sender,
EventArgs e)
{
int selectedRowIndex;
selectedRowIndex = grid.SelectedIndex;
GridViewRow row = grid.Rows[selectedRowIndex];
string name = row.Cells[0].Text;
detailsLabel.Text = "You selected " + name + ".";
}
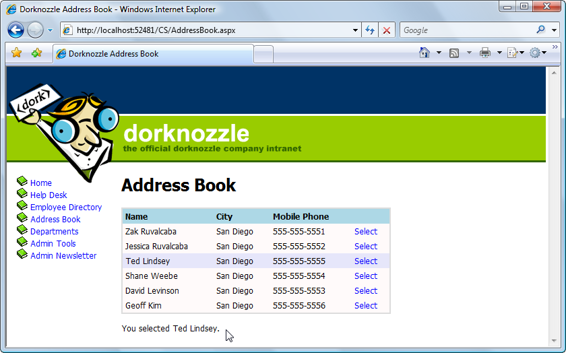
Execute the project, and select one of the records. You should see a display like the
Licensed to [email protected]

Managing Content Using Grid View and Details View
463
Figure 11.9. Displaying details about the selected row
It was easy to add this new feature, wasn’t it?
Using the DetailsView Control
ASP.NET 2.0 introduced the DetailsView control, which can come in very handy
when you want to display more details about one record in a grid. You’ll find this
control very useful when you need to display details about a record that contains
many fields—so many, in fact, that the main grid can’t display all of them.
The DetailsView control is commonly used to create a page that shows a list of
items, and allows you to drill down to view the details of each item. For instance,
an ecommerce site might initially present users with only a little information about
all available products, to reduce download time and make the information more
readable. Users could then select a product to see a more detailed view of that
product.
Let’s see how this works by using a GridView and a DetailsView in our Address
Book web form. Replace detailsLabel with a DetailsView control, as shown in
the following code snippet:
Licensed to [email protected]
464
Build Your Own ASP.NET 3.5 Web Site Using C# & VB
Dorknozzle\VB\09_AddressBook.aspx
(excerpt)
⋮
AutoGenerateColumns="false">
⋮
Next, we’ll modify the BindGrid method to specify the grid’s
data key
. The data
key feature of the GridView control basically allows us to store a piece of data about
each row without actually displaying that data. We’ll use it to store the EmployeeID
of each record. Later, when we need to retrieve additional data about the selected
employee, we’ll be able to read the employee’s ID from the data key, and use it in
our SELECT query. Add this line to your code-behind file:
Visual Basic
Dorknozzle\VB\10_AddressBook.aspx.vb
(excerpt)
Try
conn.Open()
reader = comm.ExecuteReader()
grid.DataSource = reader
grid.DataKeyNames = New String() {"EmployeeID"}
grid.DataBind()
reader.Close()
C#
Dorknozzle\CS\10_AddressBook.aspx.cs
(excerpt)
try
{
conn.Open();
reader = comm.ExecuteReader();
grid.DataSource = reader;
grid.DataKeyNames = new string[] { "EmployeeID" };
grid.DataBind();
reader.Close();
}
Licensed to [email protected]
Managing Content Using Grid View and Details View
465
As you can see, we tell the GridView which keys to store by setting the DataKeyNames
property. This property needs to be populated with an
array
of keys, because the
GridView supports storing zero, one, or many keys for each row it displays. In this
case, we create an array that contains just one value: EmployeeID. In the code you’ve
just written, you can see the syntax that creates such an array on the fly, without
declaring an array first.
After you make this change, you’ll be able to access the EmployeeID value for any
given row through the GridView’s DataKeys property.
With this new data to hand, loading the details of the selected employee into the