Build Your Own ASP.NET 3.5 Website Using C# & VB (82 page)
Read Build Your Own ASP.NET 3.5 Website Using C# & VB Online
Authors: Cristian Darie,Zak Ruvalcaba,Wyatt Barnett
Tags: #C♯ (Computer program language), #Active server pages, #Programming Languages, #C#, #Web Page Design, #Computers, #Web site development, #internet programming, #General, #C? (Computer program language), #Internet, #Visual BASIC, #Microsoft Visual BASIC, #Application Development, #Microsoft .NET Framework

(paging controls)
PageIndexChanging, PageIndexChanged
Delete
ItemDeleting, ItemDeleted
Insert
ItemInserting, ItemInserted
Edit
ModeChanging, ModeChanged
Update
ItemUpdating, ItemUpdated
Delete
RowDeleting, RowDeleted
(custom action)
ItemCommand
Notice that, except for the RowCommand (for the GridView) and the ItemCommand (for
the DetailsView) events, we have some events that are named in the present tense
(that is, those that end in “ing,” such as SelectedIndexChanging and ItemUpdating),
and other events that are named in the past tense (that is, those that end in “ed,”
such as SelectIndexChanged and ItemUpdated). The events that end in “ing” are
fired just before their past-tense counterparts, and should be handled only if you
want to implement some logic to determine whether the action in question should
be performed.
The “ed” events, on the other hand, should perform the actual task of the button.
We saw such an event handler when we handled the SelectIndexChanged event
of our GridView control. In this handler, we queried the database to get the details
of the selected employee, then displayed the result in a DetailsView control.
If we wanted to disallow the selection of a particular employee (say, the employee
with the ID 1), we could do so by setting e.Cancel to True in the SelectIndexChanging event handler, as shown below:
Visual Basic
Protected Sub grid_SelectedIndexChanging(ByVal sender As Object,
➥ ByVal e As GridViewSelectEventArgs)
➥ Handles grid.SelectedIndexChanging
Dim selectedRowIndex As Integer = grid.SelectedIndex
Dim employeeId As Integer = _
grid.DataKeys(selectedRowIndex).Value
If employeeId = 1 Then
Licensed to [email protected]


Managing Content Using Grid View and Details View
473
e.Cancel = True
End If
End Sub
C#
protected void grid_SelectedIndexChanging(object sender,
GridViewSelectEventArgs e)
{
int selectedRowIndex = grid.SelectedIndex;
int employeeId = (int)grid.DataKeys[selectedRowIndex].Value;
if (employeeId == 1)
{
e.Cancel = true;
}
}
Where’s RowEdited?
Note that, in the case of the Edit action in the GridView, there’s no RowEdited
event. Why not? Well, it wouldn’t make much sense to have one—GridView
knows what to do when an editing action is approved to take place. More specifically, when a row enters edit mode, it’s displayed using the default editing style of the column. The built-in column types (such as bound columns, check box
columns, and so on) have built-in editing templates, which you can customize by
providing custom templates.
Entering Edit Mode
To get a better grasp on all this theory, let’s look at another example. Here, we’ll
modify the DetailsView control to let users update employee data. To implement
GridView or DetailsView editing, we can use a CommandField column.
Let’s get started. Open
AddressBook.aspx
in the designer, click the DetailsView’s
smart tag, and choose
Add New Field…
. In the
Choose a field type
drop-down, select
CommandField
, and check the
Edit/Update
checkbox
, as shown in Figure 11.14
. Licensed to [email protected]

474
Build Your Own ASP.NET 3.5 Web Site Using C# & VB
Figure 11.14. Adding the Edit/Update CommandField
If you’d prefer to add the new column by hand, do so by adding it to
AddressBook.as-
px
. Either way, you should end up with the following code:
Dorknozzle\VB\14_AddressBook.aspx
(excerpt)
AutoGenerateRows="False">
HeaderText="Home Phone" />
HeaderText="Extension" />
<%#Eval("Name")%>
The new item will appear in the designer as an
Edit
link immediately below the list
of columns. If you execute the project and click that
Edit
link, an exception will be
thrown, telling you that you didn’t handle the ModeChanging event. The DetailsView
Licensed to [email protected]
Managing Content Using Grid View and Details View
475
control doesn’t know how to switch itself to edit mode, but fortunately, it’s extremely
easy to write the code yourself.
To have Visual Web Developer generate the ModeChanging event signature for you,
open
AddressBook.aspx
in Design view, select the DetailsView control, click the
yellow button with the lightning symbol in the Properties window to display the
list of the control’s events, and double-click on the ModeChanging entry. This will
generate an empty event handler for you (as well as the onmodechanging property
on the DetailsView control if you’re using C#), and take you straight to the function
in the code-behind file. Complete the generated code like this:
Visual Basic
Dorknozzle\VB\15_AddressBook.aspx.vb
(excerpt)
Protected Sub employeeDetails_ModeChanging(ByVal sender As Object,
➥ ByVal e As System.Web.UI.WebControls.DetailsViewModeEventArgs)
➥ Handles employeeDetails.ModeChanging
employeeDetails.ChangeMode(e.NewMode)
BindDetails()
End Sub
C#
Dorknozzle\CS\15_AddressBook.aspx.cs
(excerpt)
protected void employeeDetails_ModeChanging(object sender,
DetailsViewModeEventArgs e)
{
employeeDetails.ChangeMode(e.NewMode);
BindDetails();
}
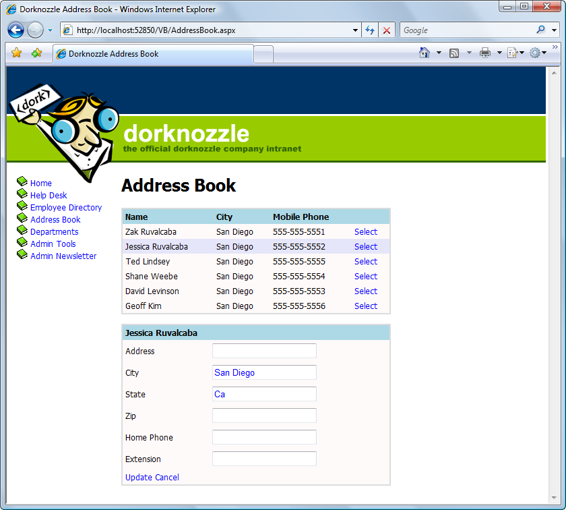
Execute the project and click the
Edit
button. This will transform the control as
Licensed to [email protected]

476
Build Your Own ASP.NET 3.5 Web Site Using C# & VB
Figure 11.15. The DetailsView in edit mode
In order to understand the code in employeeDetails_ModeChanging, you need to
know about the
display modes
of the DetailsView control. The DetailsView control
supports three display modes. You can change the current mode using its ChangeMode
method, providing as parameter one of these values:
DetailsViewMode.ReadOnly
This is the default mode, which is used to display data. When you execute your
project, and load the details of an employee, you see those details in ReadOnly
mode.
DetailsViewMode.Edit
This mode is used to edit an existing record. We saw this mode in action earlier,
when we clicked the
Edit
button.
Licensed to [email protected]
Managing Content Using Grid View and Details View
477
DetailsViewMode.Insert
We use this mode to insert a new record. It’s similar to the edit mode, except
all the controls are empty, so you can fill in data for a new item.
If you look at the employeeDetails_ModeChanging, you’ll see it receives a parameter
named e that is an object of class DetailsViewModeEventArgs. e’s NewMode property
tells us which display mode was requested by the user. Its value will be DetailsViewMode.Edit when the ModeChanging event is fired as a result of the
Edit
button being clicked. We pass this value to the DetailsView control’s ChangeMode method,
which does exactly as its name suggests: it changes the mode of the DetailsView.
With this code, you’ve implemented the functionality to make both the
Edit
and
Cancel
buttons work correctly, as we’ll see in an example shortly.
However, note that once you switch to edit mode, clicking the
Update
button will
generate an error, because we still haven’t handled the ItemUpdating event that’s
fired when the user tries to save changes to a record. We’ll create the event handler
later; next, we want to improve our existing solution using templates.
Using Templates
The built-in column types are sufficiently varied and configurable to provide for
most of the functionality you’re likely to need, but in cases where further customization is required, you can make the desired changes using templates. In the smart tag menu of the GridView and DetailsView controls, you’ll see an option called
Edit Columns
(for the GridView) or
Edit Fields
(for the DetailsView). Select that option to open a dialog that provides us with a great deal of control over the options for
each column or field.
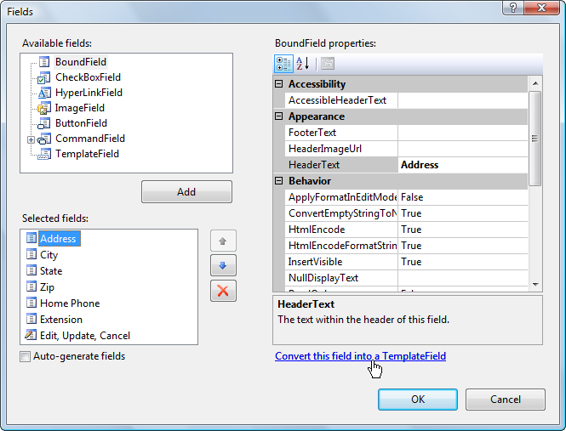
You’ll notice a
Convert this field into a TemplateField
link in the dialog. Let’s see how this works. Click the smart tag of your DetailsView control, then click
Edit Fields
.
In the dialog that appears, select the
Address
field from the
Selected fields
list, as
Licensed to [email protected]
