Building Web Sites All-in-One For Dummies® (66 page)
Read Building Web Sites All-in-One For Dummies® Online
Authors: Claudia Snell

4.
Choose the Source Images and Destination folders.
Click the Browse button to navigate to the folder in which the source images are stored, and then click the Browse button to navigate to the folder where the finished photo gallery will be stored.
5.
Select an option from the Thumbnail Size drop-down menu.
This determines the size of the thumbnail that Fireworks creates.
6.
Accept the default option to show filenames.
Doug always deselects this option unless the photo gallery is for a photographer whose client will be choosing which images she wants to purchase. The only time you should select this option is when the filename is important, such as when the filename needs to be present in order to identify a photo.
7.
Accept the default value of 5 for Columns, or enter another value.
This determines how many columns are created in the HTML page that houses the thumbnails.
8.
Choose options from the Thumbnail Format and Photo Format drop-down menus.
These options enable you to choose the image quality and file format. When you're creating a photo gallery, the obvious choice is JPEG. If your client's intended audience accesses the Internet with high-speed connections, choose JPEG-Better Quality.
9.
Accept the default Scale value of 100 percent, or enter a different value.
The default displays the full-size images at their original sizes. Enter a smaller value to resize the images. Entering a larger percentage is possible, but not advised because image degradation occurs.
10.
Accept the default Create Navigation Page for Each Photo.
This option creates an HTML page for each image with navigation buttons to go forward, back, or to the home page of the image gallery.
11.
Click OK.
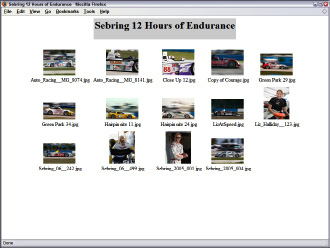
Fireworks launches and creates the optimized full-size images and thumbnails, and Dreamweaver handles the task of creating the HTML documents for the image gallery. Figure 4-18 shows the finished gallery as displayed in the Firefox Web browser.
Figure 4-18:
A Dream-weaver Web gallery in action.
Book V
Multimedia
Chapter 1: Incorporating Flash Creations
In This Chapter
Adding Flash interactivity
Adding Flash navigation to a Web site
Creating Flash animations
Creating a Flash presentation
If you need to kick up a Web design with some multimedia, Flash is an excellent tool to use. With a bit of imagination, you can use this powerful tool to create Web sites that make those of your competition look positively lame. This chapter introduces you to the all-singing, all-dancing Flash CS4 workspace. Here, you find out how to use it to create flashy navigation in a flash (almost the same duration as a New York minute), add animation to your designs, and produce stellar presentations. Let the games begin.
Introducing Flash CS4
Historically, Flash has been used to create animated introductions to Web sites and full-fledged Web sites. However, Flash intros are no longer in vogue, and Flash Web sites are not search engine friendly. Despite all this, Flash is as strong as ever; Web designers just use it in different ways.
Designers can control the user's experience in a Web site by how they place items on the Flash Timeline. They can also control the flow of the Flash movie via ActionScript. Flash navigation menus consist of buttons that can transport the visitor to other parts of the Web site.
Whether you're creating an animation or a menu in Flash, the end result is an SWF file, which is also known as a movie. When constructed properly, Flash movies are relatively small files. Yet a designer can go over the top by adding so many graphics and other bells and whistles that the finished product loads at a snail's pace.
The tempo or pace of a Flash movie is defined by the frame rate. The default frame rate of a Flash movie is 24 frames per second (fps), which is fine for most Flash movies. You can also incorporate Flash video (FLV file format) in a Flash project or in an HTML Web page. For more information on Flash video and other Web video formats, see Chapter 3 of this minibook.
Touring the interface
The Flash interface might seem a little daunting to the uninitiated. We certainly had our doubts when we first launched Flash 4. However, the workspace is really quite civil after you work with Flash for a while. To know Flash in all its glory, you need a good book on the topic, such as
Building Flash Web Sites For Dummies
(by Doug),
Flash All-in-One Desk Reference For Dummies
(Doug again, with Bill Sanders), or
Flash CS4 For Dummies
(Ellen Finkelstein and Gurdy Leete; all from Wiley).
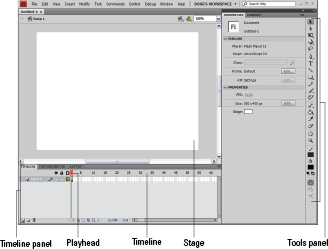
To start the tour, we bring you up to speed on the various parts of the Flash interface (see Figure 1-1) in the upcoming sections.
Figure 1-1:
The Flash interface in all its glory.
Exploring the Tools panel
The right side of the interface is home to the Tools panel, which is shown in Figure 1-2. This part of the interface is home to the tools you use to create objects and text. For the purpose of this illustration, the Tools panel is floating in a two-column format. You can also use the tools to move and modify objects, or you can choose a different workspace from the drop-down menu to the right of the menu groups. Some of the less frequently used tools share space in the Tools panel. When you see a right-pointing down arrow, you've found a tool that's subletting space to another. Click the arrow to reveal a fly-out menu that shows more tools.
Figure 1-2:
Tools you use for fun and profit.
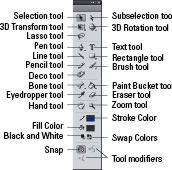
The following tools reside in the Tools panel:
â¢
Selection tool:
Select and moves objects.
â¢
Subselection tool:
Select points along a path and objects within a group.
â¢
Free Transform tool:
Scale objects; change the width or height of an object; skew an object; change an object's center of rotation; rotate an object.
â¢
Gradient Transform tool:
Transform a gradient that fills an object. This tool shares space on the Tools panel with the Free Transform tool.
â¢
3D Rotation tool:
Take objects for a spin. Flash isn't true 3-D yet, but you can simulate 3-D in an animation with this tool.
â¢
3D Transform tool:
This tool has three axes â x, y, and z â that you use to move an object left and right, up and down, forward and backward. This tool makes it possible for you to simulate 3-D in a motion tween animation. A motion tween animation is one where an object moves from Point A to Point B and Flash creates the objects in the in-between frames. This tool shares space with the 3-D Rotation tool in the Tools panel.
â¢
Lasso tool:
Create a freeform selection.
â¢
Pen tool:
Create a path. You can choose other tools from the fly-out menu that enable you to add points to or delete points from a path. There is also a tool to convert a straight point to a curve point and vice versa.
â¢
Text tool:
Add text to a document.
â¢
Line tool:
Create lines.
â¢
Oval tool:
Create ovals. Hold down the Shift key while using this tool to create a circle. The Oval tool shares a one-story walkup with the Rectangle, Rectangle Primitive, and Oval Primitive tools.
â¢
Rectangle tool:
Create rectangles. Hold down the Shift key while using this tool to create a square. You can add a radius to rectangle corners to create rectangles with round corners by clicking the Set Corner Radius button in the Options area of the Tools panel.
â¢
Rectangle Primitive tool:
This critter is also used to create rectangles and rounded rectangles. The beauty of a primitive shape is that you can edit the shape's attributes at any time using the Property inspector.
â¢
Oval Primitive tool:
Create ovals that can be edited in the Property inspector any time after they are created.
â¢
Pencil tool:
Create freeform lines in the document.
â¢
Brush tool:
Paint objects within the document.
â¢
Spray Brush tool:
Use to add graffiti-like splashes of color to a document. You can change the color that sprays from the nozzle, or spray a symbol out the tool's nozzle from the document Library. This tool shares the rent with the Brush tool.
â¢
Deco tool:
Use to draw a shape that looks like a flowering vine. You specify the colors in the Property inspector, and you can also choose a symbol from the document Library for the leaf and the vine.
â¢
Bone tool:
Use to create an Inverse Kinematics (IK) animation. You use the tool to add bones to the object you're animating. The bones are the Inverse Kinematics chain. You yank a bone with the Selection tool, and the bones that are higher in the chain move.
â¢
Bind tool:
Use this to fine-tune an IK animation that's not performing up to snuff â “bound up,” if you will. You use the tool to bind points from an object with a bone.
â¢
Polystar tool:
Create multisided polygons and stars. The Polystar tool appears on a fly-out when the arrow in the corner of the Rectangle tool is clicked. When the Polystar tool is selected, it appears on the Tools panel; the Rectangle tool is now on the fly-out.
â¢
Ink Bottle:
Change the color of an object's stroke (outline). The Ink Bottle and Paint Bucket share space in the Tools panel.
â¢
Paint Bucket:
Change an object's fill, which can be a solid color or gradient.
â¢
Eyedropper:
Sample a color from an object within the document.
â¢
Eraser:
Erase an area or object within the document.
â¢
Hand tool:
Pan within the document.
 While using any tool, press and hold down the spacebar to momentarily activate the Hand tool. Release the spacebar to revert to the previously used tool.
â¢
Zoom:
Zoom in within the document. Click to zoom to the next highest level of magnification. Click and drag to zoom to a specific area of the document. Press the Alt key (Windows) or Option key (Mac) and then click inside the document to zoom out to the nextâlowest level of magnification.
â¢
Stroke Color:
Click the swatch to open the Color Picker and then choose a stroke color. This color is applied to all the tools that create objects with a stroke.
â¢
Fill Color:
Click the swatch to open the Color Picker and then choose a fill color. This color is used by all the tools that create objects with a fill.
â¢
Black and White:
Click this icon to revert to the default stroke color (black) and fill color (white).
â¢
No Color:
Click the Fill Color swatch to open the Swatches panel, and then click this icon to create an object with no fill. Or, click the Stroke Color swatch and then click this icon to create an object with no stroke.
â¢
Swap Colors:
Swap the current stroke and fill colors.
â¢
Options:
This part of the Tools panel changes depending on the tool you select. For example, when you choose the Brush tool, you are presented options that specify how the tool disperses color, the brush size, tip, and so on.
Someone told me it's all happening on the Timeline
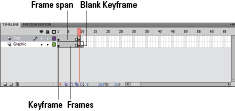
You use the Timeline to control the tempo of your Flash movie. The Timeline consists of frames. You add keyframes where you want a change to occur. When you create an animation, you add a keyframe and then move the object to a different position.
You create blank keyframes to signify the end of a set of frames. For example, if you're creating a slide show, you add an image to a keyframe where you want the animation to start. The frames downstream from the keyframe duplicate the contents of the keyframe â in this case, the image. The number of frames signifies the length of time for which the image is displayed. We don't show you how to create an animation just yet â that comes later, in the “Creating your first animation” section â but we get you started:
â¢
To create a keyframe, click a regular frame and press F6.
Alternatively, choose InsertâTimelineâKeyframe. A keyframe with objects is signified by a solid dot. (See Figure 1-3.)
â¢
To create a blank keyframe, click a regular frame and press F7.
Alternatively, choose InsertâTimelineâBlank Keyframe. A blank keyframe is signified by a hollow dot. (See Figure 1-3.)
â¢
To create a regular frame, press F5.
Alternatively, choose InsertâTimelineâFrame. Frames duplicate the content of the previous keyframe. The area between keyframes is a
frame range.
The last frame in a frame range is signified by a rectangle. (See Figure 1-3.)
Figure 1-3:
Frames, keyframes, and blank keyframes.
