Canning and Preserving For Dummies (24 page)
Read Canning and Preserving For Dummies Online
Authors: Amelia Jeanroy

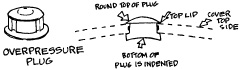
Figure 9-6:
An over-pressure plug.
Rack
Your pressure canner should come with a rack. (If the rack is missing, contact the store where you made your purchase.) The perfect rack lies flat in the bottom of your canner and has lots of holes and openings that allow steam to circulate around your filled jars. Figure 9-7 is an example of a canner rack.
Figure 9-7:
A rack for holding jars in the bottom of your pressure canner.

 Make sure your rack is stable when you place it in the bottom of the canner. A stable rack holds jars in place, thus preventing the jars from tipping, touching other jars, or touching the sides of the canner.
A-Canning You Will Go: Instructions for Successful Pressure Canning
In order to ensure a processed product of high quality, free from microorganisms, be sure to follow each step in this section. Don’t omit or modify any part. You may spend a bit more time canning low-acid foods with a pressure canner than you would canning high-acid foods in a water-bath canner, but the end result is worth the extra effort.
 In this section, you begin your journey of pressure-canning low-acid foods. Avoid any temptation to omit any step or portion of any step in the process. Each step is important to produce safe, home-canned foods.
If you’ve never used a pressure canner before, do a trial run with no jars: Heat up the canner and go through the steps of pressurizing and depressurizing to familiarize yourself with the sounds the pressure canner makes as it builds and then releases pressure. You’ll hear the steam escaping, the weight gauge shaking, and the ticking of the canner as it heats and cools; if you don’t know what to expect, you could misinterpret these noises as scary or wrong.
Step 1: Gearing up
At least a couple of weeks before you want to use it, check your pressure canner and replace any gasket or missing part, have a dial gauge checked professionally, and replace a missing manual. Also count your jars and two-piece caps and examine the jars for nicks or chips, the screw bands for proper fit and corrosion, and the new lids for imperfections and scratches. It’s also a good idea to select your recipe, and inventory your pantry for any nonperishable ingredients, adding any needed items to your shopping list. Your goal is to have all the supplies you need and your pressure canner in good working order on the day you’re ready to can.
Preparing your pressure canner before the actual canning season means you will not find the store out of supplies and the extension agent too busy to check your gauge in time to begin canning when the produce is ripe.
On the actual canning day, get your tools ready by following these steps:
1. Assemble your prechecked equipment and utensils.
In addition to your pressure canner and the standard canning supplies (jars with two-piece lids), other items can make your canning easier: things like a food scale, extra pans for cooking your veggies and keeping a water reserve on hand, a wide-mouth funnel, and so on. Head to Chapter 2 for a list of canning supplies.
2. Wash your jars and screw bands in warm, soapy water, rinsing well to remove any soap residue.
Double-check for nicks and dents and discard any damaged items.
3. Place your clean jars and lids in a kettle of hot — not boiling — water until you’re ready to fill them.
 Never boil the lids because the sealant material may be damaged and won’t produce a safe vacuum seal.
4. Ready your canner by filling it with 2 to 3 inches of water and heating the water.
Always read the manufacturer’s instructions for your pressure canner and follow them to the letter.
Also, assemble the other canning items you need. You can find a complete list in Chapter 2.
Step 2: Preparing your food
Always start with food of the highest, freshest quality. Food that’s spoiled or bruised doesn’t improve in quality during the pressure-canning process! To prepare your food for pressure canning, follow these steps:
1. Wash all food prior to packing it in the jars or precooking it.
For detailed instructions on washing your food, refer to Chapter 3.
2. Thoroughly cut away all evidence of spoilage or discard any inferior products.
3. Prepare the food by precisely following your recipe.
Some recipes call for you to fill your jars with raw food; others may want you to precook the food. If you’re precooking your low-acid food before filling your jars, don’t discard the cooking liquid; use this liquid for filling your jars.
Work in manageable batches. To determine just what a “manageable batch” is, consider how much food fills one canner load at a time. Most recipes are geared for manageable batches, but if you’re in doubt, check the yield for the recipe.
Step 3: Filling your jars
Always place your product into hot jars (you keep them hot by leaving them in a kettle of hot water, as explained in the earlier section “Step 1: Gearing up.”) To fill your jars, follow these steps:
1.
Remove a jar from the kettle and pack the food into the jar so that the food is snug, yet loose enough for liquid to circulate into the open spaces.
2. Ladle boiling water (or the liquid from precooking the vegetables) into the jars, leaving the amount of headspace stated in your recipe.