Canning and Preserving For Dummies (28 page)
Read Canning and Preserving For Dummies Online
Authors: Amelia Jeanroy

3 pounds dried beans (or dried peas)
Canning salt
1
Rinse the beans in a colander and remove any stones or broken bean pieces. Place them in a 12-quart pot and cover them with cold water. Let the beans soak at least 12 hours (set them to soaking overnight).
2
Prepare your canning jars and two-piece caps (lids and screw bands) according to the manufacturer’s instructions. Keep the jars and lids hot. (For information on preparing your jars, see Chapter 4.)
3
Pour out the soaking water and add more cold water to cover the beans. Bring the covered beans to a boil and allow them to boil for 30 minutes, or until they’re tender. Do not drain.
4
Using a slotted spoon, loosely pack the hot beans into your canning jars, leaving 1-inch headspace. Pour the cooking liquid over the beans, maintaining the proper headspace. Add 1/2 teaspoon salt to each pint jar or 1 teaspoon salt to each quart jar. Release any air bubbles with a nonreactive utensil, adding more liquid as necessary to maintain the proper headspace (refer to Chapter 3). Wipe the jar rims; seal the jars with the two-piece caps, hand-tightening the bands.
5
Process the filled jars in a pressure canner at 10 pounds pressure for 40 minutes (pints) or 50 minutes (quarts). Allow the pressure to return to 0, wait an additional 10 minutes, and then carefully open the canner lid. (Head to Chapter 9 for detailed processing instructions for pressure canning.)
6
Remove the jars from the canner with a jar lifter. Place them on a clean kitchen towel away from drafts. After the jars cool completely, test the seals (refer to Chapter 4). If you find jars that haven’t sealed, refrigerate them and use them within two weeks. Prior to eating or tasting, boil the food for 15 minutes.
Per 1/2-cup serving:
Calories 71 (From fat 2); Fat 0g (Saturated 0g); Cholesterol 0mg; Sodium 292mg; Carbohydrates 13g (Dietary fiber 4g); Protein 5g.

Beets
Select beets with a deep red color. A beet with a diameter of 1 to 2 inches is the most desirable size for pressure canning. Larger-size beets are best pickled (head to Chapter 8 for information on pickling and a Spiced Pickled Beets recipe).
Canned Beets
To preserve the bright, red color of the beet, add 1 tablespoon of vinegar (with an acidity of 5 percent) to each quart of liquid before sealing the jars.
Preparation time:
15 minutes
Processing time:
Pints, 30 minutes; quarts, 35 minutes
Pressure level:
10 pounds
Yield
: 14 pints or 7 quarts
21 pounds beets without tops
Canning salt
1
Prepare your canning jars and two-piece caps (lids and screw bands) according to the manufacturer’s instructions. Keep the jars and lids hot. (For information on preparing your jars, see Chapter 4.)
2
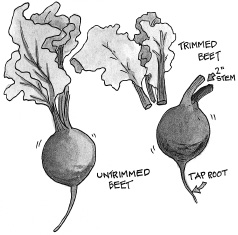
Scrub your beets clean of dirt and remove the tap roots (see Figure 10-2). Place the cleaned beets in a 12-quart pot and cover them with water. Boil the beets for 15 to 20 minutes. When beets are cool enough to handle, the skins will peel off easily. Remove them from the water and peel. Trim the remaining root and stem. Leave small beets whole, and cut larger beets in half for a better fit in the jar. Reserve the cooking liquid.
3
Pack the beets into your prepared jars. Pour the cooking liquid over the beets, leaving 1-inch headspace. Add 1/2 teaspoon salt to each pint jar or 1 teaspoon salt to each quart jar. Release any air bubbles with a nonreactive utensil, adding more liquid as necessary to maintain the proper headspace (see Chapter 3). Wipe the jar rims; seal the jars with the two-piece caps, hand-tightening the bands.
4
Process the filled jars in a pressure canner at 10 pounds pressure for 30 minutes (pints) or 35 minutes (quarts). Allow the pressure to return to 0, wait an additional 10 minutes, and then carefully open the canner lid. (Head to Chapter 9 for detailed processing instructions for pressure canning.)
5
Remove the jars from the canner with a jar lifter. Place them on a clean kitchen towel away from drafts. After the jars cool completely, test the seals (refer to Chapter 4). If you find jars that haven’t sealed, refrigerate them and use them within two weeks. Prior to eating or tasting, boil the food for 15 minutes.
Per 1/2-cup serving:
Calories 72 (From fat 3); Fat 0g (Saturated 0g); Cholesterol 0mg; Sodium 416mg; Carbohydrates 0g (Dietary fiber 0g); Protein 0g.
Figure 10-2:
A trimmed beet ready for precooking.
Bell peppers (green, red, orange, yellow)
Sweet, firm bell peppers produce the best results. With so many beautiful colored peppers available, a jar of canned bell peppers could turn into a lovely gift.
 Because of the extremely low acid level in this vegetable, you must adjust the acidity level of the bell peppers by adding bottled lemon juice. Use only pint or half-pint jars for this extremely low-acid vegetable.
To peel peppers easily, heat them in a 400-degree oven for 6 to 8 minutes, or until the skin blisters. Then cover them with a damp cloth and let them cool. Voilá! You can now easily remove skins with a knife or simply by rubbing them with your hands as you run cool water over the pepper.
Canned Bell Peppers
Canned peppers come out tender and full of flavor. Heat them up with sautéed onions and hot sausage.
Preparation time:
15 minutes
Processing time:
Half-pints, 35 minutes; pints, 40 minutes
Pressure level:
10 pounds
Yield
: 10 half-pints or 5 pints
5 pounds sweet peppers
Boiling water
Canning salt
Lemon juice
1
Prepare your canning jars and two-piece caps (lids and screw bands) according to the manufacturer’s instructions. Keep the jars and lids hot. (For information on preparing your jars, see Chapter 4.)
2
Wash the peppers and cut them into quarters and remove the stem and seeds. Meanwhile bring 2 quarts of water to a boil.
3
Pack flattened peppers firmly into jars. Pour the boiling water over the peppers, leaving 1-inch headspace. Add 1/2 tablespoon lemon juice and 1/4 teaspoon salt to each half-pint jar or 1 tablespoon lemon juice and 1/2 teaspoon salt to each pint jar. Release any air bubbles with a nonreactive utensil, adding more water as necessary to maintain the proper headspace (see Chapter 3). Wipe the jar rims; seal the jars with the two-piece caps, hand-tightening the bands.
4
Process the filled jars in a pressure canner at 10 pounds pressure for 35 minutes (half-pints) or 40 minutes (pints). Allow the pressure to return to 0, wait an additional 10 minutes, and then carefully open the canner lid. (Head to Chapter 9 for detailed processing instructions for pressure canning.)
5
Remove the jars from the canner with a jar lifter. Place them on a clean kitchen towel away from drafts. After the jars cool completely, test the seals (refer to Chapter 4). If you find jars that haven’t sealed, refrigerate them and use them within two weeks. Prior to eating or tasting, boil the food for 15 minutes.
Per 1/2-cup serving:
Calories 32 (From fat 2); Fat 0g (Saturated 0g); Cholesterol 0mg; Sodium 584mg; Carbohydrates 8g (Dietary fiber 2g); Protein 1g.
Carrots
For canning, choose carrots with a diameter of 1 to 1 1/2 inches. Canned carrots make a favorite side dish even faster. Once reheated, add brown sugar and butter for a sweet treat.
Canned Carrots
Carrots are an inexpensive vegetable at farmer’s markets during their season, and canning is an excellent way to preserve them. They keep all of their sweet flavor and the texture remains very nice.
Preparation time:
15 minutes
Processing time:
Pints, 25 minutes; quarts, 35 minutes
Pressure level:
10 pounds
Yield
: 6 pints or 3 quarts
12 pounds of carrots, peeled and without tops
Canning salt
1
Prepare your canning jars and two-piece caps (lids and screw bands) according to the manufacturer’s instructions. Keep the jars and lids hot. (For information on preparing your jars, see Chapter 4.)
2
Rinse and scrub the carrots with a brush to remove any dirt. Alternatively, remove the skin with a vegetable peeler. Remove the carrot tops. Cut the carrots into 1/4 -inch slices or dice the carrots, being sure that all the diced pieces are approximately the same size.
3
Place the sliced or diced carrots in a 12-quart pot and cover them with water. Bring them to a boil. Reduce heat to medium and allow the carrots to simmer for 5 minutes, or until they’re still slightly firm in the center but tender on the outside. Do not drain.
4
Pack the hot carrots into your prepared jars. Pour the cooking liquid over them, leaving 1-inch headspace. Add 1/2 teaspoon salt to each pint jar or 1 teaspoon salt to each quart jar. Release any air bubbles with a nonreactive utensil, adding more liquid as necessary to maintain the proper headspace (see Chapter 3). Wipe the jar rims; seal the jars with the two-piece caps, hand-tightening the bands.