Canning and Preserving For Dummies (29 page)
Read Canning and Preserving For Dummies Online
Authors: Amelia Jeanroy

5
Process the filled jars in a pressure canner at 10 pounds pressure for 25 minutes (pints) or 35 minutes (quarts). Allow the pressure to return to 0, wait an additional 10 minutes, and then carefully open the canner lid. (Head to Chapter 9 for detailed processing instructions for pressure canning.)
6
Remove the jars from the canner with a jar lifter. Place them on a clean kitchen towel away from drafts. After the jars cool completely, test the seals (refer to Chapter 4). If you find jars that haven’t sealed, refrigerate them and use them within two weeks. Prior to eating or tasting, boil the food for 10 minutes.
Per 1/2-cup serving:
Calories 94 (From fat 3); Fat 0g (Saturated 0g); Cholesterol 0mg; Sodium 424mg; Carbohydrates 22g (Dietary fiber 7g); Protein 2g.

Corn
Starting with corn that has the husks on and the silk attached allows you to assess the freshness of the corn. Choose ears with brightly colored husks that are free of spots and moisture; silks should be golden, not matted or brown.
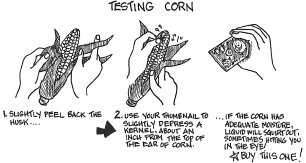
 Here’s a surefire way to select corn that is sure to be juicy and tender (see Figure 10-3): Slightly peel back the husk to check for any pests. If all is clear (no bugs or mold), use your thumbnail to depress a kernel about an inch below the top of the corn. If the ear has adequate moisture, liquid will squirt out. Buy this ear! If no spitting occurs, select another ear and repeat the test.
Figure 10-3:
Testing corn.
Canned Corn
Canned corn is a staple in most people’s homes. Many don’t realize how easy it is to store this tasty vegetable.
Preparation time:
15 minutes
Processing time:
Pints, 55 minutes; quarts, 1 hour 25 minutes
Pressure level:
10 pounds
Yield
: 12 pints or 6 quarts
24 pounds fresh corn on the cob
Boiling water
Canning salt
1
Prepare your canning jars and two-piece caps (lids and screw bands) according to the manufacturer’s instructions. Keep the jars and lids hot. (For information on preparing your jars, see Chapter 4.)
2
Remove the husk and silk from the corn. Using a sharp knife, slice the corn from the cob, measuring the corn as you go so that you know how many total pints or quarts of corn kernels you have. Meanwhile, bring 1 gallon of water to a boil in an 8-quart pot (you’ll use this as a reserve).
3
Place the corn in a 12-quart pot. For each pint of corn, add 1 cup of boiling water; for each quart of corn, add 2 cups of boiling water. Place the pot over medium-high heat and bring to a simmer. Then reduce heat to medium and allow the corn to simmer for 5 minutes.
4
Ladle the corn into your prepared jars and pour additional boiling water over it if necessary, leaving 1-inch headspace. Add 1 teaspoon salt to each quart jar or 1/2 teaspoon salt to each pint jar. Release any air bubbles with a nonreactive utensil, adding more water as necessary to maintainthe proper headspace (see Chapter 3). Wipe the jar rims; seal the jars with the two-piece caps, hand-tightening the bands.
5
Process the filled jars in a pressure canner at 10 pounds pressure for 55 minutes (pints) or 1 hour 25 minutes (quarts). Allow the pressure to return to 0, wait an additional 10 minutes, and then carefully open the canner lid. (Head to Chapter 9 for detailed processing instructions for pressure canning.)
6
Remove the jars from the canner with a jar lifter. Place them on a clean kitchen towel away from drafts. After the jars cool completely, test the seals (refer to Chapter 4). If you find jars that haven’t sealed, refrigerate them and use them within two weeks. Prior to eating or tasting, boil the food for 15 minutes.
Per 1/2-up serving:
Calories 136 (From fat 15); Fat 2g (Saturated 0g); Cholesterol 0mg; Sodium 312mg; Carbohydrates 32g (Dietary fiber 3g); Protein 4g.
Canned Creamed Corn
Creamed corn doesn’t actually contain cream. Its creaminess comes from the naturally sweet juice, or
milk,
of the kernel. To obtain the creaminess, simply cut off the kernels and run your knife against the cob a second time, even closer to release the milk. Creamed corn is a great base for soups and makes a classic comfort food. This recipe uses pints (quarts aren’t recommended).
Preparation time
: 20 minutes
Processing time:
Pints, 1 hour 35 minutes
Pressure level:
10 pounds
Yield:
9 pints
20 pounds corn
Boiling water
Canning salt
1
Prepare your canning jars and two-piece caps (lids and screw bands) according to the manufacturer’s instructions. Keep the jars and lids hot. (For information on preparing your jars, see Chapter 4.)
2
In a 12-quart pot, bring 2 gallons of water to a boil. Remove the husk and silk from the corn. Blanch the corn on the cob for 4 minutes in the boiling water. Allow the corn to cool enough to handle. Slice the corn kernels from cob with a sharp knife. Then run the knife blade along the ear again to remove the extra juice or milk. Measure the corn as you go so that you know how many pints of corn and corn milk you have.
3
Place the corn and corn milk in a 12-quart pot. For each pint of corn and corn milk, add 2 cups of water. Heat the corn to boiling.
4
Using a canning funnel, pour the corn and corn milk mixture into your prepared jars, leaving 1-inch headspace. Add 1/2 teaspoon salt to each jar. If necessary to attain the required headspace, add boiling water to the jars. Release any air bubbles with a nonreactive utensil, adding more water as necessary to maintain the proper headspace (see Chapter 3). Wipe the jar rims; seal the jars with the two-piece caps, hand-tightening the bands.
5
Process the filled pint jars in a pressure canner at 10 pounds pressure for 1 hour 35 minutes. Allow the pressure to return to 0, wait an additional 10 minutes, and then carefully open the canner lid. (Head to Chapter 9 for detailed processing instructions for pressure canning.)
6
Remove the jars from the canner with a jar lifter. Place them on a clean kitchen towel or paper towels away from drafts. After the jars cool completely, test the seals (refer to Chapter 4). If you find jars that haven’t sealed, refrigerate them and use them within 2 weeks. Prior to eating or tasting, boil the food for 10 minutes.
Per 1/2-cup serving:
Calories 151 (From fat 16); Fat 2g (Saturated 0g); Cholesterol 0mg; Sodium 605mg; Carbohydrates 35g (Dietary fiber 4g); Protein 5g.
Greens
Greens
is a catchall term that refers to the green, leafy portions of a variety of plants that, when cooked (traditionally simmered in water with some type of pork fat), creates a delicious addition to many meals. You can use any combination: beets, collard, kale, mustard, spinach, Swiss chard, and turnip.
Select tender stems and leaves to produce a superior product after cooking and pressure canning. Large, older stems and leaves tend to produce a strong-tasting or stringy product.
Corn, glorious corn!
Corn is a wonderful vegetable to get to know. It has a traceable history of nearly 7,000 years! From the Aztecs to Native Americans to the modern world of today, corn has a multi-faceted place in our society.
In addition to eating corn one the cob or off, here are a variety of other traditional dishes made from corn:
Spoon bread: A pudding-like bread made of corn mush mixed with eggs, butter, and milk that you eat with a spoon or fork.
Hoecakes: Thin cornmeal batter fried in a griddle
Corn pone: An eggless corn bread batter cooked in a skillet
Hushpuppies: Deep-fried cornmeal bread.
Hominy: Corn without the germ that is traditionally boiled and served with butter or syrup
Grits: A maize-based porridge
Succotash: A dish consisting primarily of corn mixed with a variety of other beans
Corn isn’t just for human consumption, however. Corn and all its parts are used for everything from animal feed to making nylon, plastics, and lubricating oils. In fact, about 60 percent of the corn grown in the United States is grown for animal feed. Although edible, animal feed corn is nothing like the super sweet corn we all know and love.
Canned Greens
Canned greens are a fast way to add nutrients to any meal. Add these to soups and stews during the last 15 minutes of cooking time.
Preparation time
: 15 minutes
Processing time:
Pints, 1 hour 10 minutes; quarts, 1 hour 30 minutes
Pressure level:
10 pounds
Yield:
14 pints or 7 quarts
28 pounds fresh, young greens
1
Prepare your canning jars and two-piece caps (lids and screw bands) according to the manufacturer’s instructions. Keep the jars and lids hot. (For information on preparing your jars, see Chapter 4.)
2
Thoroughly wash the greens, changing the water in the sink once or twice to be sure all the grit is removed. Place the greens in a 12-quart pot and add enough water to cover. Heat the greens on medium-high until they’re wilted, about 5 to 7 minutes. Using a slotted spoon, remove the greens from the water and cut them into small pieces (about 1 inch). Reserve the cooking liquid.