Authors: Betsy Matheson
Tags: #Non-Fiction
DIY Projects for the Self-Sufficient Homeowner: 25 Ways to Build a Self-Reliant Lifestyle (33 page)

Backyard beekeeping makes more sense today than ever
before. Not only are honey bees necessary for pollinating plants and ensuring a better fruit set and bigger crops, they produce delicious honey and valuable beeswax. And recently, the world bee population has experienced a mysterious and concerning dropoff in numbers. Getting homeowners to cultivate a bee colony is a helpful component of the preservation strategy.

Honey and beeswax
are the two commodities a functioning backyard beehive will yield. If your primary interest is honey, build a traditional stacking-box style beehive in which the bees expend most of their energy filling the premade combs with sweet honey. If it’s beeswax you seek, make a top-bar hive like the one shown on the following pages.
5 Ways to Keep Your Bees safe & Healthy
1. Avoid using insecticides in your garden
—Many are long-lasting and toxic to bees.2. Buy seeds that are not treated with insecticides
—Some coated seeds may cause the entire plant to become toxic to bees. Check seed packets carefully.3. Mix your own potting soil and compost
—Some composts and potting mixes sold at garden centers contain insecticide that is highly toxic to bees and other insects, and will eventually pollute all of your soil. Make your own compost, and mix with natural additives for potting plants.4. Plant bee-friendly flowers
—Buy wildflower seed mix and plant in uncultivated areas to create small sections of wild, natural habitat for your bees.5. Provide a home for bees
—Whether you’re a blossoming beekeeper or not, it’s easy to provide a home for bees! Provide a simple box as a place for feral bees to nest, or start your own hive.
In many ways, tending bees is like growing food. There is an initial flurry of activity in spring, followed by ongoing maintenance in the summer and then harvest in the fall. There is prep work you’ll need to complete before you begin and there is a learning curve—you’ll need to spend more time with your bees in the beginning until you learn how it’s done. Beekeeping is not necessarily an expensive hobby, but with higher-end operations, purchasing the hive, some blue ribbon bees, and all the necessary equipment can require a significant financial investment.
Keeping bees will help you have a better garden, more fruits and vegetables, and honey in the kitchen—even beeswax candles, skin creams, and other natural cosmetics. And, by building a top-bar beehive, you’re creating a safe home and enabling one of our earth’s most necessary and miraculous species to thrive.
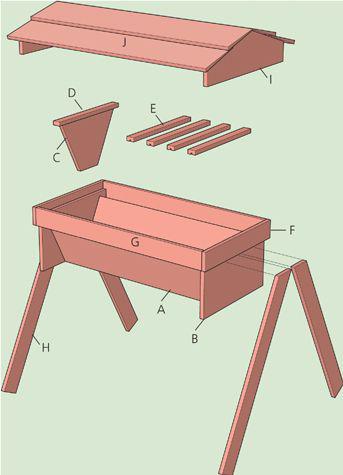
 Top-Bar Hive
Expert beekeeper Phil Chandler insists that beekeeping should be a very simple pursuit, largely because the bees do almost all of the work for you. Chandler, who maintains a Website called The Barefoot Beekeeper (See Resources,
page 158
), is an advocate for natural beekeeping and has designed a top-bar hive that you can build yourself using simple materials. This hive (see
pages 127
to
129
) is designed to enable the bees to build their own comb, instead of relying on a premade comb.
The top-bar hive is simple in its construction and, unlike the traditional stacked box Langstroth hive, does not require that you lift heavy boxes to check on your hive’s progress, which disturbs the bees within. Rather, you can simply remove the hive roof and inspect the bars one by one without disturbing the rest of the hive. Storage is minimal for a top-bar hive, as there are no supers needed. And, it is not necessary with this hive design to isolate the queen.

This simple top-bar beehive
design is a warm and safe home for bees that is easily adjustable to accommodate a growing hive. This design also greatly simplifies the inspection process and minimizes the amount of equipment needed to keep and maintain bees.
Building a Top-bar Beehive
CUTTING LIST

TOOLS & MATERIALS
Lumber (1 × 2, 1 × 3, 2 × 4, 1 × 12)
Carpenter’s square
Pencil
Circular saw or table saw
Socket wrench
Exterior-grade construction adhesive
Caulk gun
Clamps
Drill
Tape measure
Hammer
Handsaw
1-1/4", 2", 2-1/2" deck screws
Stainless-steel mesh
Rooting nails or narrow crown staples
Eye protection
1" holesaw
3/8 × 2" galv. lag bolts with washers and nuts
Molten beeswax
How to Build a Top Bar Beehive

1 Lay out cutting lines
for the insert panels on a piece of 1 × 12 cedar stock. The trapezoid-shaped panels (sometimes called followers) are meant to slide back and forth within the hive cavity, much like a file folder divider. This allows the beekeeper to subdivide the hive space as the honeycombs accumulate. The shape should be 15" wide along the top and 5" wide along the bottom (See diagram,
page 127
).

2 Cut the insert panels
to size and shape and then attach a top cap to the top edge of each panel. The 1 × 2 caps, installed with the flat surface down, should overhang the panels by 1" at each end. Use exterior-rated wood glue and 2" deck screws driven through pilot holes to attach the tops. Also cut 20 top bars from the same 1 × 25. Use a router or table saw to cut a 1/4 × 1/4" groove in the bottom of each top bar (inset). The bees use these grooves to create purchase for their hanging honeycombs.