Sew What! Bags: 18 Pattern-Free Projects You Can Customize to Fit Your Needs (28 page)
Read Sew What! Bags: 18 Pattern-Free Projects You Can Customize to Fit Your Needs Online
Authors: Lexie Barnes

If you plan to carry your bag on your shoulder, measure from the top of your shoulder to your hip. Double that number to determine the length of your strap. If you plan to carry your bag with the strap across your chest, add another 6" to 8". It’s always best to add yet another couple of inches for tweaking and attaching the strap. It’s much easier to cut a strap shorter than to start over to make a longer one!
2.
CUT YOUR FABRIC
Measure and draw the bag pieces on the wrong side of the fabric and cut out the following:
primary fabric: two body pieces and two strap pieces
Put It Together3.
MARK THE POCKET PANEL
. Decide what you’ll want to carry in the pocket panel and measure out slots for compartments on the right side of the fabric.
4.
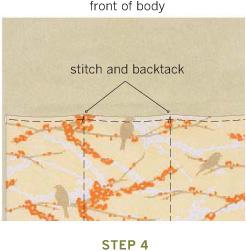
MAKE THE POCKETS
. Press under the top of the pocket ¼", then press under another ¼". Pin and edgestitch the bottom fold. With right sides facing up, pin the pocket to the front panel, lining up the raw edges. Stitch the compartments as desired and backtack at the top edges.
5.
MAKE AND ATTACH THE FLAP (OPTIONAL)
. Pin the two flap pieces with right sides together and stitch the sides and bottom. Clip the corners and trim the seam allowances. Turn the flap right side out, press, and with right sides together, baste the flap to the back bag panel. (Make sure you are basting to the
back
of the purse, not the side with the pocket panel.)

6.
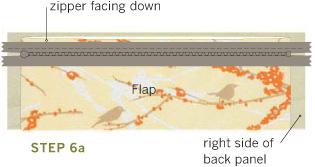
ATTACH THE ZIPPER (OPTIONAL)
. It helps to take the zipper installation one step at a time. (
See the next page.
)
a. Place the closed zipper facedown on the edge you just basted in step 5. Line up the edge of the zipper with the raw edge of the fabric, pin, and stitch. When you come to the zipper pull, stop stitching. Leave your needle in the fabric while you slide the zipper pull out of the way, and then continue stitching.
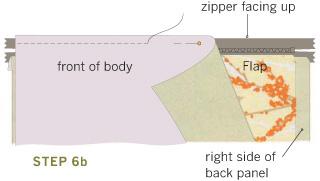
b. To attach the front panel, turn the zipper up, away from the body of the bag and press the bag away from the zipper. Lay the front of the bag facedown on top of the zipper and align the top edges (this should not be the edge with the pocket panel). Pin and then stitch the top edge, as you did with the other side of the zipper. After stitching, flip the top layer away from the zipper to get a feel for how the bag is coming together. You should be able to see the zipper teeth at the top and the attached flap. The sides and bottom of the bag are not yet stitched.
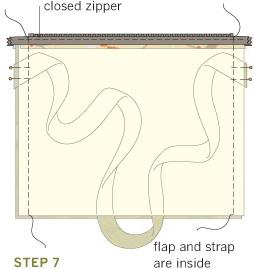
7.
MAKE AND ATTACH THE STRAP
. Stitch the short ends of two 27" strips together to make one long 53" strap. Make a strap as instructed on page 42, and cut the ends of the strap at an angle. Pin the ends to each side edge of the front panel’s right side, near the zipper. Lay the back of the bag on top with right sides together and the zipper closed. The strap and the flap should be tucked inside. Pin
in place. Stitch up the sides of the bag and straps, going through the zipper, and backtack.

Options Galore8.
STITCH AND TURN THE BAG
. Open the zipper. Stitch the bottom of the bag and up both sides an inch or so for reinforcement, backtacking at the ends. Clip the corners and trim the seam allowance. You might also want to add a zigzag stitch to the seam edges to prevent fraying. Turn the bag right side out through the zipper opening, and press.
UNZIPPED
. If you want to make the personal purse without a zipper, just leave out step 6 above. Instead, turn under the top edge of the bag ¼" and press, then turn under another ¼", press and stitch. Or, you daredevils might want to add a lining (
see
DJ Bag
for lining instructions
).
UNFLAPPABLE
. If you’d like to keep the zipper but lose the flap, simply skip step 5. You’ll have a zip-top purse with even easier access to the front pockets.
MAXIMUM SECURITY
. Secure your flap by adding a closure such as Velcro, some snaps, or a button and a buttonhole.
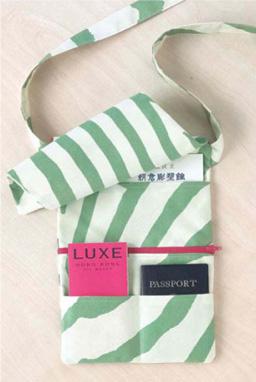
CUSTOMIZE
. Changing the shape and pocket layout can turn a simple purse into a perfect travel bag (
at right
). A zippered side pouch adds an extra safety slot. It’s all about the details — your details!