Stitch 'n Bitch: The Knitter's Handbook (58 page)
Read Stitch 'n Bitch: The Knitter's Handbook Online
Authors: Debbie Stoller

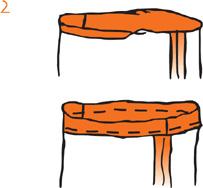
While bag is still inside out, turn the top edge over ¼" and press. Then fold over another 1" for the hem, press down, and stitch
⅝
" in from the fold
(figure 2)
.
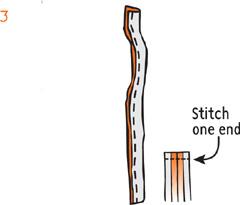
For the handles, fold the 2 smaller pieces of fabric lengthwise with RS tog. Sew a seam
⅝
" in from the edge. Stitch across one end, then turn RS out to form handle. Hem the other end
(figure 3)
.
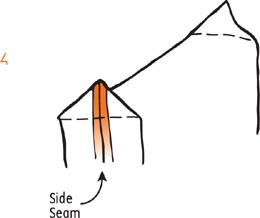
To square up the bottom of the bag, turn the bag inside out, fold the side seam against the bottom seam, and stitch a 4"-long line at the bottom of the triangle (2" at center of side seam)
(figure 4)
.
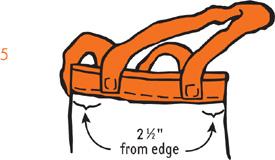
Attach the handles 2½" in from each side seam. Stitch a rectangle from the bottom of the trim to the top of the bag to attach the handles
(figure 5)
.
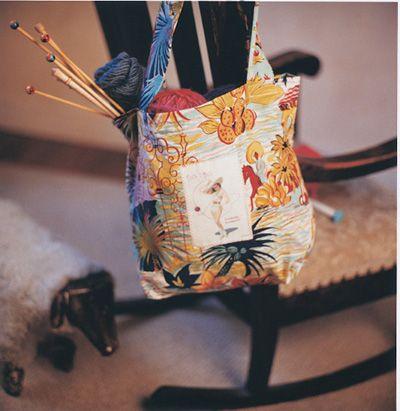
FOR VICKIE’S DIY PATCH
Using your computer, download an image that you’d like to use as your patch, or scan the
following
artwork. If the picture has text on it, it will need to be reversed before you print it. Flip the picture horizontally using your image-editing software.
The print edition of this book includes artwork for
Stitch ’n Bitch Patch
.
Please download a PDF of this artwork here:
workman.com/ebookdownloads

Next, print your image onto a sheet of iron-on transfer paper (you can find this at any office supply store). To do this, just open up a file in any word-processing program, and insert the image into it (in Microsoft Word, this means using “Insert Picture From File” on your tool bar). If you center the picture onto the document, you’ll be sure that none of the image will be cut off during the printing process, since the transfer paper is the same size as standard letter paper.
Cut the image out, leaving about ¼" all around.
Cut out a square of light-colored cotton or muslin larger than your picture. Following the directions on the transfer paper package, iron the image onto the fabric scrap. There are two reasons to do this instead of ironing the patch directly onto the bag: (1) If the bag’s fabric is not plain and light-colored, the transfer will not show up (I found this out the hard way); and (2) if something goes wrong during the ironing process, you’ve only ruined an inexpensive scrap of fabric and not your kick-ass knitting tote.
Once you’ve ironed on the transfer, cut the excess fabric off around the picture.
Finally, pin the finished patch onto the desired place on your bag. Sew it on either by machine (I recommend using the zigzag stitch for effect) or by hand, using the blanket stitch (see
page 89
). Voilà! You have made a knitting bag worthy of your crafty girl self.

ABOUT HILDA
(right)
I’m a bohemian child of the ’70s. I grew up in Hollywood, where I still live today, with my boyfriend and our three kids. When I was eleven years old, I learned to knit and sew, and I spent my teenage years sewing wrap dresses, lacing inset tees, and knitting scarves from vintage linens and unraveled afghans. My passion for perusing thrift shops, sewing, and knitting has carried over into adulthood. Practicing the three has allowed me to create fun, funky, and whimsical designs.
ABOUT VICKIE
(left)
I’m a twenty-nine-year-old mother of two and founder of an online business for hip mamas called Mamarama. I’ve been sewing and crocheting for years, but I didn’t start knitting until early 2001, when a friend insisted that I take a class with her at a popular Los Angeles boutique. Enamored of the fabulous yarn textures and soothed by the act of knitting, I was immediately hooked. In order to meet up with other hip, funky, feminist knitters, I started an L.A.-based Stitch ’n Bitch group. Hilda and I met there and collaborated on this bag.
I moved to Austin at the end of 2002, but the L.A. Stitch ’n Bitch continues to flourish. And the Austin Stitch ’n Bitch is off to a great start.
ECHO DEVORE
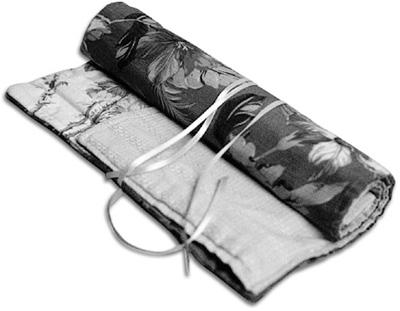
I’m into accessories, so when I began accumulating knitting needles, I wanted something to carry them in. Anything ugly, like a plastic tube or a cheap box, was out of the question. I thought about canvas paintbrush cases, but the price was too high and they weren’t great-looking. Finally, I decided to visit my favorite fabric store and pick out the prettiest, funkiest, and coolest upholstery fabric I could find. My case was easy to make, and I have gotten tons of compliments on it. Now I just need more needles!
M
ATERIALS
¾ yd each of 4 different fabrics (It’s a good idea to pick thick fabrics like upholstery if possible. If you can’t get upholstery or don’t like any, double up the fabric you do choose.) For the case shown here, I used a variety of prints from Reprodepot Fabrics.
Sewing needle or sewing machine
Sewing thread to match fabric
Iron
Pins
Fabric pencil or tailor’s chalk
60" piece of ribbon for tying bag closed
D
IRECTIONS
Cut your fabric as follows:
A:
For the outside of the bag, cut one piece of fabric 26" wide and 17" long.
B:
For the inside surface of the bag, cut one piece of fabric 26" wide and 17" long.
C:
For the inside needle holder, cut one piece of fabric 26" wide and 24" long.
D:
For the flap, cut one piece of fabric 26" wide and 24" long.
Take piece C and fold it in half, WS tog, so that the folded side is 26" long and the edges are 12" long. Press.
Lay piece B down, RS up, and lay piece C on top of it, with the open edge at the bottom. Line up the bottom edges of B and C. The folded edge of piece C should be about 5" from the top of piece B.
Iron them both like that, with one on top of the other, and decide where you want your needle pockets to be. Use a tape measure or a yardstick to measure lines on the top piece of fabric (C), and draw them on with tailor’s chalk. These will be the lines you will follow when you stitch the pockets. Make as many pockets as
you want, keeping in mind the sizes of your needles. I made some lines close together so my size 0 and 1 needles could fit comfortably without sliding around. I also made some bigger pockets for my 13s and 19s. Pin or baste pieces B and C together to keep them from slipping apart.