Stitch 'n Bitch: The Knitter's Handbook (54 page)
Read Stitch 'n Bitch: The Knitter's Handbook Online
Authors: Debbie Stoller

ABOUT BECKY

Most of my life, I’ve been focused on building my career as a corporate lawyer. I never dreamed that someday I’d be passionate about knitting. I remember chuckling at a partner in my firm when he admitted that he knitted to relieve stress. But in the summer of 2000, I was expecting my first child and confined to complete bed rest. Bored, I told my husband that I wished I knew how to knit so I could make baby clothes. The next day he brought home knitting needles, wool, a beginner’s manual, and a layette pattern book. My husband sat down and showed me how to cast on (he remembered seeing his grandmother do it years before). With his help and my beginner’s manual, I knit a baby scarf in garter stitch. That’s all it took. During the rest of the summer and in the months following my son’s birth, I put together several baby sweaters and ensembles. Then I put up a knitting site at
www.skinnyrabbit.com
, where I blab incessantly about all things knitting. Thanks to my site, I’ve come into contact with knitters of all ages from all over the world.
KAREN BAUMER
I conceived this design as a way to use a bag of
Goa
yarn that was given to me by a friend who owned a yarn shop. I really like tank tops with wide, squared-off necklines—they’re a good way to show off muscles and broad shoulders, if you like that sort of thing.

SKILLS | PAGE |
CAST ON | |
KNIT | |
PURL | |
DECREASE | |
3-NEEDLE BIND-OFF | |
SEW SEAM |
S
IZES
Small (Medium, Large, Extra-Large)
Finished bust: 33 (36, 39, 42)"
Finished length: 19 (20, 21, 22)"
M
ATERIALS
GGH
Goa
(50% cotton/50% acrylic, 50g/66 yds), 8 (8, 9, 10) skeins #24
US 9 (5.5mm) needles, or size needed to obtain gauge
Stitch holders
G
AUGE
17 sts and 21 rows = 4" in p2, k1, rib
S
TITCH
P
ATTERN
P2, K1 RIB
Row 1 (RS): *P2, k1; rep from * across, end p2.
Row 2: *K2, p1; rep from * across, end k2.
Rep rows 1–2 for patt.
REVERSE STOCKINETTE
Row 1 (RS): P.
Row 2 (WS): K.
Rep rows 1–2 for patt.
D
IRECTIONS
Note:
Normally it is preferable to start a new ball of yarn at the edge, especially with a chunky yarn such as Goa. This is what you should do on this garment when you are still below the armhole decreases. However, since the armhole openings are self-edged, once you are working at or above the armhole decreases, it is preferable to add new balls near, but not directly at, the edge of the fabric. This can be done less noticeably if it is done in the 2 stitches forming the “ditch” between ribs (the p2 sections on the right side or the k2 sections on the wrong side). I recommend working with the old and new strands held together for those two stitches, leaving a tail hanging from both the old and the new ball of yarn to be woven in later.

BACK
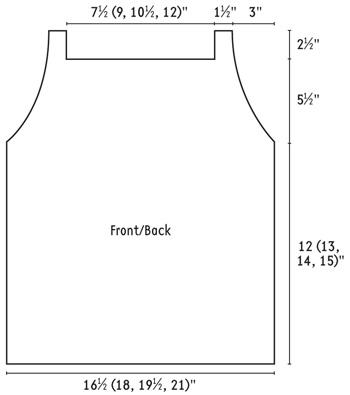
CO 71 (77, 83, 89) sts and work even in p2, k1 rib for 12 (13, 14, 15)", ending with a WS row. BO 6 sts at beg of the next 2 rows—59 (65, 71, 77) sts. From this point on, maintain the edge st on each side in rev St st.
SHAPE ARMHOLES
Maintaining rib patt as well as possible at dec points, dec 1 st each side every RS row 7 times as foll: P1, k2tog, rib to last 3 sts, k2tog tbl, p1—45 (51, 57, 63) sts. Piece should now beg p1, k1, p2 and end p2, k1, p1 on RS.
Cont to work even in rib until piece meas 17¾ (18¾, 19¾, 20¾)" from bottom edge, end with a WS row.
SHAPE NECK
Rib 6 sts, BO center 33 (39, 45, 51) sts, rib to end of row. There should now be 6 live sts on each side of the BO section. Work each side separately from this point
as foll: Cont in rib over 6 sts (on RS, p1, k1, p2, k1, p1) until strap meas approx 1¼" (on RS). Place sts on a holder and cut yarn, leaving an 18" tail (you can use it later to BO the straps tog). Attach yarn at neck edge of the rem 6 sts and work to match the other side.
FRONT
Work as for back until piece meas 16½ (17½, 18½, 19½)" from bottom edge, end with a WS row. Shape neck as for back and make straps 2½" long, or length needed to match back piece.
FINISHING
Join shoulder seams with 3-needle bind-off. Sew side seams and weave in all ends.

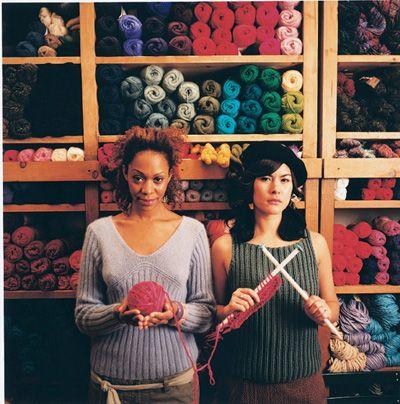
Pinup Queen
(left)
& Tank Girl
(right)
ABOUT KAREN
See Karen’s bio on
page 181
.
JENNA WILSON
One of the staples in my wardrobe is the little black top—a plain, black, sleeveless, fitted top that can be worn just about anywhere, with just about anything. This particular little black top has a funnel neck and some subtle texture in a narrow front panel of garter stitch. The simplicity of the pattern keeps finishing steps to a minimum, because the hems and armholes are worked in garter stitch as well. There’s a keyhole opening at the back neck, fastened with a button. The design includes an optional knitted tie belt finished with beads. If you find knitting the belt onerous (it is more than six feet long), you can skip it altogether, or cheat and make a tie belt using store-bought cording.

SKILLS | PAGE |
CAST ON | |
KNIT | |
PURL | |
INCREASE | |
DECREASE | |
SHORT-ROW SHAPING ( | |
I-CORD | |
CROCHET CHAIN | |
BIND OFF | |
SEW SEAM |
S
IZES
Small (Medium, Large, Extra-Large)
Finished bust: 33 (36, 39, 42)"
Finished length: 19½ (20, 20½, 21½)"
Note:
The instructions include the option to add short-row shaping to the front to accommodate a larger bust.
M
ATERIALS
FOR TOP:
Classic Elite
Provence
(100% cotton; 125g/256 yds), 3 (3, 3, 3) skeins #2652
US 5 (3.75mm) knitting needles, or size needed to obtain gauge
One
⅜
" button
FOR BELT:
G/6 crochet hook
Beads with hole large enough to thread yarn through (I used cube-shaped alphabet beads from
artbeads.com
to spell out “Glam Gal”)
US 5 (3.75mm) double-pointed needles (2 needed for I-cord version)
G
AUGE
22 sts and 30 rows = 4" in St st
S
TITCH
P
ATTERN
WRAP & TURN (W&T)
On RS: K to the point indicated, then slip the next st from the left-hand needle onto the right-hand needle purlwise. Bring yarn to front and turn the work so that the WS faces you. Slip the first st from what is now the left-hand needle to the right-hand needle, then bring the working yarn between the two needles so that it extends to the front of the work. (The one st you’ve been slipping back and forth is now wrapped with a loop of yarn around its base, and the yarn is now on the side facing you.) On WS: P to the point indicated in the instructions, then slip the next st from the left-hand needle to the right-hand needle purlwise. Bring yarn to back, and turn so that the RS faces you. Slip the first st from what is now the left-hand needle to the right-hand needle, then bring yarn to back.