Stitch 'n Bitch: The Knitter's Handbook (56 page)
Read Stitch 'n Bitch: The Knitter's Handbook Online
Authors: Debbie Stoller

D
IRECTIONS
Note:
The finished bikini pieces are quite small, but they are intended to be worn stretched, to fit. If you’re bigger than a D cup, you could try adding a few stitches to make it bigger, though a knit string bikini might not be the thing for you anyway.
CUPS
With MC, CO on 31 (35, 37, 41) sts. This will make the base of a triangle about 6 (6½, 7¼, 8)" across the bottom when it’s done. Work 22 (24, 26, 28) rows in St st.
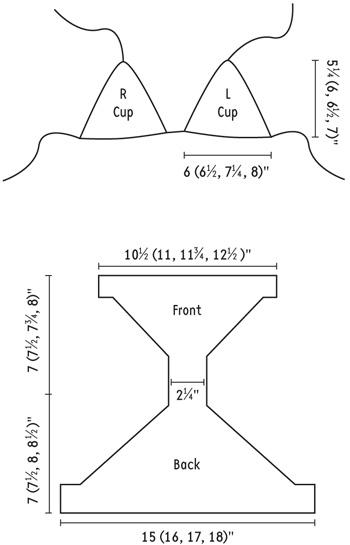
Beg: RS dec row: K13 (15, 16, 18), k2tog tbl, k1, k2tog, k 13 (15, 16, 18).
WS dec row: P 12 (14, 15, 17), p2tog, p1, p2tog tbl, p 12 (14, 15, 17).
Cont as established, dec 2 sts every row and working 1 less st before and after each dec until you have 3 sts left. K3tog or p3tog (depending on which side you’re working on)—1 st.
At the same time,
beg small heart chart on row 13 (15, 17, 19) as foll: k 11 (13, 14, 16) sts, work 9 chart sts, k 11 (13, 14, 16) sts; OR the small thunderbolt chart on row 11 (13, 15, 17) as foll: k 12 (14, 15, 17) sts, work 7 chart sts, k 12 (14, 15, 17) sts, end with row 22 (24, 26, 28).
NECK STRAP
Place the 1 st from the top of the triangle onto your crochet hook. Ch for about 14" to 18", or as long as needed to reach up around your neck and tie. It will be kind of curly at the ends, so it’s okay if it’s a bit too long. Cut and pull the end through the last st. Parade around in front of the mirror half-naked and imagine how great it will look when it’s done.
FINISHING
Once you have 2 cups, you need to make the strap that holds them together and ties around the back.
With crochet hook, ch about 48", or whatever length you need to go around your rib cage and tie at the back. Cut and pull end through.
Find the middle of the strap. You’re going to want to attach the inside bottom corners of the cups (where your cleavage is) pretty close to the middle of the strap. For skinny ladies with close-together boobs, you won’t
want to leave any space between the triangles. For bigger ladies, you might want to leave ½" or so in the middle.
Beg at the middle of the strap (or close to it) with RS facing, attach yarn and sc the strap to the bottom of one of the cups, attaching one k st to each ch as foll:
Start with 1 st on the hook. *Insert hook through 1 st of the ch and 1 st of the cup. Make a loop and pull it through both ch and cup (you will have a new st and the original st on the hook). Loop again and pull it through both sts. Rep from * to end of cup. Weave in the ends.
Make sure everything is facing the right way before you attach the 2nd cup. Count back 31 (35, 37, 41) ch sts from the middle (plus whatever you’re leaving as cleavage space), and sc the cup to the strap from the outside bottom corner (near your armpit) to the inside.
BOTTOMS
Note:
There’s a “choose your own adventure” quality to these instructions, because every booty is unique and deserves special attention.
FRONT
With MC, CO 63 (67, 71, 75) sts. Work 17 (18, 19, 20) rows in St st.
BO 5 (6, 7, 8) sts at the beg of next 2 rows—53 (55, 57, 59) sts. Cont in St st, dec 1 st at each end of every row 19 (20, 21, 22) times (k2tog or p2tog)—15 sts.
At the same time,
beg large heart chart on row 11 as foll: K 23 (25, 27, 29), work 17 charts sts, k 23 (25, 27, 29) sts; OR the large thunderbolt chart on row 9 as foll: k 24 (26, 28, 30) sts, work 14 chart sts, k 25 (27, 29, 31) sts, working motifs in CC. Remember that you’re working upside down. The charts cont into the dec part, so stay alert.
CROTCH PANEL
Work 28 (30, 32, 34) rows in St st, keeping first and last 2 sts in garter st.
BACK
Note:
If you have a very round, plump derriere, you can do a few more inc row A and a few less row B. If you have a very flat bum, you can do the opposite. But don’t go overboard. Your bum is probably more normal than you think.
Inc row A: Inc 1 st at beg and end of every row. Rep 24 (26, 28, 30) times.
Inc row B: Inc 1 st at beg only of every row. Rep 24 (26, 28, 30) times.
FITTING
Note:
This is a crucial stage to make sure it’s going to fit around your thighs. You will almost certainly regret it if you don’t take the trouble. As you’re getting close to the end of the inc rows, figure out which sides are going to turn into the leg holes, and measure one of them around the top of your leg, where the elastic of your underwear goes. (It would work best to strip down to undies before doing this.) Is it going to make it all the way around? Is it going to be too baggy? Adjust the number of inc rows to fit. Making it fit your thighs should also take care of making it fit your butt.
Once you’ve fixed it to fit around your thighs, cont in St st for 17 (18, 19, 20) more rows and BO
very
loosely.
FINISHING
Sew up the side seams. The elastic isn’t in yet, but try it on to make sure you can
get
it on. Don’t worry if it’s baggy at the hips. But if you can’t pull it up, or if won’t pull up high enough to cover your crack, you’ve got a problem and will have to backtrack to the fitting stage to make it bigger.
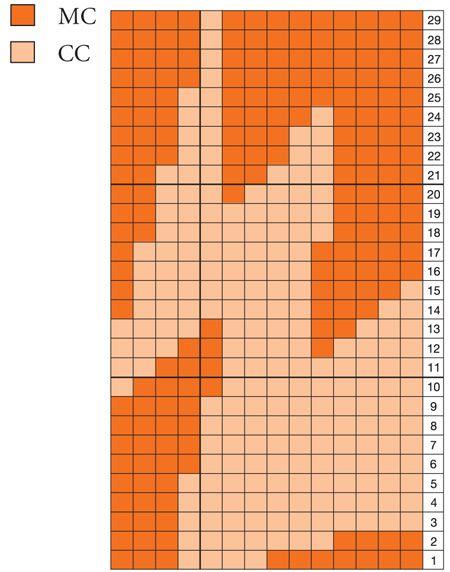
Bottom thunderbolt
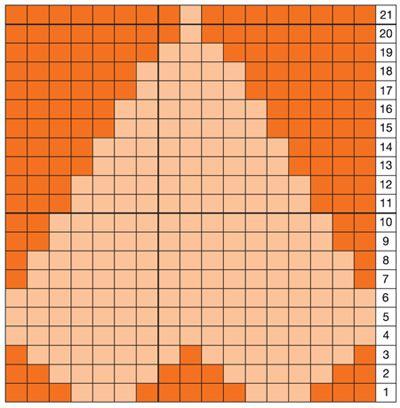
Bottom heart
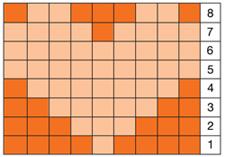
Cup heart
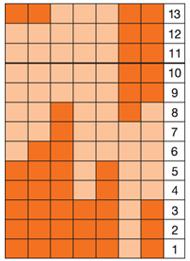
Cup thunderbolt
This chart is for the right cup. Reverse the chart for the left cup.
Put the elastic in: Attach yarn at the waist seam. With a safety pin, attach the end of the elastic to the inside of the waistband, a little to the right of where you attached the yarn. Now you’re going to crochet around the waist, encasing the elastic as you go. With the WS facing you, hold the elastic pretty close to the top of the waistband.
With your crochet hook, pu a p loop a bit below the elastic, then pu a st above the elastic in the top row (elastic is behind hook). You’ve now got 2 sts on the hook. Pull a loop through both. Chain 1 st. Now keep going around the waist, crocheting into every st and corresponding p loop, rep the following steps:
1.
Pu a p loop below the elastic.
2.
Pu a st above the elastic (elastic is behind hook).
3.
Pull a loop through these 2 sts (2 sts on hook).
4.
Pull a loop through both sts.
When you’ve made it all the way around, take out the safety pin and grab both ends of the elastic. Try it on, and pull the elastic as tight as you want it. Sew or tie the elastic together at the right length. Tuck the ends into the crocheted casing.
Instead of attaching elastic, you can sew a pair of panties to the inside as a liner. This has the added advantage of extra opacity.
And it’s done! Parade around in front of the mirror, admiring your fine work.
ABOUT CATHERINE
See Catherine’s bio on
page 186
.
BRENDA JANISH
I’m a sucker for eyelash yarns, and they know it, too—a couple of skeins mysteriously manage to jump into my bag every time I visit my local yarn store. After knitting too many extra-long, skinny, furry scarves, I decided it was time to make something more useful with my favorite yarn. Voilà: a fashionable furry bed for my furry companions.
This project is perfect for beginners—a long garter-stitch rectangle sewn to the edge of a garter-stitch circle. That’s really all there is to it. Both the pattern and the intended recipients will forgive any imperfections, so relax and have fun with it. Your cats will love that you’re finally knitting something for
them
!
