Read Teaching the Common Core Math Standards With Hands-On Activities, Grades 3-5 Online
Authors: Judith A. Muschla,Gary Robert Muschla,Erin Muschla-Berry
Tags: #Education, #Teaching Methods & Materials, #Mathematics, #General
Teaching the Common Core Math Standards With Hands-On Activities, Grades 3-5 (45 page)

BOOK: Teaching the Common Core Math Standards With Hands-On Activities, Grades 3-5
6.47Mb size Format: txt, pdf, ePub
ads
Background
An angle is a geometric figure formed by two rays with a common endpoint. This endpoint is called the vertex of the angle. Angles are measured in degrees. If the vertex of an angle is placed at the center of a circle, and the circle is divided into 360 pie-shaped regions, the angle formed by two adjacent rays is 1°.
Activity: Making an Angle
Students will make a model of an angle by cutting out two rays and attaching them with a paper fastener.
Materials
Scissors; protractor; card stock; 1 round-top paper fastener; reproducible, “Rays,” for each student; hole punchers that students will share.
Preparation
Copy the reproducible on card stock.
Procedure
1.
Explain that an angle is formed by two rays that have the same endpoint. If necessary, draw an angle on the board and note the rays and the vertex. Tell students that they will make a model of an angle.
2.
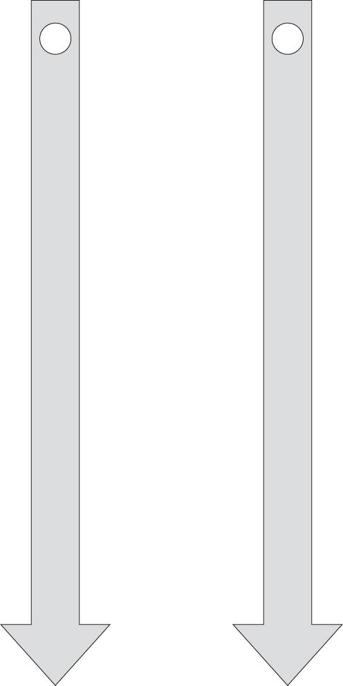
Distribute copies of the reproducible. Explain that it contains two arrows, which represent the sides of the angle.
3.
Instruct students to cut out the arrows.
4.
After students have cut out their arrows, explain that there should be a small circle at the end of each arrow. Students are to use a hole punch to punch out the circles.
5.
After students have punched out the small circles, instruct them to place the arrows, one on top of the other with the small holes aligned. They should place the end of the paper fastener through both holes so that the round end of the fastener is on top of the top arrow, and then open the bottom of the fastener and fold it up.
6.
Explain that the point where the sides of their arrows are joined represents the vertex of the angle. The arrows represent the sides (or rays) of the angle. The rays should be able to rotate.
7.
Instruct your students to place the bottom arrow on their desk, parallel to the edge of the desk. (Having the bottom arrow aligned in this manner will help them to more easily recognize angle sizes.) Suggest that they rotate the top arrow, which represents a side of the angle, by moving it in a counterclockwise direction. (If necessary, explain that a counterclockwise direction is the opposite direction of the way the hands of a clock turn.) Students should see that the angle becomes larger. If they rotate the top arrow completely around, it will eventually coincide with the bottom arrow. Because a circle contains 360°, the angle rotated 360°. Note that a 1° angle isof the rotation. Ask your students to make a 1° angle. Students will likely be surprised at how small this angle is and how difficult it is to measure.
8.
Ask students to use their angle to form a 30° angle, a 45° angle, a 60° angle, and a 90° angle. Students should verify their measurements with a protractor.
Closure
Ask students to write an exit card explaining how they formed various angles.
Rays
Measurement and Data: 4.MD.6
“Geometric measurement: understand concepts of angle and measure angles.”
6. “Measure angles in whole-number degrees using a protractor. Sketch angles of specified measure.”
Background
The ability to identify acute, obtuse, and right angles can help students to measure angles correctly:
- An acute angle has a measure less than 90°. If an angle is smaller than the corner of a page in a book, the angle is acute.
- An obtuse angle has a measure greater than 90°. If an angle is larger than the corner of a page, the angle is obtuse.
- A right angle has a measure of 90°. The corner of a page represents a right angle.
Activity 1: Measuring Angles Virtually
Students will measure angles virtually at a Web site.
Materials
Computers with Internet access for students; computer with Internet access and digital projector for the teacher.
Procedure
1.
Explain to your students that for this activity they will measure angles with a virtual protractor at a Web site.
2.
Review the meaning of acute angles (a measure of less than 90°), obtuse angles (a measure of more than 90°), and right angles (a measure of 90°). Provide some examples of these angles and ask students to identify them. Note that being able to recognize acute, obtuse, and right angles is helpful when measuring angles.
3.
Instruct your students to go to
www.mathplayground.com/measuringangles.html,
where they will find “Measuring Angles.”
4.
Read the directions on the screen with your students. Note that the crossbar of the protractor is always aligned with the vertex of the angle. To measure the angle, students must rotate the protractor by clicking and holding on “rotate” so that the 0° mark on the protractor lies on one of the rays of the angles. The other ray will intersect a scale on the protractor.
5.
Explain that to find the measure of the angle, students should find the degree mark where the other ray passes through the scale. Students can check to ensure that they used the correct scale by deciding if the angle is acute or obtuse. If the angle is acute, the measure of the angle should be less than 90°. If the angle is obtuse, the measure of the angle should be more than 90°.
6.
Demonstrate the process by clicking on “Start.” Rotate your protractor so that the 0° mark on the protractor lies on one of the rays of the angle. Find the degree mark where the other ray passes through the scale. Determine if the angle is acute or obtuse to make certain you used the correct scale. Place the measure of the angle in the box by the angle symbol. Click on “Check It” and you will find if the measurement is correct.
7.
Instruct your students to follow the same procedure. They will be given 10 angles to measure. If they provide an incorrect measurement, they will be given the correct measurement and should click on “Next” to measure another angle. They should also click on “Next” after correctly measuring an angle.
Closure
Discuss why recognizing whether an angle is acute or obtuse is a useful strategy when measuring angles. Ask your students: Can either scale on a protractor be used easily to measure a right angle? Why?
Activity 2: Angle Estimate and Measure Game
Working in groups of three or four, students will first estimate and draw angles with a given measure, then measure the angles to determine the accuracy of their estimated measurements.
Materials
Rulers; protractors; unlined paper for each group of students.
Procedure
1.
If necessary, review how students can use a protractor to measure an angle.
2.
Explain that students will play a game in which they must estimate, draw, and measure angles. Emphasize that the degree of the angles in the game must end in a 5 or 0 and be less than or equal to 180°. The game begins when one student in the group announces an angle of a specific degree. The other students in the group must then estimate the size of the angle and draw it on paper with their rulers (not their protractors). When they are finished, the students must measure their angles, using their protractors. The student who announced the angle determines whose angle is closest to the actual angle. That student receives a point. If two or more students tie for the closest measure, they each receive a point. Another student of the group now announces the measurement of an angle, and the other members of the group estimate, draw, and measure it. The student with the closest angle measurement receives a point. A third student announces an angle, and the process continues with each student of the group taking turns and announcing an angle for the other group members to estimate, draw, and measure. Note that in cases where students have difficulty agreeing on the measure of an angle, you will serve as the referee.
3.
The game should be played for a set time period, perhaps 15 or 20 minutes. This will give all of the students in the various groups a chance to estimate, draw, and measure several angles. You might want to mention that the more efficiently they work, the more angles they will be able to estimate, draw, and measure, and the more points they may accumulate.
Closure
After time is up, declare the student with the most points in each group as the winner of his or her group. Also, determine the student who scored the most points in the class. Review the steps for measuring angles with protractors.
Measurement and Data: 4.MD.7
“Geometric measurement: understand concepts of angle and measure angles.”
7. “Recognize angle measure as additive. When an angle is decomposed into non-overlapping parts, the angle measure of the whole is the sum of the angle measures of the parts. Solve addition and subtraction problems to find unknown angles on a diagram in real world and mathematical problems, e.g., by using an equation with a symbol for the unknown angle measure.”
Background
BOOK: Teaching the Common Core Math Standards With Hands-On Activities, Grades 3-5
6.47Mb size Format: txt, pdf, ePub
ads
Other books
Marked: A Vampire Blood Courtesans Romance by Gwen Knight, Michelle Fox
All Wounds by Dina James
The Phoenix Code by Catherine Asaro
Clarity by Kim Harrington
Soulbound by Kristen Callihan
Betting the Rainbow (Harmony) by Thomas, Jodi
Allison by Allen Say
Rum Cay, Sweet Surrender (Rum Cay, Sweet Surender) by Collins, Hallie
Por unos demonios más by Kim Harrison
A Trap So Tender by Jennifer Lewis