Read The New Drawing on the Right Side of the Brain Online
Authors: Betty Edwards
The New Drawing on the Right Side of the Brain (20 page)

BOOK: The New Drawing on the Right Side of the Brain
13.29Mb size Format: txt, pdf, ePub
ads
Our job now is to bring this state into clearer focus and under greater conscious control, in order to take advantage of the right hemisphere’s superior ability to process visual information and to increase your ability to make the cognitive shift to R-mode at will.
“The development of an Observer can allow a person considerable access to observing different identity states, and an outside observer may often clearly infer different identity states, but a person himself who has not developed the Observer function very well may never notice the many transitions from one identity state to another.”
—Charles T. Tart
Alternate States of
Consciousness,
1977
Alternate States of
Consciousness,
1977
6
Getting Around Your Symbol System: Meeting Edges and Contours
“To empty one’s mind of all thought and refill the void with a spirit greater than oneself is to extend the mind into a realm not accessible by conventional processes of reason.”
—Edward Hill
The Language of Drawing,
1966
The Language of Drawing,
1966
WE HAVE REVIEWED YOUR CHILDHOOD ART and the development of the set of symbols that formed your childhood language of drawing. This process paralleled the development of other symbol systems: speech, reading, writing, and arithmetic. Whereas these other symbol systems formed useful foundations for later development of verbal and computational skills, childhood drawing symbols seem to interfere with later stages of art.
Thus, the central problem of teaching realistic drawing to individuals from age ten or so onward is the persistence of memorized, stored drawing symbols when they are no longer appropriate to the task. In a sense, L-mode unfortunately continues to “think” it can draw long after the ability to process spatial, relational information has been lateralized to the right brain. When confronted with a drawing task, the language mode comes rushing in with its verbally linked symbols. Then afterward, ironically, the left brain is all too ready to supply derogatory words of judgment if the drawing looks childlike or naive.
In the last chapter I said that an effective way to “set aside” the dominant left verbal hemisphere and to “bring forward” your nondominant right brain, with its visual, spatial, relational style, is to present your brain with a task that the left brain either can’t or won’t work at. We have used the Vase/Faces drawings and upside-down drawings to illustrate this process. Now we’ll try another, more drastic strategy that will force a stronger cognitive shift and set aside your L-mode more completely.
Nicolaides’s contour drawingI’ve called the method of the next exercise “Pure Contour Drawing,” and your left hemisphere is probably not going to enjoy it. Introduced by a revered art teacher, Kimon Nicolaides, in his 1941 book,
The Natural Way to Draw,
the method has been widely used by art teachers. I believe that our new knowledge about how the brain divides its workload provides a conceptual basis for understanding why Pure Contour Drawing is effective as a teaching method. At the time of writing his book, Nicolaides apparently felt that the reason the contour method improved students’ drawing was that it caused students to use both senses of sight and touch. Nicolaides recommended that students imagine that they were touching the form as they drew. I suggest an alternate possibility: L-mode rejects the meticulous, complex perceptions of spatial, relational information, thus allowing access to R-mode processing. In short, Pure Contour Drawing doesn’t suit the left brain’s style. It suits the style of the right brain—again, just what we want.
Using Pure Contour Drawing to bypass your symbol systemThe Natural Way to Draw,
the method has been widely used by art teachers. I believe that our new knowledge about how the brain divides its workload provides a conceptual basis for understanding why Pure Contour Drawing is effective as a teaching method. At the time of writing his book, Nicolaides apparently felt that the reason the contour method improved students’ drawing was that it caused students to use both senses of sight and touch. Nicolaides recommended that students imagine that they were touching the form as they drew. I suggest an alternate possibility: L-mode rejects the meticulous, complex perceptions of spatial, relational information, thus allowing access to R-mode processing. In short, Pure Contour Drawing doesn’t suit the left brain’s style. It suits the style of the right brain—again, just what we want.
In my classes, I demonstrate Pure Contour Drawing, describing how to use the method as I draw—if I can manage to keep talking (an L-mode function) while I’m drawing. Usually, I start out all right but begin trailing off in mid-sentence after a minute or so. By that time, however, my students have the idea.
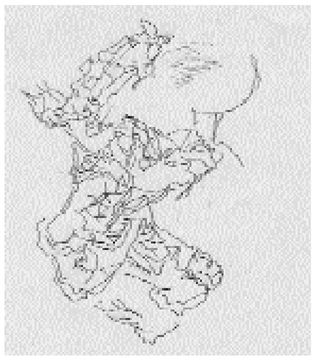
Following the demonstration, I show examples of previous students’ Pure Contour Drawings. See examples of students’ drawings on page 95.
What you’ll need:• Several pieces of drawing paper. You will draw on the top sheet and use two or three additional sheets to pad the drawing.
• Your #2 writing pencil, sharpened
• Masking tape to tape your drawing paper to your drawing board
• An alarm clock or kitchen timer
• About thirty minutes of uninterrupted time
Please read through the following instructions before you begin your drawing.
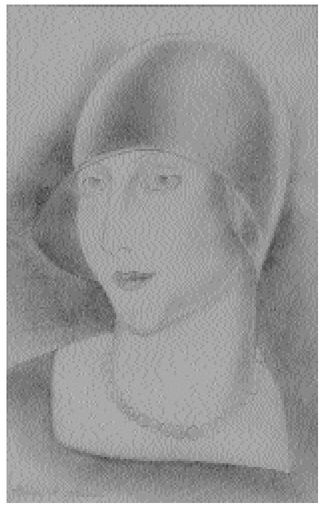
Woman in a Hat,
Kimon Nicolaides. Collection of the author.
Kimon Nicolaides. Collection of the author.
“Merely to see, therefore, is not enough. It is necessary to have a fresh, vivid, physical contact with the object you draw through as many of the senses as possible—and especially through the sense of touch.”
—Kimon Nicolaides
The Natural Way to Draw,
1941
The Natural Way to Draw,
1941

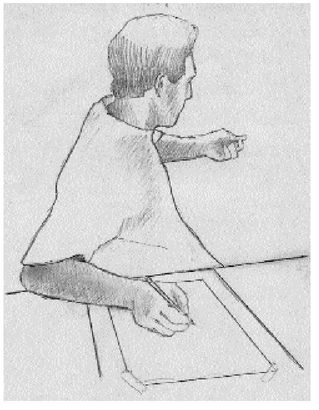
Fig. 6-1.
1. Look at the palm of your hand—the left hand if you are right-handed and the right if you are left-handed. Bring your fingers and thumb together to create a mass of wrinkles in your palm. Those wrinkles are what you are going to draw—all of them. I can almost hear you saying, “Are you joking?” or “Forget that!”
2. Sit in a comfortable position with your drawing hand on the drawing paper, holding the pencil and ready to draw. Then, put the pencil down and tape the paper in that prearranged position so it won’t shift around while you are drawing.
3. Set the timer for 5 minutes. In this way, you won’t have to keep track of time, an L-mode function.
4. Then, face all the way around in the opposite direction, keeping your hand with the pencil on the drawing paper, and gaze at the palm of the other hand. Be sure to rest that hand on some support—the back of a chair or perhaps on your knee—because you will be holding this rather awkward position for the allotted 5 minutes. Remember, once you start to draw, you will not turn to look at the drawing until the timer goes off. See figure 6-1.
5. Gaze at a single wrinkle in your palm. Place your pencil on the paper and begin to draw just that edge. As your eyes track the direction of the edge very slowly, one millimeter at a time, your pencil will record your perceptions. If the edge changes direction, so does your pencil. If the edge intersects with another edge, follow that new information slowly with your eyes, while your pencil simultaneously records every detail. An important point: Your pencil can record only what you see—nothing more, nothing less—at the moment of seeing. Your hand and pencil function like a seismograph, responding only to your actual perceptions.
The temptation to turn and look at the drawing will be very strong. Resist the impulse! Don’t do it! Keep your eyes focussed on your hand.
Match the movement of the pencil exactly with your eye movement. One or the other may begin to speed up, but don’t let that happen. You must record everything at the very instant that you see each point on the contour. Do not pause in the drawing, but continue at a slow, even pace. At first you may feel uneasy or uncomfortable: Some students even report sudden headaches or a sense of panic.
6. Do not turn around to see what the drawing looks like until your timer signals the end of 5 minutes.
7. Most important, you must continue to draw until the timer signals you to stop.
8. If you experience painful objections from your verbal mode (“What am I doing this for? This is really stupid! It won’t even be a good drawing because I can’t see what I’m doing,” and so forth), try your best to keep on drawing. The protests from the left will fade out and your mind will become quiet. You will find yourself becoming fascinated with the wondrous complexity of what you are seeing, and you will feel that you could go deeper and deeper into the complexity. Allow this to happen. You have nothing to fear or be uneasy about. Your drawing will be a beautiful record of your deep perception. We are not concerned about whether the drawing looks like a hand. We want the record of your perceptions.
9. Soon, this mental chatter will cease, and you will find yourself becoming intensely interested in the complexity of the edges you see in your palm and intensely aware of the beauty of that complex perception. When that change takes place, you will have shifted to the visual mode and again you will be “really drawing.”
10. When the timer signals the allotted time, turn and look at your drawing.
Think back now on how you felt at the beginning of the Pure Contour Drawing compared to how you felt later, when you were deeply into the drawing. What did that later state feel like? Did you lose awareness of time passing? Like Max Ernst, did you become enamored of what you saw? When you return to the alternative state you were in, will you recognize it?
“Blind swimmer, I have made myself see. I have seen. And I was surprised and enamored of what I saw, wishing to identify myself with it....”
—Max Ernst
,
1948
,
1948
BOOK: The New Drawing on the Right Side of the Brain
13.29Mb size Format: txt, pdf, ePub
ads
Other books
Maxwell's Island by M.J. Trow
Her Billionaire Secret Part 1: An Alpha Billionaire Romance by Jenna Chase, Elise Kelby
On Silver Wings by Currie, Evan
Drink for the Thirst to Come by Lawrence Santoro
Secrets of the Tides by Hannah Richell
Body Master by Barry, C.J.
Heart of the Raven by Susan Crosby
Setup on Front Street by Dennis, Mike
The Home for Wayward Supermodels by Pamela Redmond Satran
7 Days by Deon Meyer