Read The New Drawing on the Right Side of the Brain Online
Authors: Betty Edwards
The New Drawing on the Right Side of the Brain (24 page)

BOOK: The New Drawing on the Right Side of the Brain
3.94Mb size Format: txt, pdf, ePub
ads
Here is yet another of the paradoxes of drawing:
The flat, two-dimensional image you see (with one eye closed) on the picture-plane, when copied onto your drawing paper, miraculously “looks” three-dimensional to the person who views your drawing. One necessary step in learning to draw is to believe that this miracle will happen. Often, students struggling with a drawing will ask, “How can I make this table look like it’s going back in space?” or “How do I make this arm look like it’s coming toward me?” The answer, of course, is to draw—to copy!—just what you see flattened on the picture-plane. Only then will the drawing convincingly depict these “movements” through three-dimensional space (see Figure 6-13).
You may be wondering, “Is it always necessary to close one eye while drawing?” Not always, but most artists do quite a lot of one-eye closing while drawing. The closer the viewed object, the more eye-closing. The farther away the object, the less eye closing, because the binocular disparity referred to above diminishes with distance.
In this next exercise, you will use your technical aids (your plastic Picture Plane and your Viewfinders) to enable you to do a realistic drawing of your own hand—a “real” drawing depicting a three-dimensional form on a flat sheet of paper.
Fig. 6-13. Brian Harking.
Students often become very frustrated at the start of a drawing—perhaps because the starting of a drawing is always difficult. Also I think students beginning in drawing believe that drawings just “flow out.” They don’t. You will be making numerous intense relational calculations at the start, and it’s only after the drawing is well started—in fact, nearing completion—that it begins to “flow.”
What you’ll need:
• Several sheets of the smaller drawing paper
• Your graphite stick and some paper napkins or paper towels
• Your #2 writing pencil or your #4B drawing pencil, sharpened
• Your eraser
• Your plastic Picture Plane
• Your felt-tip marker
• The Viewfinder you used for your drawing on the Picture Plane
• An hour of uninterrupted time
Before you begin: Please read through all of the instructions.
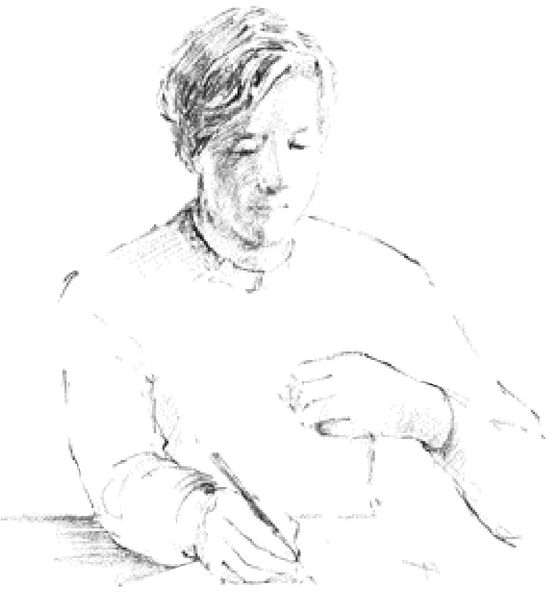
In this drawing, we are modifying the instructions for Pure Contour Drawing. You will sit in a normal position and therefore be able to glance at your drawing to monitor its progress (see Figure 6-14). Nevertheless, I hope you will use the same focused concentration that you used in Pure Contour Drawing.
Fig. 6-14. The position for Modified Countour Drawing is the usual drawing position.
Most of my students greatly enjoy this process of toning their paper, and the physical action of “working up” the tone seems to help them get started with a drawing. A possible reason is that, having marked the paper and made it their own, so to speak, they escape the intimidation of that blank sheet of white paper staring at them.
1. Tape a stack of several sheets of paper to your drawing board. Tape all four corners securely, so that the paper will not shift around. One of your hands will be “posing” and must remain still. The other will be drawing and perhaps erasing. If the paper shifts under your hand while you are drawing or erasing, it is very distracting.
2. Draw a format on your drawing paper, using the inside edge of your Viewfinder.
3. The next step is to tone your paper. Make sure you have a stack of several sheets of paper to pad your drawing. Begin to tone your paper by rubbing the edge of the graphite stick very lightly over the paper, staying inside the format. You want to achieve a pale, even tone—don’t worry too much about staying within the lines. You can clean up the edges at a later time. Figure 6-15.
4. Once you have covered the paper with a light application of graphite, begin to rub the graphite into the paper with your paper towels. Rub with a circular motion, applying even pressure right up to the edge of the format. You want to achieve a very smooth, silvery tone. Figure 6-16.
5. Next, lightly draw horizontal and vertical crosshairs on your toned paper. The lines will cross in the center just as they do on your plastic Picture Plane. Use the crosshairs on the plastic plane to mark the position of the crosshairs on the format of your toned paper. A caution: Don’t draw the lines too dark. They are only guidelines and later you may want to eliminate them. Figure 6-17.
6. Retrieve your Picture Plane with the felt-tip drawing that you did at the start of this chapter, or, if you wish, you can do a new drawing (Figure 6-18). Place the plane down on a light surface, perhaps a sheet of paper, so that you can clearly see the drawing on the plastic. This image will act as a guide for you when you next draw your hand without the actual plane. Figure 6-19.
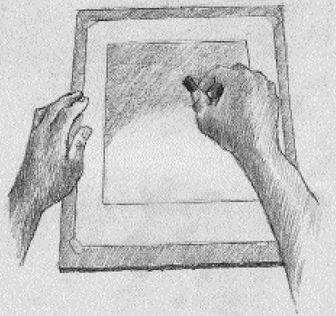
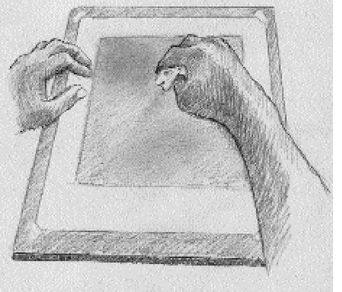
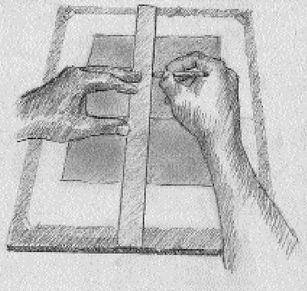
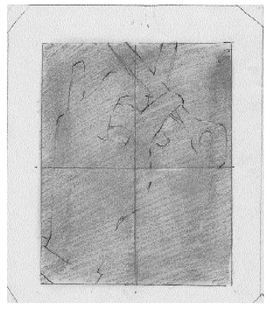
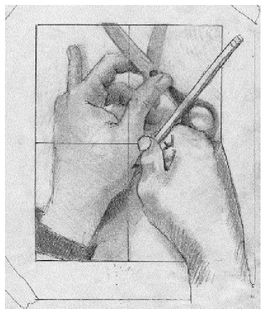
Fig. 6-15.
Fig. 6-16.
Fig. 6-17.
Fig. 6-18. Pose your hand under the Picture Plane.
Fig. 6-19. Draw the edges as you see them on the Picture Plane.
Fig. 6-20. Transfer the main points from your drawing or plastic to your toned drawing paper.
Fig. 6-21.
Try to observe the shapes of the lights and shadows. I realize you haven’t yet had any instruction of the fourth drawing skill, the perception of lights and shadows. I’ve found, however, that students do well just plunging in and they often enjoy it very much.
7. An important step: Now, you will transfer the main points and edges of your drawing on plastic to your drawing paper (Figure 6-20). The formats are the same size, so it is a one-to-one scale transfer. Using the crosshairs, place the point where an edge of your hand contacts the format. Transfer several of these points. Then, begin to connect the edges of your hand, fingers, thumb, palm, wrinkles, and so on with the points you have established. This is just a light sketch to help you place the hand within the format. Recall that drawing is copying what you see on the picture plane. For this drawing, you will take this actual step, to get used to the process. Don’t worry about erasing the ground if you have to change a line. Erase, then just rub the erased area with your finger or a paper napkin and the erasure disappears.
8. Once this rough, light sketch is on your paper, you are ready to start drawing.
9. Reposition your “posing” hand, using the drawing-on-plastic to guide the positioning. Then, set aside your drawing-on-plastic, but place it where you can still refer to it.
10. Then, closing one eye, focus on a point on some edge in your posing hand. Any edge will do to make a start. Place your pencil point on this same point in the drawing. Then, gaze again at this point on your hand in preparation to draw. This will start the mental shift to R-mode and help to quiet any mutterings from L-mode.
11. When you begin to draw, your eyes—or rather, eye—will move slowly along the contour and your pencil will record your perceptions at the same slow speed that your eye is moving. Just as you did in Pure Contour Drawing, try to perceive and record all of the slight undulations of each edge (Figure 6-21). Use your eraser whenever needed, even to make tiny adjustments in the line. Looking at your hand (with one eye closed, remember), you can estimate the angle of any edge by comparing it to the crosshairs. Check these angles in your drawing-on-plastic that you did earlier, but also try to see these relationships by imagining a picture-plane hovering over your hand, with its helpful crosshairs and the edge of the format to guide you.
12. About 90 percent of the time, you should be looking at your hand. That is where you will find the information that you need. In fact, all the information you need to do a wonderful drawing of your hand is right in front of your eyes. Glance at the drawing only to monitor the pencil’s recording of your perceptions, to check for relationships of sizes and angles, or to pick a point to start a new contour. Concentrate on what you see, wordlessly sensing to yourself, “How wide is this part compared to that? How steep is this angle compared to that?” And so on.
13. Move from contour to adjacent contour. If you see spaces between the fingers, use that information as well: “How wide is that space compared to the width of that shape?” (Remember, we are not naming things—fingernails, fingers, thumb, palm. They are all just edges, spaces, shapes, relationships.) Be sure to keep one eye closed at least a good portion of the time. Your hand is quite close in proximity to your eyes, and the binocular disparity can confuse you with two images.
BOOK: The New Drawing on the Right Side of the Brain
3.94Mb size Format: txt, pdf, ePub
ads
Other books
The Heavenly Fox by Richard Parks
El caballero errante by George R. R. Martin
Curing Doctor Vincent (The Good Doctor Trilogy Book 1) by Mason, Renea
The Runaways by Elizabeth Goudge
Timeless Desire by Cready, Gwyn
The Wrong Hostage by Elizabeth Lowell
Glyphbinder by T. Eric Bakutis
For Love's Sake by Leonora De Vere
Criminal Intent (MIRA) by Laurie Breton
The Outback by David Clarkson