Read The New Drawing on the Right Side of the Brain Online
Authors: Betty Edwards
The New Drawing on the Right Side of the Brain (22 page)

BOOK: The New Drawing on the Right Side of the Brain
7.85Mb size Format: txt, pdf, ePub
ads
A quick review of the five perceptual skills of drawing
What you’ll need:
In this lesson, we are working on the perception of edges as one of the component skills of drawing. Recall that there are four others and together these five components make up the whole skill of drawing:
Modified Contour Drawing: First, drawing on the picture plane1. The perception of edges (the “shared” edges of contour drawing).
2. The perception of spaces (in drawing called
negative
spaces).
negative
spaces).
3. The perception of relationships (known as perspective and proportion).
4. The perception of lights and shadows (often called “shading”).
5. The perception of the whole (the gestalt, the “thingness” of the thing).
What you’ll need:
• Your clear plastic Picture Plane
• Your felt-tip marker
• Both of your viewfinders
Before you begin: Please read through all of the instructions before starting your drawing. In the next section I will define and fully explain the Picture Plane. For now, you will be simply using it. Just follow the instructions.
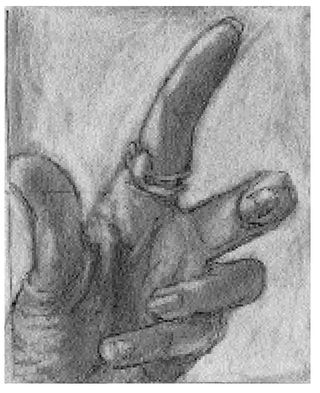
What you’ll do:1. Rest your hand on a desk or table in front of you (the left hand if you are right-handed, and the right, if you are left-handed) with the fingers and thumb curved upward, pointing toward your face. This is a foreshortened view of your hand. Imagine now that you are about to draw that foreshortened form.
If you are like most of my students, you would simply not know how to go about doing that. It seems far too difficult to draw this three-dimensional form, with its parts moving toward you in space. You would hardly know where to start. The viewfinders and plastic Picture Plane will help you get started.
2. Try out each of the Viewfinders to decide which size fits most comfortably over your hand, which you should be holding in a foreshortened position with the fingers coming toward you. Men often need the larger, women the smaller-sized Viewfinder. Choose one or the other.
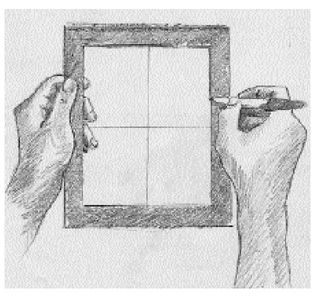
3. Clip the Viewfinder you have chosen on top of your clear-plastic Picture Plane.
4. Use your felt-tip marker to draw a “format” line on the plastic Picture Plane, running your marker around the inside of the opening of the Viewfinder. A format line forms the outer boundary of your drawing. See Figure 6-4.
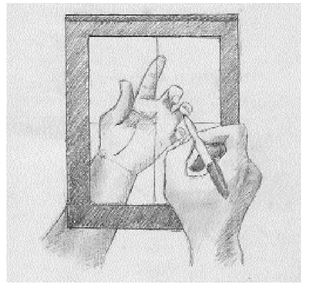
5. Now, holding you hand in the same foreshortened position as before, balance the Viewfinder/plastic Picture Plane on the tips of your fingers and thumb. Move it about a bit until the picture-plane seems balanced comfortably.
6. Pick up your uncapped marking pen, gaze at the hand under the plastic Picture Plane and close one eye. (I’ll explain in the next segment why it is necessary to close one eye. For now, please just do it.) See Figure 6-5.
7. Choose an edge to start your drawing. Any edge will do. With the marking pen, begin to draw on the plastic Picture Plane the edges of the shapes just as you see them. Don’t try to “second guess” any of the edges. Do not name the parts. Do not wonder why the edges are the way they are. Your job, just as in Upside-Down Drawing and in Pure Contour Drawing, is to draw exactly what you see, with as much detail as you can manage with the marking pen (which is not as precise as a pencil).
8. Be sure to keep your head in the same place and keep one eye closed. Don’t move your head to try to “see around” the form. Keep it still. (Again, I’ll explain why in the next segment.)
9. Correct any lines you wish by just wiping them off with a moistened tissue on your forefinger. It is very easy to redraw them more precisely.
Fig. 6-3.
Fig. 6-4.
Fig. 6-5.
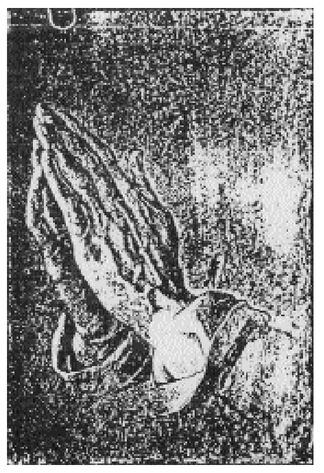
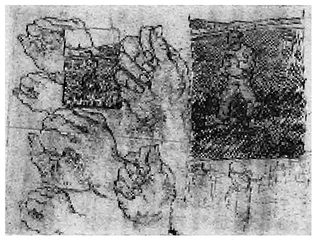
Fig. 6-6. Albrecht Dürer (1471-1528),
Hands in Adoration.
Black and white tempera on blue paper. Albertina Museum, Vienna.
Hands in Adoration.
Black and white tempera on blue paper. Albertina Museum, Vienna.
Fig. 6-7. Vincent Van Gogh,
Sketches with Two Sowers.
St. Remy, 1890.
After you have finished:Sketches with Two Sowers.
St. Remy, 1890.
Place the plastic Picture Plane on a plain sheet of paper so that you can clearly see what you have drawn. I can predict with confidence that you will be amazed. With relatively little effort, you have accomplished one of the truly difficult tasks in drawing—drawing the human hand in foreshortened view. Great artists in the past have practiced drawing hands over and over. Observe the examples by Albrecht Dürer and Vincent Van Gogh, Figures 6-6 and 6-7.
How did you accomplish this so easily? The answer, of course, is that you did what a trained artist does: You “copied” what you saw on the picture-plane—in this instance, an actual plastic plane. I fully define and explain the Picture Plane in the next section. For now, you are simply using it. I have found that the explanation makes more sense after students have used the plastic plane.
For further practice: I suggest that you erase your felt-tip pen drawing from the Picture Plane with a damp tissue and do several more, with your hand in a different position each time. Try for the really “hard” views—the more complicated the better. Oddly enough, the flat hand is the hardest to draw; a complex position is actually easier. Therefore, arrange your hand with the fingers curved, entwined, crossed, fist clenched, whatever. Try to include some foreshortening. Remember, the more you practice each of these exercises, the faster you will progress. Save your last (or best) drawing for the next exercise.
This brings us to a crucial question—that is, an all-important question in terms of your understanding: What is drawing?
The quick answer: Drawing is “copying” what you see on the picture-plane. In the drawing you did just now, your own hand in foreshortened view, you “copied” the “flattened” image of your hand that you “saw” on the plastic Picture Plane.
And now, a more complete answer to the question, “What is drawing?”
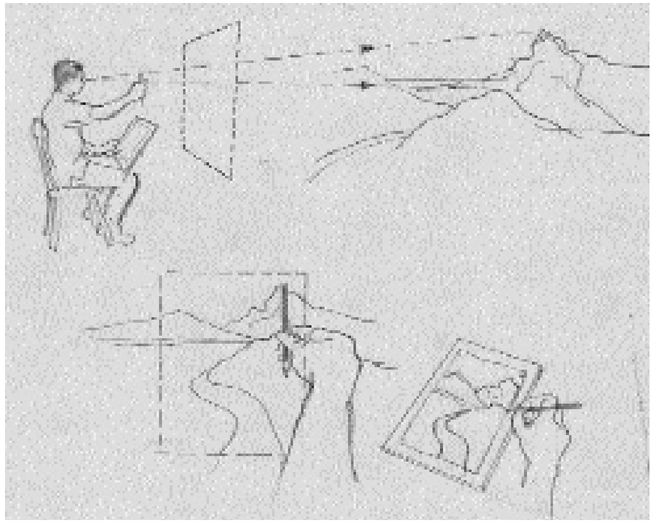
In art, the concept of “the picture plane” is extremely abstract and difficult to explain, and even more difficult to comprehend. But this concept is one of the most important keys to learning to draw, so stay with me. I’ll try to be clear.
The picture plane is a mental concept. See this in your “mind’s eye”: the picture plane is an imaginary transparent plane, like a framed window, that is always hanging out in front of the artist’s face, always parallel to the “plane” of the artist’s two eyes. If the artist turns, the plane also turns. What the artist sees “on the plane” actually extends back into the distance. But the plane enables the artist to “see” the scene as though it were magically smashed flat on the back of the clear glass plane—like a photograph, in a sense. Put another way, the 3-D image behind the framed “window” is converted to a 2-D (flat) image. The artist then “copies” what is seen “on the plane” onto the flat drawing paper.
This trick of the artist’s mind, so difficult to describe, is even more difficult for beginning students to discover on their own. In this course, therefore, you need an actual picture plane (your plastic Picture Plane) and actual window frames (the Viewfinders).
These devices seem to work like magic in causing students to “get” what drawing is—that is, to understand the fundamental nature of drawing perceived objects or persons.
To further help beginners in drawing, I asked you to draw crosshairs on your sheet of plastic (the plastic Picture Plane). These two “grid” lines represent vertical and horizontal, the two constants that the artist absolutely depends on to assess relation ships. Early on in my classes, I used a grid of many lines, but I found that students were counting up—“two spaces over and three down.” This is just the kind of L-mode activity we didn’t want. I then reduced the “grid” lines to one vertical and one horizontal and found that was sufficient.
It might help your understanding of the picture plane to realize that photography grew out of drawing. In the years before photography was invented, artists generally understood and used the concept of the picture-plane. You can imagine the artists’ excitement (and, perhaps, dismay) to see that a photograph could, in an instant, capture the image on the picture-plane—an image that would have taken an artist hours, days, or even weeks to render in a drawing. Artists, deposed from realistic depiction, began exploring other aspects of perception, such as the effects of light (Impressionism). After photography became common, the concept of the picture plane was less necessary and began to fade away.
The picture plane is an imaginary vertical surface, like a window, through which you look at your subject. In this way, you copy your three-dimensional view of the world to your two-dimensional surface onto your drawing paper.
BOOK: The New Drawing on the Right Side of the Brain
7.85Mb size Format: txt, pdf, ePub
ads
Other books
Lost Angel (The List #1) by N K Love
Hearts in Cups by Candace Gylgayton
Stealing Picasso by Anson Cameron
Otis by Scott Hildreth
Roses and Chains by Delphine Dryden
A Groom With a View by Sophie Ranald
Manly Wade Wellman - John the Balladeer 02 by After Dark (v1.1)
Rage by Wilbur Smith
Kiss and Cry by Ramona Lipson
A Spanish Awakening by Kim Lawrence