Read The New Drawing on the Right Side of the Brain Online
Authors: Betty Edwards
The New Drawing on the Right Side of the Brain (27 page)

BOOK: The New Drawing on the Right Side of the Brain
10.65Mb size Format: txt, pdf, ePub
ads
Fig. 7-6. Paul Cézanne (1839-1936),
The Vase of Tulips.
Courtesy of The Art Institute of Chicago. By making the positive forms touch the edge of the format in several places, Cézanne enclosed and separated the negative shapes, which contribute as much to the interest and balance of the composition as do the positive forms.
The Vase of Tulips.
Courtesy of The Art Institute of Chicago. By making the positive forms touch the edge of the format in several places, Cézanne enclosed and separated the negative shapes, which contribute as much to the interest and balance of the composition as do the positive forms.
Summing up, then, negative spaces have two important functions:
1. Negative spaces make “difficult” drawing tasks easy—for example, areas of foreshortening or complicated forms or forms that don’t “look like” what we know about them, become easy to draw by using negative space. The chair drawings in the margin and the horns of the sheep on page 116 are good examples.
2. Emphasis on negative spaces unifies your drawing and strengthens composition and—perhaps most important, improves your perceptual abilities.
I realize that it is counter-intuitive—that is, it goes against common sense—to think that focusing on the spaces around objects will improve your drawing of the objects. But this is simply another of the paradoxes of drawing and may help to explain why it is so difficult to teach oneself to draw. So many of the strategies of drawing—using negative space, for example—would never occur to anyone “in their left mind.”
Our next bit of preparation is to define the “Basic Unit.” What is it and how does it help with drawing?
Choosing a Basic UnitOn looking at a finished drawing, students just beginning to draw often wonder how the artist decided where to start. This is one of the most serious problems that plague students. They ask, “After I’ve decided what to draw, how do I know where to start?” or “What happens if I start too large or too small?” Using a Basic Unit to start a drawing answers both these questions, and ensures that you will end with the composition you so carefully chose before you started a drawing.
After years of teaching classes and workshops, struggling to find words to explain how to start a drawing, I and my fellow teachers finally worked out a method that helped us to communi- cate how a trained artist does this. We had to carefully introspect what we were doing when starting a drawing and then figure out how to teach the process, which is fundamentally non-verbal, extremely rapid, and “on automatic.” I have called this method, “Choosing a Basic Unit.” This Basic Unit becomes the key that unlocks all of the relationships within a chosen composition: All proportions are found by comparing everything to the Basic Unit.
“Nothing is more real than nothing.”
—Samuel Beckett
“You can never have the use of the inside of a cup without the outside. The inside and the outside go together. They’re one.”
—Alan Watts
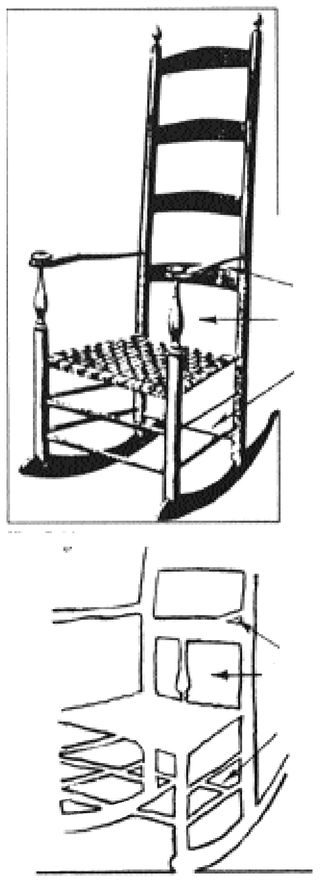
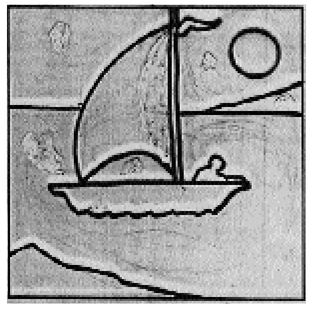
Fig. 7-7.
The Basic Unit—A definitionIn Chapter Six, I stated that all parts of a composition (negative spaces and positive forms) are locked into a relationship that is bounded by the outside edge of the format. For realistic drawing, the artist is bound to that relationship in which all the parts fit together: The artist is not at liberty to change the proportional relationships. I’m sure you can see that if you change one part, something else necessarily gets changed. In Chapter Six I used a child’s jigsaw puzzle to illustrate the important concept of shared edges. I’ll use the same puzzle to illustrate the Basic Unit (Figure 7-7).
The Basic Unit is a “starting shape” or “starting unit” that you choose from within the scene you are looking at through the Viewfinder (the sailboat on the water). You need to choose a Basic Unit of medium size—neither very small nor very large, relative to the format. In this instance, you could choose the straight edge of the sail. A Basic Unit can be a whole shape (the shape of a window or the shape of a negative space) or it can be just a single edge from point to point (the top edge of a window, for example). The choice depends only on what is easiest to see and easiest to use as your Basic Unit of proportion.
In the jigsaw puzzle, I chose to use the straight edge of the sail as my Basic Unit.
Once chosen, all other proportions are determined relative to your Basic Unit. The Basic Unit is always called “One.” You can lay your pencil down on the puzzle to compare the relationships. For example, you can now ask yourself, “How wide is the boat compared to my Basic Unit, the long edge of the sail?” (One to one and one-third.) “How wide is the sail relative to my Basic Unit?” (One to two-thirds.) “Where is the sea/sky edge from the bottom of the format?” (One to one and one-quarter.) Note that for each proportion, you go back to your Basic Unit to measure it on your pencil and then you make the comparison with another part of the composition. I’m sure you can see the logic of this method and how it will enable you to draw in proportion.
As I teach you how to find and use a Basic Unit, this method of starting may seem a bit tedious and mechanical at first. But it resolves many problems, including problems of starting and of composition as well as problems of proportional relationships. It soon becomes quite automatic. In fact, this is the method most experienced artists use, but they do it so rapidly that someone watching would think that an artist “just starts drawing.”
An anecdote about French artist Henri Matisse illustrates this point and also illustrates the almost subconscious process of finding a Basic Unit. John Elderfield, curator of drawings at the Museum of Modern Art in New York, in his wonderful catalog of the Matisse Retrospective Exhibition of 1992, states: “There is a 1946 film of Matisse painting
Young Woman in White, Red Background
[see Figure 7-8].... When Matisse saw the slow-motion sequence of the film, he felt ‘suddenly naked,’ he said, because he saw how his hand ‘made a strange journey of its own’ in the air before drawing the model’s features. It was not hesitation, he insisted: ‘I was unconsciously establishing the relationship between the subject I was about to draw and the size of my paper.’ ” Elderfield goes on to say, “This can be taken to mean that he had to be aware of the entire area he was composing before he could mark a particular section of it.”
Clearly, Matisse was finding his “starting shape,” the head of the model, to make sure he would have it the right size to show the whole figure in his painting. The curious thing about Matisse’s remark, I think, is that he felt “suddenly naked” when he saw himself apparently figuring out how big to make that first shape. I think this indicates the almost entirely subconscious nature of this process.
Later on, you too will rapidly find a starting shape or a Basic Unit or your “One”—or whatever you may eventually call it. And someone watching you will think that you “just started drawing.”

Fig. 7-8. Henri Matisse,
Young Woman in White, Red Background,
1946.
Young Woman in White, Red Background,
1946.
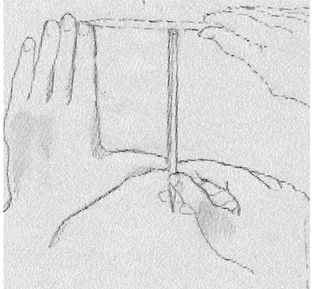
Fig. 7-9.
Getting off to a good startI hope that you will become used to quickly choosing a Basic Unit to ensure a good composition. I imagine that you have already grasped the (visual) logic of starting your drawing this way, but allow me to put it into words once more.
When students are first learning to draw, they almost desperately want to get something down on the paper. Often, they just plunge in, drawing some object in the scene in front of them without paying attention to the size of that first shape in relation to the size of the format.
The size of the first shape that you draw controls the subsequent size of everything in the drawing. If that first shape is inadvertently drawn too small or too large, the resulting drawing may be an entirely different composition from the one you intended to depict.
Students find this frustrating, because it often happens that the very thing that interested them in the scene turns out to be “off the edge” of the paper. They don’t get to draw that part at all simply because the first shape they drew was too large. Conversely, if the first shape is too small, students find that they must include much that is of no interest to them in order to “fill out” the format.
The method I am recommending to you, of correctly sizing the first shape (your Basic Unit) that you set down, prevents this inadvertent problem and becomes quite automatic with a bit of practice. Later on, when you have discarded all of your drawing aids—the Viewfinders and plastic Picture Plane, you will use your hands to form a rough “viewfinder” (as in Figure 7-9), and you will still size the first shape (which, in these lessons, we are calling your Basic Unit) correctly for your chosen composition.
Your Negative Space drawing of a chairWhat you’ll need:
• Your Viewfinder with the larger opening
• Your Picture Plane
• Your felt-tip marker
• Your masking tape
• Several sheets of drawing paper
• Your drawing board
• Your pencils, sharpened
• Your eraser
• Your graphite stick and several dry paper towels or paper napkins
• About an hour of interrupted time—more, if possible, but at least an hour
You’ll be taking some preliminary steps, so please read all of the instructions before you start. The following are the preliminary steps for every drawing and take only a few minutes, once you have learned the process.
• choosing a format and drawing it on your paper
• toning your paper (if you choose to work on a toned ground)
• drawing your crosshairs
• composing your drawing
• choosing a Basic Unit
• drawing the chosen Basic Unit on the Picture Plane with a felt-tip marker
• transferring the Basic Unit to your paper
• then, starting the drawing
I’ll describe each step.
1. The first step is to draw a format on your drawing paper. For your Negative Space drawing of a chair, use the
outside
edge of your Viewfinder or the plastic Picture Plane. The drawing will be larger than the opening of your Viewfinder.
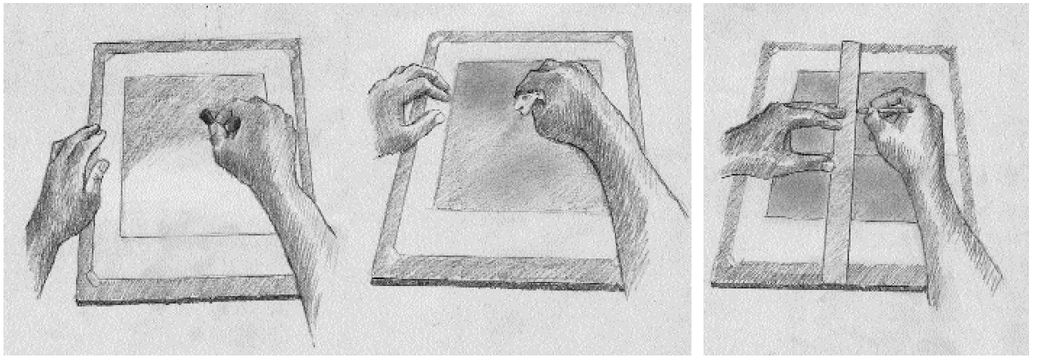
outside
edge of your Viewfinder or the plastic Picture Plane. The drawing will be larger than the opening of your Viewfinder.
As in any field, the “rules” of art are made to be broken by artists working at advanced levels. While acquiring basic drawing skills, however, I think it is best to stay with the task at hand—learning how to see and draw. Once you have mastered basic drawing, you can take it as far as you want and break the rules intentionally, not by accident.
BOOK: The New Drawing on the Right Side of the Brain
10.65Mb size Format: txt, pdf, ePub
ads
Other books
Mine to Tell by Donnelly, Colleen L
Swept Away by Robyn Carr
Apple's Angst by Rebecca Eckler
Epiphany by Ashley Suzanne
Byron-4 by Kathi S Barton
Two-Thousand-Pound Goldfish by Betsy Byars
The Standing Water by David Castleton
Dear God by Josephine Falla
Sugar Cube by Kir Jensen
Gallipoli Street by Mary-Anne O'Connor