Read The New Drawing on the Right Side of the Brain Online
Authors: Betty Edwards
The New Drawing on the Right Side of the Brain (28 page)

BOOK: The New Drawing on the Right Side of the Brain
2.47Mb size Format: txt, pdf, ePub
ads
2. The second step is to tone your paper. Make sure you have a stack of several sheets of paper to pad your drawing. Begin to tone your paper by rubbing the edge of the graphite stick very lightly over the paper, staying inside the format.
3. Once you have covered the paper with a light application of graphite, begin to rub the graphite into the paper with your paper towels. Rub with a circular motion, applying pressure evenly and going right up to the edge of the format. You want to achieve a very smooth, silvery tone.
4. Next, lightly draw horizontal and vertical crosshairs on your toned paper. The lines will cross in the center, just as they do on your plastic Picture Plane. Use the crosshairs on the plastic plane to mark the position of the crosshairs on the format of your toned paper. A caution: Don’t make the lines too dark. They are only guidelines, and later you may want to eliminate them.
5. The next step is to choose a chair to use as the subject of your drawing. Any chair will do—an office chair, a plain straight chair, a stool, a cafeteria chair, whatever. If you are lucky, you may find a rocking chair or a bentwood chair or something else very complicated and interesting. But the simplest kind of chair will be fine for your drawing.
6. Place the chair against a fairly simple background, perhaps a room corner or a wall with a door. A blank wall is just fine and will make a beautiful, simple drawing, but the choice of setting is entirely up to you. A lamp placed nearby may throw a wonderful shadow of the chair on the wall or floor—a shadow that can become part of your composition.
7. Sit in front of your “still life”—the chair and setting you have chosen—at a comfortable distance of about eight to ten feet. Take the cap off your felt-tip marker and place it close beside you.
8. Next, use your Viewfinder to compose your drawing. Fasten the Viewfinder onto your clear plastic Picture Plane. Hold the Viewfinder/ Picture Plane in front of your face, close one eye, and, moving the device forward or backward, “frame” the chair in a composition that you like. (Students are very good at this. They seem to have an intuitive “feel” for composition.) If you wish, the chair can nearly touch the format so that the chair pretty much “fills the space.”
9. Hold the Viewfinder very still. Now, gazing at a space in the chair, perhaps between two back slats, imagine that the chair is magically pulverized and—like Bugs Bunny, in a poof!—disappears. What is left are the negative spaces. They are real. They have real shapes, just like the remains of the door in the analogy above. These negative space-shapes are what you are going to draw. I repeat: You will draw the spaces, not the chair. See Figure 7-10.
Choosing a Basic Unit1. When you have found a composition you like, hold the Viewfinder/plastic Picture Plane in that position. Pick up the felt-tip marker. Next, choose a negative space within the drawing—perhaps a space-shape between two rungs or between two back-slats. This space-shape should be fairly simple, if possible, and neither too small nor too large. You are looking for a manageable unit that you can clearly see for its shape and size. This is your Basic Unit, your “starting shape,” your “One.” See Figure 7-10 for an example.
2. With one eye closed, focus on that particular negative space—your Basic Unit. Keep your eye focused on your Basic Unit until it “pops” into focus as a shape. (This always takes a moment—perhaps it is L-mode’s protesting time!)
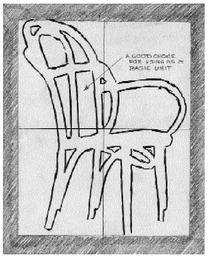
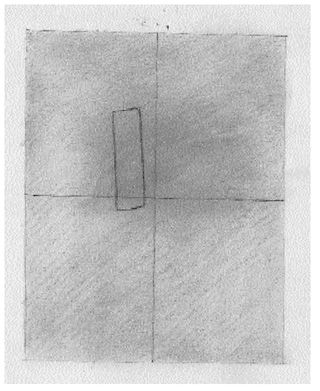
Fig. 7-10.
Fig. 7-11.
Note that:
•
The toned format on your paper is larger in size than the format of the opening of your Viewfinder. Though the sizes are different, the proportion of the two formats—meaning the relationship of width to length—is the same.
The toned format on your paper is larger in size than the format of the opening of your Viewfinder. Though the sizes are different, the proportion of the two formats—meaning the relationship of width to length—is the same.
•
Your felt-tip drawing of your Basic Unit on the plastic Picture Plane and your drawing on the toned paper will be the same, but the one on your paper will be larger.
Your felt-tip drawing of your Basic Unit on the plastic Picture Plane and your drawing on the toned paper will be the same, but the one on your paper will be larger.
•
Stated another way, the images are the same, but the scale is different. Note that in this instance, you “scale up.” At other times, you may “scale down.”
Stated another way, the images are the same, but the scale is different. Note that in this instance, you “scale up.” At other times, you may “scale down.”
3. With your felt-tip marker, carefully draw your Basic Unit on the plastic Picture Plane. This shape will be the start of your negative space drawing on your toned paper (Figure. 7-11).
4. The next step is to transfer your Basic Unit onto the paper you have toned. You will use your crosshairs to place it and size it correctly. (This is called “scaling up.” See the sidebar for an explanation.) Looking at your drawing on the plastic plane, say to yourself: “Relative to the format and to the crosshairs, where does that edge start? How far over from that side? From the crosshair? From the bottom?” These assessments will help you draw your Basic Unit correctly. Check it three ways: The shape on your toned paper, the actual space-shape in the chair-model, and the shape in the Picture Plane drawing should all be proportionally the same.
5. Check each angle in your Basic Unit the same way, by comparing three ways as above. To determine an angle, say to yourself, “Relative to the edge of the format (vertical or horizontal), what is that angle?” You can also use the crosshairs (vertical and horizontal) to assess any angles in your Basic Unit. Then, draw the edge of the space at an angle just as you see it. (Simultaneously, of course, you are drawing the edge of the chair.)
6. One more time, check your drawing of your Basic Unit, first with the actual chair-model and then with the rough sketch on the plastic Picture Plane. Even though the scale is different in each, the relative proportions and angles will be the same.
It is worth taking time to make sure your Basic Unit is correct. Once you have this first negative space-shape correctly sized and placed within the format in your drawing, all of the rest of the drawing will be in relationship to that first shape. You will experience the beautiful logic of drawing and you will end with the composition you so carefully chose at the start.
Drawing the rest of the negative spaces of the chair1. Remember to focus only on the shapes of the negative spaces. Try to convince yourself that the chair is gone, pulverized, absent. Only the spaces are real. Try also to avoid talking to yourself or questioning why things are the way they are—for example, why any space-shape is the way it is. Draw it just as you see it. Try not to “think” at all, in terms of L-mode logic. Remember that everything you need is right there in front of your eye and you need not “figure it out.” Remember also that you can check out any problem area by returning to your plastic Picture Plane and, remembering to close one eye, drawing the troublesome part directly on the plastic plane.
2. Draw the spaces of the chair one after another. Working outward from your Basic Unit, all the shapes will fit together like a jigsaw puzzle. You don’t have to figure out anything about the chair. In fact, you don’t have to think about the chair at all. And don’t question why the edge of a space goes this way or that. Just draw it as you see it. See Figure 7-12.
3. Again, if an edge is at an angle, say to yourself, “What is that angle compared to vertical?” Then, draw the edge at the angle you see it.
4. Gauge horizontals in the same way: What is the angle, compared to horizontal (that is, the top or bottom edges of your format)?
5. As you draw, try to take conscious note of what the mental mode of drawing feels like—the loss of the sense of time, the feeling of “locking on” to the image, and the wonderful sense of amazement at the beauty of the perceptions. During the process, you will find that the negative spaces will begin to seem interesting in their strangeness and complexity. If you have a problem with any part of the drawing, remind yourself that everything you need to know in order to do this drawing is right there, perfectly available to you.
6. Continue working your way through the drawing, searching out relationships, both angles (relative to vertical or horizontal) and proportions (relative to each other). If you talk to yourself at all during the drawing, use only the language of relationships: “How wide is this space compared to the one I have just drawn?” “What is this angle compared to horizontal? “How far does that space extend relative to that whole edge of the format?” Soon, you will be “really drawing.” The drawing will begin to seem like a fascinating puzzle, the parts fitting together in an entirely satisfying way (Figure 7-14).
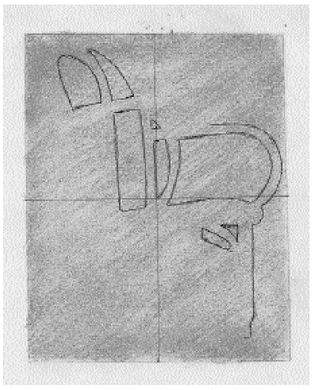
Fig. 7-12.
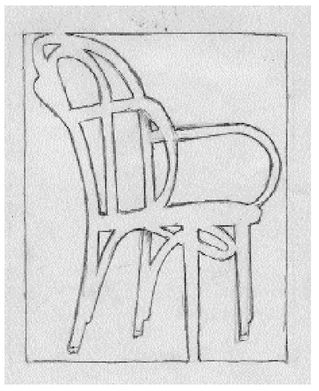
Fig. 7-13.
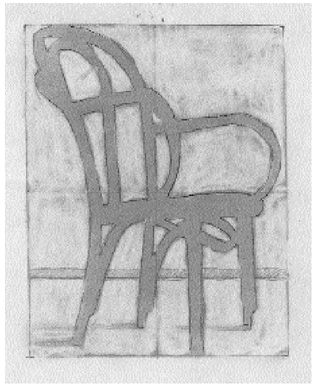
Fig. 7-14.
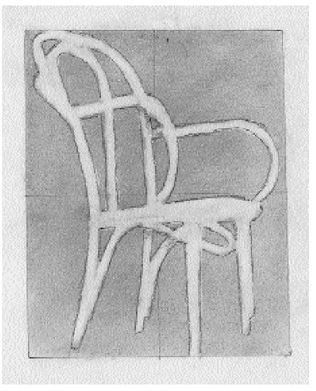
Fig. 7-15.
BOOK: The New Drawing on the Right Side of the Brain
2.47Mb size Format: txt, pdf, ePub
ads
Other books
Obscure Blood by Christopher Leonidas
Deceived by Camilla Isles
The Silent Hour by Elisabeth Grace Foley
Watching Jimmy by Nancy Hartry
The Miniature Wife: and Other Stories by Gonzales, Manuel
Hell on Wheels by Julie Ann Walker
The Billionaire's Caress by Olivia Thorne
Monday Night Man by Grant Buday
Desired By The Pack: Part Three by Emma Storm
Maid for the Rock Star by Demelza Carlton