Vegan Cookies Invade Your Cookie Jar: 100 Dairy-Free Recipes for Everyone's Favorite Treats (20 page)
Authors: Terry Hope Isa Chandra;Romero Moskowitz
Tags: #Best cookbooks

BOOK: Vegan Cookies Invade Your Cookie Jar: 100 Dairy-Free Recipes for Everyone's Favorite Treats
6.66Mb size Format: txt, pdf, ePub
4. When the agar agar has been soaking for 15 minutes, turn the heat up and bring to a boil. Boil for about 10 minutes, or until the agar agar is completely dissolved. Add the sugar and turmeric and boil until dissolved, about 3 minutes. Lower the heat to medium and add the arrowroot powder mixture, then add the lemon zest and soy milk. Whisk constantly until the mixture thickens, about 5 minutes. It should not be rapidly boiling, but a low bubbling is okay.
5. Pour the mixture into the prepared crust, let it cool for 20 minutes, and then refrigerate for at least 3 hours, until the filling is only slightly jiggly and set. Use a sifter or a fine mesh strainer to sprinkle the bars with powdered sugar. Slice into squares and serve.

MAKES 9 HUGE SQUARES OR 12 SLIGHTLY SMALLER ONES
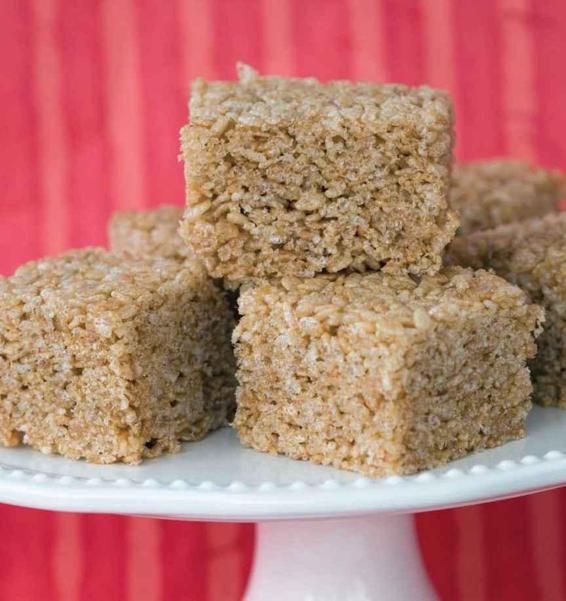
BIG, FAT CRISPY RICE SQUARES
are found in better coffee shops all over the place these days, but common ingredients like gelatin-laced marshmallows and butter make these off-limits to vegans. Okay, there are also ultra-pristine animal-free ones, too, but usually they’re too greasy or heavy with nut butters and raisins. What we really are craving is something more like the huge, crispy stacks from our childhood (and maybe yours, too!)
are found in better coffee shops all over the place these days, but common ingredients like gelatin-laced marshmallows and butter make these off-limits to vegans. Okay, there are also ultra-pristine animal-free ones, too, but usually they’re too greasy or heavy with nut butters and raisins. What we really are craving is something more like the huge, crispy stacks from our childhood (and maybe yours, too!)
On that note, we’re proud to present a crisp rice cereal treat that’s huge, satisfying, yet still light, crunchy, and just sweet enough. We’ve eliminated the nut butter, kept the health nut-like addition of brown rice cereal, and enriched it with plenty of vanilla. A good firm pressing and freezing make these easy to slice. We also recommend making these in advance and letting them stand for a while (overnight is best), as these become sturdier given a little time to mellow. We like ’em plain, but perhaps try a fun little smattering of colorful sprinkles if you’re in the mood to celebrate.
⅓ cup maple syrup
⅔ cup brown rice syrup
¼ cup nonhydrogenated margarine,
cut into chunks
2½ teaspoons pure vanilla extract
¼ teaspoon almond, maple, or coconut
extract
A pinch of salt
9 cups crispy brown rice cereal (one
10-ounce box of cereal)1. Line an 8 x 8 x 3-inch square metal brownie pan with enough aluminum foil so that it folds over the sides of the pan by about an inch. Spray the bottom and sides of the covered pan with nonstick cooking spray.2. In a large saucepan, combine the maple syrup and brown rice syrup; make sure to use a large pan with sides at least 4 inches tall, as the mixture will foam quite a bit when it boils. Stir over medium heat and cook until the mixture comes to a full, rapid, foaming boil. Cook for 2 minutes, stirring constantly. Remove from heat, add the margarine, and stir until it’s melted and mostly incorporated into syrup. Stir in the vanilla and almond extracts and salt.Big Fat Crispy Rice Squares3. Pour the cereal into a very large mixing bowl. Pour the cooked syrup mixture over the cereal, then use a large rubber spatula to stir and coat the cereal with the syrup mixture. Stir and fold for about 2 minutes, taking care to completely coat all of the cereal with syrup; the mixture should be very sticky. Use the spatula to scoop the coated cereal into the foil-lined pan, pushing the mixture around so that it’s evenly distributed throughout the pan. It should heap somewhat over the top of the pan.4. Tear a piece of waxed paper or parchment paper slightly larger than the size of the pan. Place the paper on top of the cereal mixture, then with your hands, firmly press down and mash the cereal so that it’s now level with the edges of the pan. Evenly press all of the cereal down; this step is very important as it will help the crispy rice stick together, so make sure to keep pressing down firmly and evenly on the rice, even crushing it a little if necessary. When the cereal seems as level and firm as it’s going to get, place the pan in the freezer and freeze for at least 2 hours or until very solid.5. To slice, remove the pan from the freezer and slice immediately. The easiest way to do so is grab the edges of the foil, lift the entire contents out of pan, and flip it, wax paper side down, onto a cutting board. Peel off the foil from the top. Use a very sharp and heavy knife to slice the mixture into nine large squares or twelve smaller ones. For sturdier treats, loosely cover the squares and store in a cool place for 8 hours before serving. Frozen crispy rice squares can also be served right after slicing but may become slightly crumbly as they warm to room temperature.
FANCY COOKIES

FANCY MAY BE THE LEAST EASILY DEFINABLE QUALIFICATION
of a cookie. Perhaps we like to label “fancy” any cookie that requires a more than just casually dropping or rolling out some dough onto a baking sheet. But maybe it’s because these cookies—homemade vegan copycat “Oreos,” frosted whiskey delights, hazelnut puffs sandwiched with chocolate truffle crème—make normal cookie eating into an occasion. No matter if you’re dressed in a tux or in a track suit, you’ll never feel like a plain Jane (or Joe) serving up any of these lovelies to friends or soon-to-be-friends.
of a cookie. Perhaps we like to label “fancy” any cookie that requires a more than just casually dropping or rolling out some dough onto a baking sheet. But maybe it’s because these cookies—homemade vegan copycat “Oreos,” frosted whiskey delights, hazelnut puffs sandwiched with chocolate truffle crème—make normal cookie eating into an occasion. No matter if you’re dressed in a tux or in a track suit, you’ll never feel like a plain Jane (or Joe) serving up any of these lovelies to friends or soon-to-be-friends.
Holiday cookie bakers, we’ve got your back, too, with bite-size fruitcake bars, powdery snowball-like wonders, and so many more that your family might start making up holidays just to ask for your specialty cookies on a regular basis.
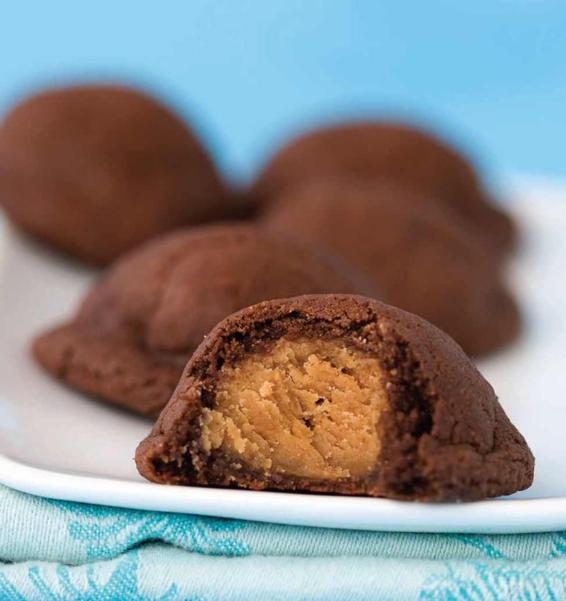
PEANUT BUTTER CHOCOLATE PILLOWSMAKES 2 DOZEN COOKIES
CHOCOLATE-WITH-PEANUT-BUTTER DEVOTEES
will totally stalk you once they bite into these seemingly ordinary chocolate cookies with a hidden peanut butter center. Or consider these a peanut butter ball with a chocolate cookie shell, and looking something like a plump round ravioli. Or a pillow, but edible, like the name says. Impatience is rewarded here: just a few minutes out of the oven, these cookies are dynamite—all warm and oozy inside. You can either press them down a little to give them a flattened shape, or leave the balls to flatten slightly on their own during baking.
FOR THE CHOCOLATE DOUGH:will totally stalk you once they bite into these seemingly ordinary chocolate cookies with a hidden peanut butter center. Or consider these a peanut butter ball with a chocolate cookie shell, and looking something like a plump round ravioli. Or a pillow, but edible, like the name says. Impatience is rewarded here: just a few minutes out of the oven, these cookies are dynamite—all warm and oozy inside. You can either press them down a little to give them a flattened shape, or leave the balls to flatten slightly on their own during baking.
½ cup canola oil
1 cup sugar
¼ cup pure maple syrup
3 tablespoons nondairy milk
½ teaspoon pure vanilla extract
1½ cups all-purpose flour
⅓ cup unsweetened cocoa powder
2 tablespoons black unsweetened cocoa
powder or more regular
unsweetened cocoa powder
½ teaspoon baking soda
¼ teaspoon salt
¾ cup natural salted peanut butter,
crunchy or creamy style
⅔ cup powdered sugar
2 to 3 tablespoons soy creamer or
nondairy milk
¼ teaspoon pure vanilla extract
crunchy or creamy style
⅔ cup powdered sugar
2 to 3 tablespoons soy creamer or
nondairy milk
¼ teaspoon pure vanilla extract
1. In a large mixing bowl, combine oil, sugar, maple syrup, nondairy milk, and vanilla and mix until smooth. Sift in flour, cocoa powder, black cocoa powder if using, baking soda, and salt. Mix to form a moist dough.
2. Make the peanut butter filling: In another mixing bowl, use a hand mixer to beat together peanut butter, powdered sugar, 2 tablespoons of the soy creamer, and vanilla to form a moist but firm dough. If peanut butter dough is dry and crumbly (natural peanut butters have varying moisture contents), stir in the remaining tablespoon of nondairy milk. If dough is too wet knead in a little extra powdered sugar.
Peanut Butter Chocolate Pillows
3. Preheat oven to 350°F. Line two baking sheets with parchment paper.
1. Create the centers of the cookies by rolling the peanut butter dough into twenty-four balls (try dividing dough in half, then each part in half again and roll each portion into six balls). Scoop a generous tablespoon of chocolate dough, flatten into a thin disc, and place a peanut butter ball in the center. Fold the sides of the chocolate dough up and around the peanut butter center and roll into a smooth ball between your palms. Place on a sheet of waxed paper and repeat with remaining dough. If desired, gently flatten cookies slightly, but this is not necessary.
2. Place the dough balls on lined baking sheets about 2 inches apart and bake for 10 minutes. Remove the sheet from the oven and let the cookies stand for 5 minutes before moving them to wire racks to complete cooling. Store cookies in tightly covered container. If desired, warm cookies in a microwave for 10 to 12 seconds before serving.
MorselsIf unsalted peanut butter
is all you have, be sure
add ¼ to ½ teaspoon salt
to the peanut butter
mixture.
MAKES 16 COOKIES
FOR THOSE OF US WHO MISS
suckling at the corporate teat of Pepperidge Farm, here is a veganized version of everyone’s favorite chocolate sandwich cookie, the Milano. Even though there is a bit of orange zest in the batter, these aren’t orange flavored, the zest just kind of pulls everything together and gives a sunny note of somethin’ somethin’. We think bittersweet chocolate gives the most authentic flavor, but use semisweet if that’s what you’ve got. And heed the directions to flour your hands before forming each cookie—otherwise the dough will stick.
suckling at the corporate teat of Pepperidge Farm, here is a veganized version of everyone’s favorite chocolate sandwich cookie, the Milano. Even though there is a bit of orange zest in the batter, these aren’t orange flavored, the zest just kind of pulls everything together and gives a sunny note of somethin’ somethin’. We think bittersweet chocolate gives the most authentic flavor, but use semisweet if that’s what you’ve got. And heed the directions to flour your hands before forming each cookie—otherwise the dough will stick.
Other books
Nothing More Beautiful by Lorelai LaBelle
Transfigured by Zavora, Ava
Eye Candy (City Chicks) by Childs, Tera Lynn
Good Time Bad Boy by Sonya Clark
Moonlight Captivation [Moon Shadows Book 1] by Angela Castle
Goblin Ball by L. K. Rigel
Valor At Vauzlee by DePrima, Thomas
More Than Him by Jay McLean
K.J. Emrick - Darcy Sweet 13 - Ghost Story by K.J. Emrick
El Cadáver Alegre by Laurell K. Hamilton

