Build Your Own ASP.NET 3.5 Website Using C# & VB (48 page)
Read Build Your Own ASP.NET 3.5 Website Using C# & VB Online
Authors: Cristian Darie,Zak Ruvalcaba,Wyatt Barnett
Tags: #C♯ (Computer program language), #Active server pages, #Programming Languages, #C#, #Web Page Design, #Computers, #Web site development, #internet programming, #General, #C? (Computer program language), #Internet, #Visual BASIC, #Microsoft Visual BASIC, #Application Development, #Microsoft .NET Framework

at the dinner table), and the entire web site needs to be updated to match the “new
look” of the company. By now, Dorknozzle Jr is back at school, and the mindnumbing job of manually updating each of the employee profile pages falls right in your lap. Lucky you!
This is the time when you’d realize that life would be a lot more easy if a database
was added to the mix. A database is a collection of data organized within a framework that can be accessed by programs such as your ASP.NET web site. For example, you could have the Dorknozzle intranet site look into a database to find a list of
employees that you want to display on the employee directory page.
Such a collection of data needs to be managed by some kind of software—that
software is called a
database server
. The database server we’ll use in this book is
SQL Server Express Edition, which is a free but very powerful database engine
created by Microsoft. Other popular database server software products include Oracle, DB2, PostgreSQL, MySQL, and others. Licensed to [email protected]

Database Design and Development
265
In our Dorknozzle scenario, the employee records would be stored entirely in the
database, which would provide two key advantages over the manual maintenance
of a list of employees. First, instead of having to write an HTML file for each employee profile page, you could write a single ASP.NET web form that would fetch any employee’s details from the database and display them as a profile. This single
form could be updated quite easily in the event of corporate rebranding or some
other disaster. Second, adding an employee to the directory would be a simple
matter of inserting a new record into the database. The web form would take care
of the rest, automatically displaying the new employee profile along with the others
when it fetched the list from the database.
As a bonus, since this slick, ultra-manageable system reduces the burden of data
entry and maintenance, you could assign the boss’s son to clean the coffee machine
to fill his time!
Let’s run with this example as we look at how data is stored in a database. A database
is composed of one or more
tables
. For our employee database, we’d probably start
with a table called Employees that would contain—you guessed it—a list of employees. Each table in a database has one or more
columns
(or
fields
). Each column holds a certain piece of information about each item in the table. In our example, the Employees table might have columns for the employees’ names, network usernames, and phone numbers. Each employee whose details were stored in this table would
then be said to be a
row
(or
record
) in the table. These rows and columns would
form a table that looks like the one shown in Figure 7.1
.
Figure 7.1. Structure of a typical database table
Notice that, in addition to columns for the employees’ names, usernames, and
telephone numbers, we included a column named Employee ID. As a matter of good
design, a database table should always provide a way to identify each of its rows
uniquely. In this particular case, you may consider using an existing piece of data
Licensed to [email protected]
266
Build Your Own ASP.NET 3.5 Web Site Using C# & VB
as the unique identifier—after all, it’s unlikely that two employees would share the
same network username. However, that’s something for our network administrator
to worry about. Just in case he or she slips up somewhere along the line, we include
the Employee ID column, the function of which is to assign a unique number to
each employee in the database. This gives us an easy way to refer to each person,
and allows us to keep track of which employee is which. We’ll discuss such database
design issues in greater depth shortly.
So, to review
, Figure 7.1 shows a four
-column table with four rows, or entries. Each row in the table contains four fields, one for each column in the table: the employee’s
ID, name, username, and telephone number.
Now, with this basic terminology under your belt, you’re ready to roll up your
sleeves and build your first database!
Creating Your First Database
The SQL Server engine does a great job of storing and managing your databases, but
in order to be able to do anything meaningful with the data, we first need to connect
to SQL Server. There are many ways to interact with SQL Server, but for starters
we’re just interested in using it as a visual tool to facilitate basic administrative
tasks. The tools you’ll use to interact with your database are:
■ Visual Web Developer Express Edition
■ SQL Server Management Studio Express Edition
That’s right, Visual Web Developer has everything you need to get started with SQL
Server! However, we’ll use SQL Server Management Studio for most database
tasks—most tasks are easier in SQL Server Management Studio than they are in
Visual Web Developer, as SQL Server Management Studio’s interface has been designed specifically for working with databases. We’ll name the database that will store the data for our sample project “Dorknozzle.”
In this chapter, you’ll learn how to create its structure, and in the next chapter, we’ll
begin to work with the database. You can use either Visual Web Developer or SQL
Server Management Studio to create the Dorknozzle database. Let’s look at both
approaches, so you’re comfortable with both options.
Licensed to [email protected]

Database Design and Development
267
Creating a New Database Using Visual Web Developer
Visual Web Developer’s Database Explorer window gives you access to most database-related features. You can make this window appear by selecting
View
>
Database
Explorer
. Right-click the
Data Connections
node and select
Add Connection…
from the context menu, as shown in
Figure 7.2
.
Figure 7.2. Adding a new database connection
If you correctly checked the SQL Server Express Edition option during the installation of Visual Web Developer back in
Chapter 1, select
Microsoft SQL Server
from the
Choose Data Source
dialog that appears, and click
Continue
. You’ll then be asked to enter the details for your data connection. Enter the following data:
■ Set
Server name
to
localhost\SqlExpress
.
■ Leave the
Use Windows Authentication
option selected.
■ Click
Test Connection
to ensure you can successfully connect to SQL Server using
the data you’ve provided.
■ Enter
Dorknozzle
in the
Select or enter a database name
field. Click
OK
.
■ You’ll be asked to confirm the creation of a new database called Dorknozzle.
Click
Yes
.
Licensed to [email protected]


268
Build Your Own ASP.NET 3.5 Web Site Using C# & VB
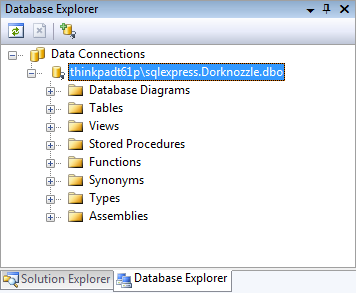
Figure 7.3. Exploring the Dorknozzle database
Once you click
Yes
, the new database will be created, and a link to it will be added
to the Data Connections node in Database Explorer. You can expand it to view its
contents, as Figure 7.3 illustrates.
Creating a New Database Using SQL Server
Management Studio
T
o start SQL Server Management Studio, which we installed in Chapter 1, select
Start
>
All Programs
>
Microsoft SQL Server
>
SQL Server Management Studio Express
. In the dialog that appears, enter
localhost\SqlExpress
into the
Server Name
box, and leave
Authentication mode
to
Windows Authentication
, as
Figure 7.4 illustrates.
(The local computer name may be used instead of
localhost
.)
Figure 7.4. Connecting to a SQL Server instance
Licensed to [email protected]

Database Design and Development
269
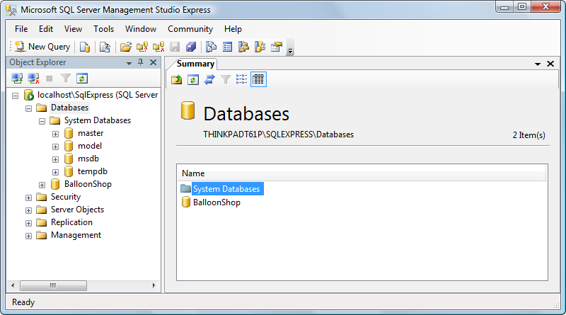
After you connect to SQL Server, expand the
Databases
node to see the current
databases. If you’ve just installed SQL Server, you’ll only have installed the system
databases, which are grouped under a
System Databases
node. In Figure 7.5
below, you can see that there’s another database, named BalloonShop, on the SQL Server.
If you added the Dorknozzle database using Visual Web Developer above, you’ll
see that listed there too.
Figure 7.5. Inspecting your SQL server instance
If you haven’t done so yet, you should go ahead and create the Dorknozzle database.
To create a new database, right-click the
Databases
node, and select
New Database…
from the context menu. In the dialog that appears, enter
Dorknozzle
into the
Database
name
field, then click
OK
.