Building Web Sites All-in-One For Dummies® (108 page)
Read Building Web Sites All-in-One For Dummies® Online
Authors: Claudia Snell

5.
After editing the page, click the Publish button.
Contribute publishes the edited page to the server. If you enabled rollbacks, Contribute saves the previous version of the page in case you're not satisfied with your edits and want to revert (
rollback,
in Contribute-ese) to a previous version of the page. As we mention earlier, the default number of rollbacks is three.
Managing a Site with Dreamweaver
If you and your staff have been contracted to manage your client's site, the obvious application for editing is the application with which the pages were created. Dreamweaver is a robust application that enables the savvy Web designer to create a way-cool Web site and edit it as well. The following sections show you how to edit your pages in Dreamweaver.
Editing new pages
The beauty of editing pages in a full-featured HTML editor like Dreamweaver is that you can edit the pages as well as the underlying code. When you edit pages in Dreamweaver, you can work in one of three modes: Design, Code, or the chameleon Split mode, which enables you to view the page and code at the same time. Now, how cool is that? To edit pages in Dreamweaver, follow these steps:
1.
In the Files panel, select Local View from the View drop-down menu and then select the site you want to edit from the Site drop-down menu.
Dreamweaver displays the files associated with the site. (See Figure 2-20.)
2.
Double-click the page you want to edit.
Dreamweaver opens the page in Design mode. (See Figure 2-21.) Editing pages in Dreamweaver is pretty straightforward. The Property inspector is your friend in Dreamweaver. You use it to change links, CSS styles, images, and so on.
3.
Edit the page as needed.
If you need to modify the code, click the Code button to display the page in Code view. (See Figure 2-22.)
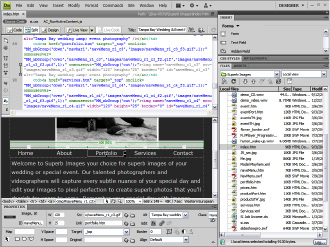
If you need to view both the code and the page at the same time, click the Split button to display the page in Split view. When working in Split view, you can select items in the Display pane, and the underlying code is displayed in the Code pane. (See Figure 2-23.)
4.
After editing the page, click the Put button, which looks like an up-pointing arrow.
Dreamweaver uploads the edited page to the server.
Figure 2-20:
The Files panel is your friend.
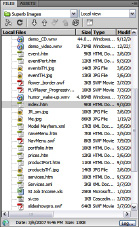
Figure 2-21:
Editing pages in Dream-weaver is, well, a dream.
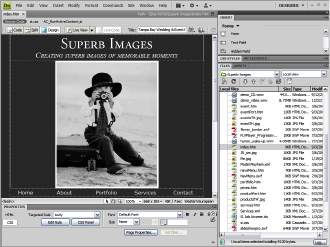
Figure 2-22:
Oh, my. This page has exposed its code.
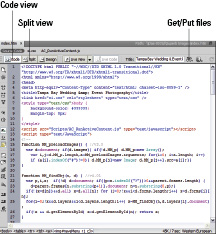
Figure 2-23:
Lie down on the couch and tell me more about this split existence.
Templates in Dreamweaver can save your sanity
If your client changes her mind frequently, you might find yourself frequently creating new pages for her Web site. When this occurs, you turn on the meter and start charging your client your going rate for revisions. But why reinvent the wheel? We mean, after all, the new pages will have common elements such as the site banner, the footer, the navigation menu, and so on. Rather than creating these items from scratch every time you create a new page, you can save yourself a lot of time by creating templates when you create the site. If you create a template for every possible page that you need to create, making a new page is a snap. Choose FileâNew and then click the Templates tab. Choose the desired template and go to town. You'll save yourself a lot of time by working with templates, as you don't need to re-create the common items that are used in the site.
Hint:
There's no need to pass the savings on to the client. For more information on creating templates, read through Book III, Chapter 6.
Archiving pages
You work hard to create compelling Web sites for your clients. If you follow our sage advice in the “Updating Pages without Destroying Them” section of this chapter, you archive pages on the server. But what happens if the server has a major malfunction (known as a
hissy fit
to your nontechnical client) and all your client's files are erased? Most Web servers have some kind of redundancy, which enables them to restore your client's files. But in the case of a natural disaster, the computers on which the backup files are kept might be toast. You probably have the latest version of your client's pages on your local machine. However, hard drive failure isn't out of the question. To prevent problems, we always archive a Web site to CD after we publish it. If you have sophisticated CD-burning software, you can set up a multisession disc and update the disc whenever you change a page. In either worst-case scenario (a server meltdown or a local machine hard drive meltdown), you still have everything you need to restore your client's Web site on a CD. Oh, yeah, we should mention that CDs are prone to failure as well. Make a copy of the CD and store it in a safe place. Better yet, invest in some archival CDs or DVDs and use them to archive the final version of your client's site. Archival CD or DVD media isn't cheap, but the discs have a life expectancy of over 30 years. It's always better to be safe than sorry.
Tips for Managing Tasks
Many of your tasks as a Web designer are repetitive. At times, you have to enter the same bit of code; other times, you use items that are the same, but different. When you perform repetitive tasks on a regular basis,
Snippets
are a Web designer's best friend. And for items like a site copyright notice that changes once yearly, you can't beat a Library item. Another way you can streamline your workload is with Assets.
Assets
are items, such as Flash movies and images that you use when designing a site. Assets have their own panel and are neatly organized in folders by content type, ready to use in an existing page or a new page. The upcoming sections show you how to streamline your work when creating or editing pages.
Simplifying repetitive tasks with Snippets
Did you ever wish you could do away with the boring tasks in your everyday life? We mean, wouldn't it be wonderful to step in front of a mirror, push a button, and get your face washed, followed by a close shave and a quick trim? Well, modern grooming technology hasn't gotten that far, but Web design has. If you find yourself doing repetitive tasks in Dreamweaver, such as inserting the same image or the same bits of code in a page multiple times, you'll love Snippets. With Snippets, you can save code that you'll be using frequently in the Snippets panel. You can then use the Snippet in any Web page you create.
Creating Snippets
One task that many e-commerce Web designers do over and over is insert Buy Now links and the associated code into Web pages. Doug's photography Web site sells prints that are different sizes. The transactions are handled through PayPal. He created a table for the popular sizes, with the price information and necessary PayPal code to carry out the transaction. The following steps show how to record PayPal code as a Snippet:
1.
Open the page that contains the code you want to save as a Snippet.
You can record any combination of code â even code to insert images, create hyperlinks, and so on. Just make sure that any Assets such as images will be present on the site in which the Snippet code will be used and that the relative path is the same.
2.
Click the Code button.
When you create a Snippet, you select the code associated with the task you want to convert to a Snippet. You can create a Snippet in Designer mode, but when you're recording several lines of code, it's hard to ensure you selected everything in Designer mode. If, however, you're recording a single object, such as text with a hyperlink, you can accomplish this in Designer mode. Otherwise, we suggest that you work in Split mode to ensure that all the needed code is selected.
3.
Select the desired code.
4.
Choose Window
â
Snippets.
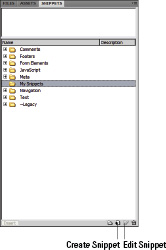
The Snippets panel opens. The Snippets panel consists of several preset Snippets that ship with Dreamweaver. You can also create folders for your own Snippets. We store our Snippets in a folder, oddly enough, named My Snippets. (See Figure 2-24.)
Figure 2-24:
The Snippets are not related to The Muppets.
5.
Select the folder in which you want to store the Snippet.
6.
Select the code you want to convert to a Snippet.
7.
Click the New Snippet icon.
The Snippet dialog box appears.
8.
Name the Snippet (see Figure 2-25) and then click OK.
The Snippet is added to the desired folder.
Using Snippets
After you amass a panel full of spicy Snippets, you can liberally sprinkle them on the new pages you create or the pages you edit. And you do so with the simple click of a button. To use a Snippet in a Web page, do this:
1.
Create a new page or open an existing page where you want to add a Snippet.