Building Web Sites All-in-One For Dummies® (115 page)
Read Building Web Sites All-in-One For Dummies® Online
Authors: Claudia Snell

The microphone is plug and play with most modern operating systems. Connect a USB cable from your computer to the microphone, and you're ready to record. When you need to pack the microphone away, coil the USB cord, place it in the base, and close it.
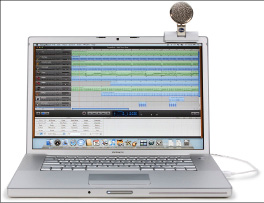
You can also separate the base and attach the microphone to a laptop computer (see Figure 2-6). This handy microphone is about the same size as a classic iPod and works with either Macintosh (OS X; USB 1.0 or 2.0; with a minimum of 64MB RAM) or Windows (XP Home Edition or XP Professional; USB 1.0 or 2.0; with a minimum of 64MB RAM) OS. As of this writing, the Snowflake has a list price of $79.
For more information on the Snowflake, visit
http://www.bluemic.com/modules.php
Figure 2-6:
The Snowflake, a road warrior's best friend.
Sound-Editing Software
After picking up a good microphone, you need software to capture your podcast. Sound-editing software is also useful when you need to edit files supplied by other contributors to your podcast. In this section, we show you three applications Doug uses: Adobe Audition, Sony Sound Forge, and Sony Acid Music Studio.
 When you record, make sure you use the VU meters that are available in most applications, and make sure the VU meters don't go into the red zone. When the meters go into the red, the peak of the waveform is flat, which means the sound is clipped and distorted.
Adobe Audition and Sound Booth
Adobe Audition (
www.adobe.com/products/audition
) is a full-featured, professional recording and sound-editing application. You can record multiple tracks with the application, clean up existing audio, and edit your podcasts. The software features several options. You can work in multitrack mode or edit an individual track. The software has tools you use to analyze a sound and much more. You can also restore noisy and clipped files. Doug uses Audition to record and edit Pixelicious (
www.pixelicious.info
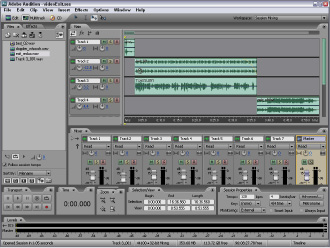
). The workspace (see Figure 2-7) is intuitive if you've edited sound before. As of this writing, Adobe Audition lists for $349.
Adobe Audition may be more than you need. In that case, you might want to consider another Adobe application called Sound Booth (
www.adobe.com/products/soundbooth
), which is targeted toward people with little or no experience in sound editing. As of this writing, the application lists for $199.
Figure 2-7:
Edit and record sound with Adobe Audition.
Sony Sound Forge
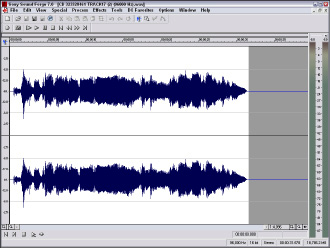
Sony Sound Forge is another powerful sound-editing application. Sony Sound Forge 9 features multitrack editing. The application also makes it possible for you to record and edit a podcast. As of this writing, Sony Sound Forge 9 retails for $299. Figure 2-8 shows the workspace for Sony Sound Forge 7.
Find more online at
www.sonycreativesoftware.com/soundforge
Sony Acid Music Studio (Windows only)
Sony Acid Music Studio is an application that enables you to create soundtracks by using music sample loops. The application supports multiple tracks and recording. You can find it at
www.sonycreativesoftware.com/musicstudio
Figure 2-8:
Record, edit, and repair sound files with Sony SoundForge.
When you assemble a song in Acid, the loops are seamlessly mixed to create your soundtrack. Doug used Sony Acid to create the background music for the intro and exit of his podcast. As of this writing, Sony Acid Music Studio, which ships with over 3,000 loops, sells for $54.95. You can purchase additional loops for most musical instruments in a wide variety of genres from Sony online at
Chapter 3: Photographer/Portfolio Site
In This Chapter
Knowing what you want
Creating a navigation menu and thumbnail page
Doing preliminary work in Fireworks
Creating the portfolio
Every client has special needs, and photographers are no exception. The old saying that a picture is worth a thousand words has never been truer than when a photographer chooses to use a Web site for promotion. Photographers need to include information about themselves and their services. By far, though, the most important part of a photographer's Web site is the portfolio section. We can share some first-hand insight into this topic because when Doug isn't occupied building Web sites and writing books, he's also a professional photographer. In this chapter, Doug takes the lead and dissects a photographer's Web site â in fact, he dissects the Web site for his own wedding and event photography company, Superb Images, Inc.
Defining Goals for the Site
If a Web site doesn't have a reason for existence, it's just another domain name taking up space on a server. When I decided to turn the photographyskills that I'd spent most of my life learning into a source of income, I realized I needed to have a Web presence. Superb Images is comprised of two talented photographers â including the author of this chapter. Before incorporating Superb Images, we researched the domain name and found that superbimages.net was available. We secured Web site hosting, reserved the domain name, and incorporated the company. This chapter gives you an idea of the thought process that went into creating the site, plus the actual construction of the site. The following is a list of goals I wanted to accomplish with the Web site, including creating
⢠A clean, uncluttered design to showcase galleries of photography that highlight the strengths of the company
⢠A simple, easy-to-understand navigation system
⢠Fast-loading pages
⢠Portfolio pages of thumbnail images that the viewer can click to reveal full-size images
⢠Multiple portfolio pages of similar images
⢠An About page to give viewers information about the company and its photographers
⢠A page that details the service the company offers, including wedding photography
⢠A Contact page
⢠A Links page
Designing the Site
After I defined the goals for the site, I was ready to design the site. I reviewed many sites of local photography companies and bookmarked those that matched my design goals. Then, it was just a matter of relying on my creativity to come up with a Web site that's immediately identifiable as a photographer's Web site â but with my own spin.
Creating the navigation menu in Fireworks
I knew how many buttons I would need for the navigation menu. I wanted a horizontal navigation menu, but the number of buttons exceeded the available space for a clean, horizontal layout. Therefore, I decided to use the Fireworks pop-up menu feature for the subpages in the portfolio section of the site. When I designed the menu in Fireworks, I added the URL in the Link text field in the Property inspector. The basic menu is shown in Figure 3-1.
After laying out the main menu, it was time to add the pop-up menu. My first step was to define the links in the Content tab of the Pop-up Menu Editor. (See Figure 3-2.) Thanks to the flexibility of Fireworks, I was also able to define the URL for each link.
After defining the content of the pop-up menu, I specified the parameters in the Appearance, Advanced, and Position tabs of the Pop-up Menu Editor. I decided to use HTML to generate the pop-up links.
Figure 3-1:
Roll up for the magical mystery menu.
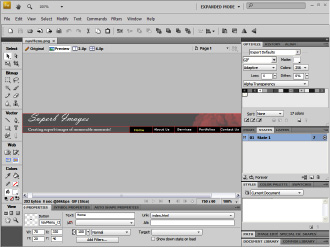
Figure 3-2:
Defining the pop-up menu.
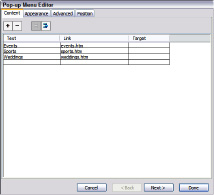
I exported the finished menu from Fireworks as HTML and images. This option creates HTML code for the menu, which neatly houses the buttons in a table. The menu, complete with HTML, can be inserted into another HTML document.
Optimizing images in Fireworks
I'm a photographer who uses Photoshop extensively for image editing, touchup, and so on. Fireworks CS4 is a remarkably versatile application in the hands of an adept designer. Although it doesn't have the image-editing features of Photoshop, Fireworks makes it easy for a Web designer to optimize a folder of images for display in a photographer's portfolio. Prior to optimizing images for a Web portfolio, I use Adobe Bridge to rename images and add other metadata, such as copyright information and keywords. If you're a photographer and want to know more about workflow in Adobe Photoshop CS2, including Adobe Bridge, pick up a copy of
Photoshop CS2 for Digital Photographers Only,
by Ken Milburn and Doug Sahlin (Wiley).
I create uncompressed copies of the original images in the Web site Images folder and rename them to reflect the portfolio in which they'll appear. For example, if I'm renaming images for a portfolio called Events, I end up with a folder of images named Events_1, Events_2, and so on. Or if the images are for a specific event, I'll create a four-character abbreviation of the event. For example, images for a classic car show at Lake Mirror would be renamed LKMR_1, LKMR_2, and so on. I then use the Fireworks Batch Process command to optimize the images in JPEG format and resize them for the Web. (See Figure 3-3.)
When you resize images, make sure you check the Only Scale Documents Currently Larger Than Target Size; otherwise, you're asking Fireworks to increase the size of pixels, which leads to image degradation. For a photographer's portfolio, image quality is an important factor. As a rule, I use a quality value of 60 as the minimum. The size to which you optimize the image depends on the desktop size used by your intended audience. After optimizing the images, you can delete the copies of the originals.
Creating thumbnails in Fireworks
One of the goals of my site was to have fast-loading pages. Therefore, I decided to display thumbnails of the images that a viewer can click to reveal full-size images in another browser window. You can easily resize a folder of images by using the Fireworks Batch Process command. When I process thumbnails in Fireworks, I use the original images and batch process using the Export, Scale and Rename options. I use the same image quality (60) as I do for the full size images. I add a suffix
_th
to the filename so as not to overwrite the original image. (See Figure 3-4.)
Figure 3-3:
Optimize me, Fireworks.
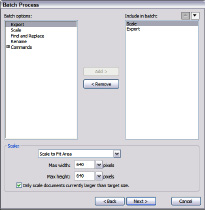
Figure 3-4:
It's so easy when you use batch processing.
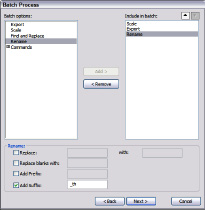
Adding
_th
to the filename tells me the images are thumbnails, which makes it a breeze to insert them (rather than the full-size images) into the gallery page. For more information on using Fireworks to optimize images, refer to
Adobe Creative Suite 3 Web Premium All-in-One For Dummies,
by Damon Dean, Andy Cowitt, Jennifer Smith, and Christopher Smith (Wiley).
Creating the other assets
For this Web page, I incorporate the banner as part of the navigation menu. But there are other times when designing a site that it makes more sense to separate the banner from the menu. In these cases, I use Photoshop to create the site banner and the original image on the home page. I use the Text tool to create the banner text, using a legible font like Adobe Garamond. I often use the Character panel to format the text with the small caps option.
I also created a slideshow in Flash CS4 for the home page. I debated long and hard whether to include background music. I did decide against including background music for the main photography site, but I might include it for a separate wedding site, which is still under construction while this chapter is being written. The slideshow was published as a Flash SWF file without HTML. I used Dreamweaver to insert the file into the home page.
 If you're not proficient in Flash, there are lots of Dreamweaver plug-ins you can use to create compelling slide shows. DMX Zone makes a plug-in called 3D Image Flow Gallery, that creates a slideshow similar to an iPod cover flow.
Putting it together in Dreamweaver
After creating the assets in Fireworks, Flash, and Photoshop, it was time to put it all together in Dreamweaver. I began by defining the site. With that task out of the way, I was ready to create a template that I could use on all pages.
I used the InsertâImage ObjectsâFireworks HTML command to add the pop-up menu at the top of the page. I followed up by creating an editable region in which I could add text. To finish the template, I added a text menu at the bottom of the template because search engines can't read the links in the Fireworks pop-up menu, which is generated by JavaScript. When finished, I saved the document as a template. For more information on using Dreamweaver CS4 to create a site, refer to Chapters 5 and 6 of Book III.
With template in hand, I could create most of the content for the site. Because I used a template, I didn't have to re-create the navigation menu and other content common to the site. Sweet. I also created a Cascading Style Sheet (CSS) to modify the default styles to suit the site and create new styles. I added the Flash slideshow was added to the HTML document by using Dreamweaver InsertâMediaâSWF command. Because I have a pop-up menu on the home page â which when popped up, displays directly over the Flash slideshow â I added the
wmode
parameter in the Property inspector and set its value to
transparent
. The finished home page as displayed in Firefox is shown in Figure 3-5.