Authors: Betsy Matheson
Tags: #Non-Fiction
DIY Projects for the Self-Sufficient Homeowner: 25 Ways to Build a Self-Reliant Lifestyle (23 page)

CUTTING LIST

Insect Mesh—fiberglass 28-7/8 × 34-3/4"
TOOLS & MATERIALS
1" spade bit
Circular saw
(1) 1 × 8" × 8ft.
(1) 1 × 6" × 8ft.
Eye protection
(2) 1 × 4" × 8ft.
Stapler
1-1/4" deck screws
Drill
Staples
Insect mesh
Window sash
1-1/2" galv. finish nails
Brad nails
How to Build a Solar Dryer
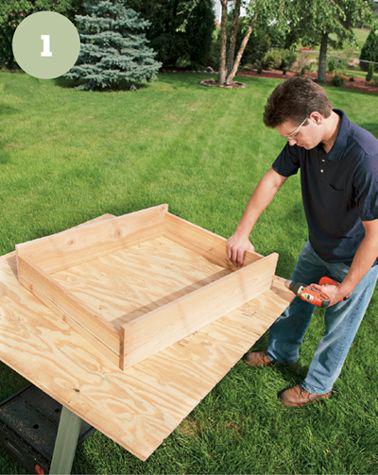
1 Assemble the box.
Attach the wider boards for the frame by driving screws through the faces of the 1 × 8" boards into the ends of the 1 × 6" boards. There will be a difference in height between these pairs of boards so that the window sash can sit flush in the recess created.
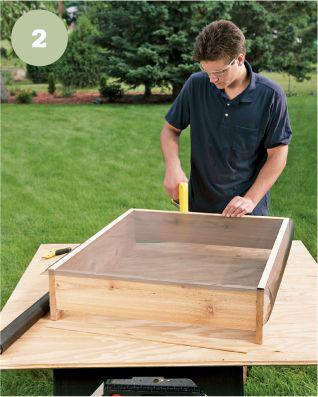
2 Install the mesh.
Staple the screen to the frame. Then tack the retainer strips over the screen to the frame with 3-4 brad nails per side. Trim off the excess mesh.

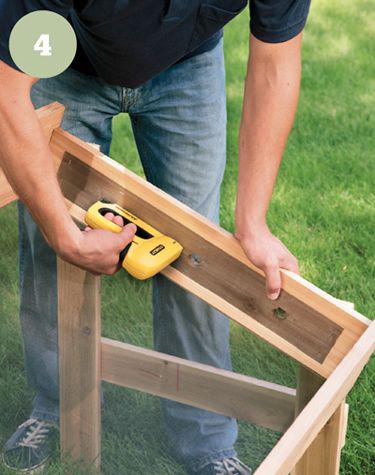
3 Build the stand.
Attach each 24" board to a 30" board (in the back) and a 22" board (in the front) with 1-1/4" deck screws. Then attach the finished posts to the frame with three 1-1/4" deck screws in each post.
4 Drill three 1" holes
for ventilation in each 1 × 6" board equally spaced along the length of the board, leaving 5" of room on each end for the posts. Staple leftover insect mesh behind the ventilation holes on the inside of the frame.
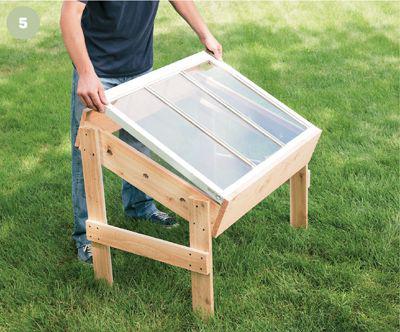
5 Finish the project
by sliding the window sash into place.
 Drying Produce Indoors
Drying vegetables indoors allows you to carefully control the drying conditions and offers more protection from insects and changes in weather. An electric food dehydrator appliance is the simplest choice for indoor drying. If you don’t have a dehydrator, the next best option is in or around your oven, although any hot, dry area will do—possibly even your attic or the area around a heater or cookstove.
If you plan to dry produce in your oven, keep in mind that the process typically takes eight to twelve hours. Preheat your oven and check that it can maintain a temperature of 130 to 145° for at least an hour—some ovens have a difficult time holding low temperatures like this, and going over 150° can be disastrous for drying produce. Wash and prepare the food, then spread food in single layers on baking sheets, making sure the pieces do not touch. Place the sheets directly on the oven racks, leaving at least 4" above and below for air circulation. Also, make sure to leave the oven door slightly ajar to allow moisture to escape. Rearrange the trays and shift food from time to time to ensure even drying.
You may also dry food on your oven’s range by creating a chafing dish. To create a chafing dish on your range, you’ll need two baking trays: The first must be large enough to cover all burners and hold a 3"-deep reservoir of water. The second tray should fit on top of the first. Fill the bottom tray with water and set all burners to low heat. Throughout the process, refill the reservoir periodically to make sure food doesn’t burn, and move/turn food as necessary to ensure even drying. Place a fan nearby to keep the air moving around the room, which will help carry moisture away from the food more quickly.
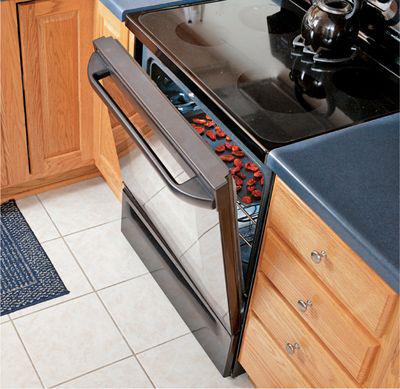
When drying produce
in the oven, leave the door slightly ajar to allow moisture to escape, and carefully monitor temperature to ensure the oven doesn’t heat to over 150°.
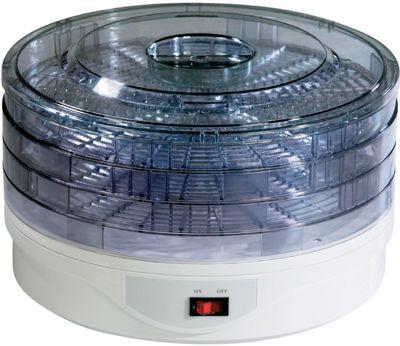
An electric produce dehydrator
can dry large quantities of fruits or vegetables in a sanitary environment. The stackable trays allow you to match the appliance’s drying capacity to your needs each time you use it.
How Long Does Dehydration Take?Drying times vary considerably—from a few hours to many days, depending on the climate, humidity, drying method, and the moisture content of the food you’re dehydrating. Generally, fruit is done drying if it appears leathery and tough and no moisture can be squeezed from it. Vegetables should be so brittle and crisp that they rattle on the tray. To check for completed dehydration, you can also check the food’s weight before and after the process. If the food has lost half its weight, it is two-thirds dry, so you should continue to dry for half the time you’ve already dried.