DIY Projects for the Self-Sufficient Homeowner: 25 Ways to Build a Self-Reliant Lifestyle (21 page)
Authors: Betsy Matheson
Tags: #Non-Fiction

Freezing is the best way to preserve delicate vegetables. It’s also a quick process that is perfectly suited to smaller batches of food. In this process, foods should be blanched to stabilize nutrients and texture, cooled to preserve color, packaged in an airtight container, and frozen as quickly as possible. Frozen food, if properly packaged and contained within a temperature-consistent frozen environment, can be preserved for as long as a year. Of course, the longer you wait to eat your food, the more it will break down, which results in a loss of taste and freshness. Food can also absorb ambient flavors in the freezer environment, negatively affecting the taste.
Freezer Tip
Fill empty food containers, such as old milk jugs, with water and place them in the freezer around your frozen foods. With a freezer full of these homemade “ice packs,” your freezer will stay colder much longer in the event of a power outage and the appliance will work at maximum efficiency, consuming less energy.
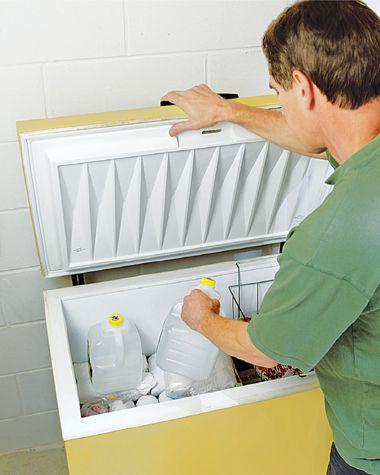
Generally, the colder you keep your freezer, the longer your frozen food will stay tasting fresh. For best results, use a chest freezer instead of the little box above your refrigerator. Although chest freezers are an investment, they maintain colder temperatures more consistently than your refrigerator’s freezer. The ideal temperature for your chest freezer is –5°F, and it should be no warmer than 0°. Even a few degrees above zero will cut the freezer life of your food in half.
 Preservation by Home Canning
Canning is a traditional method for preserving produce. It is not difficult to master, but it’s important to pace yourself. Try not to plan more than one canning project a day to keep the work manageable and enjoyable. Also, make sure you are familiar with how to use your canning equipment safely, and that you have a reliable recipe to reference for each food you plan to can. Every fruit and vegetable has a different acidity and requires slightly different accommodations in the canning process.
To get started with canning, there are two main tools to become familiar with: a water bath canner and a pressure canner. Foods with high acidity, such as fruits (including tomatoes), can be canned in a boiling water bath. Less acidic foods, including most vegetables, and any combination of high- and low-acidity foods must be processed using a pressure canner. Water bath and pressure canners are NOT interchangeable, largely because they reach vastly different temperatures during their processes. Always make sure the canner you use is appropriate for the produce you’re preserving and follow your canning recipe exactly.
Home canning is perfectly safe if all instructions are followed exactly. However, if canning procedures are not followed, harmful bacteria can fester while your produce sits in your pantry waiting to be used. The best known of these bacteria is
clostridium botulinum
, which produces a potent toxin that is odorless, colorless, and fatal to humans in small amounts. Cases of botulism poisoning are rare, but to avoid this toxic substance, it’s important to always follow the home canning recipe and procedures exactly. And if in doubt, throw it out.
Other tools you’ll need include canning jars, measuring cups, a long-handled spoon, a funnel, a jar lifter, and cooking pots. Canning jars typically have two-piece metal lids: The metal band can be reused whereas the disc part of the lid cannot form an adequate seal more than once, and should be discarded after one use. Always inspect jars carefully before beginning: Check for nicks on the rim or cracks anywhere in the jar. Discard or repurpose any imperfect jars as they will not be able to form an adequate seal.
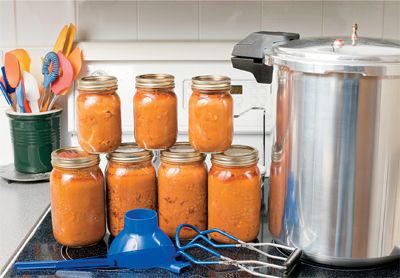
Make sure you understand
how to use your home canning equipment before you get started. Take time to read through the manual that comes with your canner, and make sure you use the right type of home canner for the fruit or vegetable you’re planning to preserve. A pressure canner and sealable canning jars with two-piece lids are shown here.
The Home Canning Process1. Wash and heat the jars.
Immerse jars in simmering water for at least 10 minutes or steam them for 15 minutes. Heat jar lids (just the disc part) in a small saucepan of water for at least 10 minutes. Keep lids hot, removing one at a time as needed.
2. Pack food in the jars.
Different packing methods are used for different types of produce. In cold packing, raw food is placed in a hot jar and then hot liquid is poured over the food to fill the jar. In hot packing, foods are precooked and poured into a hot jar immediately after removing them from the heat source.
3. Watch your headspace.
Headspace is the amount of space between the rim of the jar and the top of the food and is very important to making sure that your canning jars seal correctly. Always follow your recipe’s directions—generally it’s best to leave about 1" of headspace for low-acid foods, 1/2" for acidic foods, and 1/4" for pickles, relishes, jellies, and juices.
4. Remove air bubbles.
Insert a nonmetal spatula or chopstick and agitate the food to remove all air bubbles.
5. Place the lid.
Clean the jar rim, then set a hot disc on the jar rim and screw on the band until you meet the initial point of resistance and no further.
6. Heat.
Place jars on the rack in the water bath or pressure canner and process immediately. Follow the directions for your canner.
7. Cool.
Allow the jars to cool slowly after processing—cooling too quickly can cause breakage. Typically, jars should cool along with the water they’re submerged in, but follow the directions for your canner. Do not tighten the lids unless they are very loose. As the jars cool, you’ll hear them “pop” when they are properly sealed. If the jar does not seal, refrigerate and eat within the next couple days.
8. Clean and label.
After cooling and confirming the jar’s seal, wash the outside of the jar and label with the content and date.
9. Store.
Store in a cool, dark cupboard or pantry. If a jar loses its seal during storage (i.e., if the metal disc does not pop when you remove it), the food inside is not safe to eat. Dump it on the compost bin and try a different jar.
Canned Food Safety Quiz
Ask yourself the following ten questions to determine if your home-canned food is safe to eat:
1. Is the food in the jar covered with liquid and fully packed?
2. Has proper headspace been maintained?
3. Is the food free from moving air bubbles?
4. Does the jar have a tight seal?
5. Is the jar free from seepage and oozing from under the lid?
6. Has the food maintained a uniform color?
7. Is the liquid clear (not cloudy) and free of sediment?
8. Did the jar open with a clear “pop” or “hiss” and without any liquid spurts?
9. After opening, was the food free of any unusual odors?
10. Is the food and underside of the lid free of any cottonlike growths?
If you can answer “yes” to all of the questions, your food is probably safe. That said—if you have even a small suspicion that a jar of food is spoiled—dump it in the compost bin. Never, under any circumstances, taste food from a jar you suspect may have spoiled or lost its seal. Botulism spores have no odor, cannot be seen by our eyes, and can be fatal, even in small doses.