Yoga for a Healthy Lower Back (28 page)
Read Yoga for a Healthy Lower Back Online
Authors: Liz Owen

Sit on the floor in a cross-legged position. If your knees are higher than your hips, sit on a folded blanket. Take your hands behind your hips onto your sacral joints and be sure they are lifting upright. Elongate your torso, and be sure that your heart area is open and broad.
Place your left hand on the floor about two feet away from your left hip. Exhaling, lean your torso to the left until you feel a comfortable stretch along the right side of your trunk. For less stretch, place your hand on a block. For more stretch, place your forearm on the floor, being sure your right hip remains grounded on the floor. Stretch your right arm to the right and turn your palm upward, then reach it up and over your left ear (
fig. 4.4
). Keep your right arm straight so you actively stretch through your entire right side, from your waist all the way to your fingers.

FIG. 4.4
If you can't sit on the floor comfortably, even on a folded blanket, sit in a chair with your feet about two feet apart. Be sure your feet are flat on the floor. Hold the front edge of the seat with your left hand, lean to your left and stretch your right arm overhead and to the left.
This stretch targets the myofascia and ligaments on the side of your trunk and lower back, especially the quadratus lumborum muscle and the iliolumbar ligament, which are often indicated in lower back pain. Stretching away from the “sore” side, if you have one, often provides immediate relief.
Hold the pose for fifteen to twenty seconds, breathing through the right side of your lower back and feeling it elongating and the tight areas opening and releasing, as if the flood gates of a dam have opened and the right side of your back is once again a flowing river of energy from your sacral joint to the crown of your head.
Extended Puppy Pose and Side Puppy Pose
Stretch |
Adho Mukha Svanasana Variations
Extended Puppy Pose
This sequence is a prequel to the famous (or infamous, depending on your experience of it) Downward-Facing Dog Pose, known as the “all-in-one” pose because it stretches and tones so many parts of your body at once, including your entire spine. You'll get ready for Down Dog by practicing its younger sibling, Extended Puppy Pose, so you can warm up and stretch your hips, lower back, and shoulders without undue pressure in your wrists and shoulders.
Start on all fours on your mat. Bring your hands to the very front of your mat (yes, that means
all
the way up there!) and walk your feet back to the very back of your mat; curl your toes under. Pad your knees for comfort if needed. Stretch your arms actively, and, keeping your elbows lifted off the floor, stretch your hips backward, away from your shoulders. Lift your sit bones up (
fig. 4.5
). Your hips should be high in the air rather than descending down toward your feet. Remember, this is not Child's Poseâyour pose should feel active in the arms, lower back, shoulders, and sit bones.
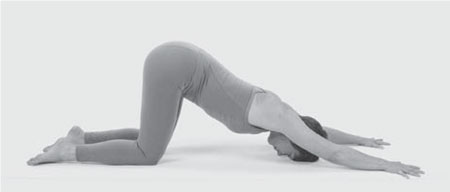
FIG. 4.5
Looking forward, move your chest down toward the floor. Now let your forehead rest onto your mat; if it doesn't reach, place it on a block or folded blanket. Breathe through your entire spine and feel a stretch all the way from your lower back up to your shoulders. Visualize your spine lengthening. You can practice Ocean Breath to help deepen the stretch as you inhale and calm your mind as you exhale. Hold Extended Puppy Pose for fifteen to twenty seconds, enjoying the length that comes into your lower back, and the quiet that comes into your mind.
Side Puppy Pose
Start in Extended Puppy Pose. On an inhalation lift your head and shoulders about one foot from the floor and walk your arms over to your right, bringing both arms past your right leg. On an exhalation descend your chest and head down, and also draw your tailbone toward the floor so your hips descend toward your heels. This should feel different from the hip position in Extended Puppy Pose; now you should feel a gentle convex curve in the left side of your back. Keep your arms straight as you reach your arms as far away from your trunk as is comfortable to your left side.
Breathe into your entire left side, starting at your sacral joint, up into your lower back, and through your middle and upper back. Hold the pose for fifteen to twenty seconds, feeling space and length all along left side. On an inhalation, come back into Extended Puppy Pose, then repeat Side Puppy Pose to the opposite side.
A Note About Downward-Facing Dog Pose
Now that you've warmed up your hips and trunk in Extended Puppy Pose, you are ready to explore Downward-Facing Dog. I mentioned before that it's called the “all-in-one” pose. That's because Down Dog, as it is often affectionately called, stretches the entire back side of your body: it brings flexibility into your hips, it tones your legs, and it stretches and opens your entire spine and shoulder girdle. At the same time, it actually rests your heart because when your hips are higher than your heart, the flow of blood from hips to heart moves more easily with the help of gravity. It's one of the
best poses you can practice for the health of your whole body, and it's especially good for your lower back.
Yet what I love just as much as the physical stretch in Down Dog is the quiet feeling it brings into students' minds. I can see it on their faces afterward; it's as if a switch to the chatter in their brains has been turned off, and they can draw their awareness deeply inside, letting go of thoughts and distractions for a few quiet moments. This change may be caused by the head's downward position, which stimulates the vagus nerve, eliciting the relaxation response of the parasympathetic nervous system.
13
(See
chapter 5
for more on the vagus nerve and the parasympathetic nervous system.)
Your hips and sacrum are the fulcrum point where all the energy of your body converges in Down Dog. Physically speaking, everything lifts up to this point. You stretch up from your wrists, arms, and shoulders, all the way through your spinal muscles into your sacrum. At the same time, you ground your feet and lift strongly through your legs up into your hips. Energetically speaking, the energy that converges in your hips and sacrum flows back down through your upper and lower bodies, nourishing your musculoskeletal system and internal organs. When I visualize a body in Downward-Facing Dog, I visualize the hips and sacrum as a radiant sphere of energy from which rays of light cascade all through the body to the hands and feet.
First you'll try Down Dog as it is classically practiced. Just in case you don't feel some of the benefits of the pose or if there is too much pressure in your wrists or shoulders, I'll also offer some modifications. Somewhere in this mix, perhaps your mind can find a few moments of peace and quiet.
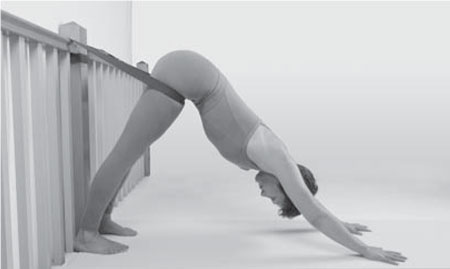
Downward-Facing Dog Pose
Stretch | Adho Mukha Svanasana
Come onto all fours on your mat. Place your hands slightly forward of your shoulders and place your knees slightly back from your hips. Spread your hands open and feel all your fingers and both palms grounded into the earth. Take a deep inhalation, visualizing your body fill with prana, and with an exhalation, lift your knees off the floor and take your hips up as high as you possibly can. Stretch up from your wrists into your shoulders, through your trunk, and into your hips. Stretch your legs completely, pressing your thighs away from your trunk and reaching your heels toward the floor (
fig. 4.6
). Take deep breaths and use the power of your inhalations to lift up through your body. I often tell students, “You can't lift your hips too high in Down Dog!” But in this chapter on the lumbar spine, I want to add a caution: don't raise your hips by overarching your lower back. Your lower back should elongate as much as possible, flowing evenly and smoothly up from your middle back into your hips.
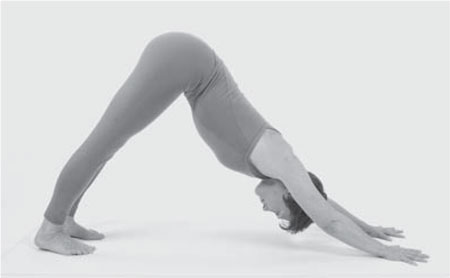
FIG. 4.6
You can play with your legs in Down Dog to create more length in your spine. This is especially helpful if your heels don't reach all the way to the floor in the pose. Try bending one knee and pressing the opposite hip back, elongating that side of your trunk as much as you can. Then change sides, bending the other knee and stretching your other side. Your spine should feel long and even.
Hold Downward-Facing Dog Pose for fifteen to twenty seconds and then release, coming into Child's Pose to rest.
The more ease and comfort you find in a pose, the more your mind will be able to soften and relax. Try these two variationsâeven if you feel reasonably good in your Down Dog.
Variation 1: Supported Downward-Facing Dog Pose
There are a few ways to support your Downward-Facing Dog Pose. If your shoulders or wrists are uncomfortable with the pressure of the pose, start on all fours and place your hands on blocks. The blocks help you to lift through your shoulders and lengthen your spinal muscles more, alleviating some of the pressure in your wrists and shoulders, and you can get the feeling of your spinal muscles elongating, releasing tension. If your hands slip on the blocks, wrap the edge of a mat up around the blocks.
If your hamstrings and/or hips are very tight, and if placing your hands on blocks didn't relieve pressure in your wrists and shoulders, try Down Dog with your hands on the seat of a chair as shown in figure 4.7. Place a sturdy chair on your mat against a wall. Stand in front of the chair, place
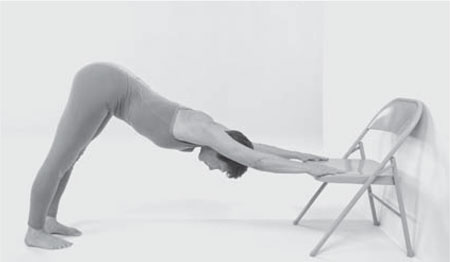
FIG. 4.7