Yoga for a Healthy Lower Back (30 page)
Read Yoga for a Healthy Lower Back Online
Authors: Liz Owen

When you're ready to practice Flying Locust Pose, lie on your front body and place your hands under your thighs, palms up. Pressing your hips down into your hands so your tailbone is moving toward the floor, raise both legs upward as you inhale, stretching them straight. Bring them down to rest as you exhale; repeat two more times and rest for a few breaths with your forehead on your hands.
Now stretch your arms forward, press your hips and legs strongly down, and lift your arms, shoulders, and head up with an inhalation. Bring them down to rest as you exhale and relax again with your forehead on your hands. If either of these actions is difficult for you, practice them individually until you feel ready to proceed into full Flying Locust Pose. When you can easily lift your legs and arms, you are ready to proceed.
For full Flying Locust Pose, lie stretched straight on your front body, with your arms and legs straight and engaged. Draw your shoulder blades away from your neck. With an inhalation, lift your arms, shoulders, head, and legs (
fig. 4.13
). Look forward, or look down at the floor if your neck feels compressed. Keep your legs straight with your toes pointing straight back. Turn your palms toward each other to ease any pressure in your shoulder joints. Hold the pose for about ten seconds, then release and rest.
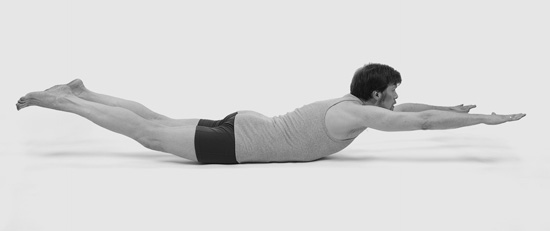
FIG. 4.13
Flying Locust Pose is a true test of sacral and lower back tone, and any time you spend in it or working up to it is “money in the lower-back bank.” When you strengthen and tone the musculature of your back, along with toning your abdominal core, as you will in chapter 5, your body will become self-supporting.
Swimming Locust Pose
Strengthen | Shalabhasana Variation 2
Once you can hold Flying Locust, you can go swimming! Start in full Flying Locust Pose. As you inhale, spread your arms and legs wide apart from each other and bring them back together as you exhale. Repeat these movements a number of timesâaim to continue your flow for six or seven breaths. Besides being a fun movement to coordinate in your body, Swimming Locust Pose is an excellent way to strengthen your hips and lower back.
Note that both Flying Locust and Swimming Locust Poses can be deeply challenging for anyone with a tight and restricted sacrum. If you can't do these poses, or if you can only do them for a moment or two, don't despair or heap judgment on yourself. Remember, you are on a journey toward lower back health, and having goals like Swimming Locust Pose can keep you motivated to continue to balance and strengthen your lower back.
Reclining Bolster Twist
Stretch | Jathara Parivartanasana Variation 1
This supported reclining twist gently massages your sacral joints and lower back, where you have just done a lot of work in Flying and Swimming Locust Poses. You can start slowly, taking your knees down partway at first to make sure your back is comfortable, and increase the twist as you progress. For less stretch, place a block in the “high” position against each side of the bolster to support your thighs.
Lie on your back with your feet flat on the floor and with a bolster by your side. Lift your hips and slide the bolster underneath them. The bolster should completely support your hips; the top edge of the bolster should touch your lower back ribs. Hold the sides of the bolster with your hands. Press your shoulders down toward the floor and lift your front ribs, creating length and space in your abdomen and chest as if you were practicing Bridge Pose. Draw your right knee toward your chest, then your left knee. Your thighs should be perpendicular to the floor, knees pointing straight up. Take your arms straight out to the sides.
Take a long, deep inhalation, feeling your chest expand with the infusion of prana, and as you exhale, take your legs down to the right until your right thigh rests on the bolster or on your block (
fig. 4.14
). With an inhalation lift them back up to center, and exhale them down to your left, resting your left thigh on the bolster. If you feel too much challenge bringing your legs back up, draw your knees toward your armpit first and then lift your legs, or lift your legs one at a time. Mindfully move your legs in sync with the rhythm of your breathâ
Ocean Breath
is excellent for this kind of gentle movement. Visualize your sacral joints lengthening and your lower back releasing tension, and feel that your spinal muscles are massaged by the twisting action of your legs. If you have a misalignment in your sacral joints, pay careful attention to each side; if one side feels achy, do not practice the pose to that side until you've created more stability in the joints.
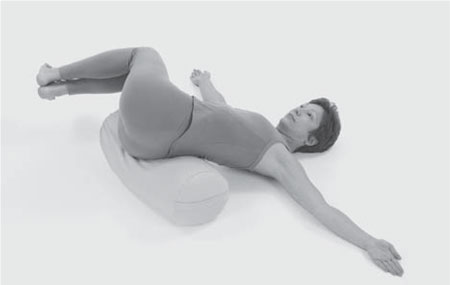
FIG. 4.14
Inverted Cleanser Pose
Rest | Viparita Karani Variations
I'll show two ways to practice Inverted Cleanser Pose. One is a freestanding version that requires a little action through your legs, bringing a refreshing feeling of stimulation and newly circulated prana through your body. The other is a restorative version with your body completely supported by props, sometimes known, for obvious reasons, as Legs-Up-the-Wall Pose. It's good to practice this version when you are ready to completely rest and relax. You can practice both and use them as your body requests. Many students tell me that they prefer the freestanding version, because their legs don't fall asleep.
Inverted Cleanser Pose rests the back in a gentle backbend. It is called
Viparita Karani
in Sanskrit, which is often translated as “reverse process.” When the body is in an upside-down positionâwith the legs and hips above the headâblood flows with gravity from the feet down into the heart. The heart can then rest, because blood is flowing fully and easily into the brain. Gravity also helps lymphatic fluids flow into the endocrine glands in the torso, throat, and head. The gentle back-bending action of the pose massages and stimulates the kidneys and adrenals, which we've learned are crucial components of lower back health.
Hold either variation of Inverted Cleanser Pose for a few minutes at least, and hold Restorative Cleanser for five or ten minutes so your body can reap the benefits of physically relaxing and becoming energetically restored and renewed. Women, during your menstrual cycle, please practice Inverted Cleanser Pose with your hips flat on the floor.
Variation 1: Active Cleanser
Come into this variation right after you've practiced Reclining Bolster Twist. From the twist, bring your legs back to the center and, leaving your bolster under your hips, lift your legs, one at a time, up toward the ceiling, as straight as you can (
fig. 4.15
). Check that your abdomen is long and soft and your chest is open. If your hamstrings are tight or if you get tired, bend your knees and let your feet hang toward the floor while your thighs stay upright for a moment. You can adjust the height under your hips until your back is very comfortable. Many students are surprised that a folded blanket (or even another bolster) on top of the first bolster creates freedom in the chest and abdomen.
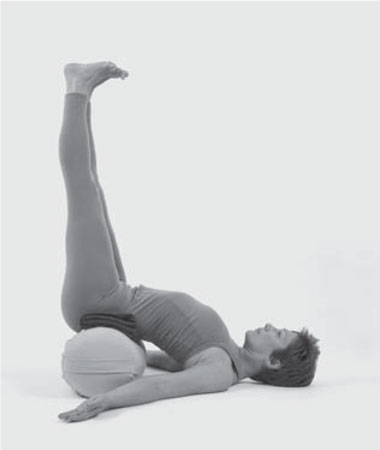
FIG. 4.15
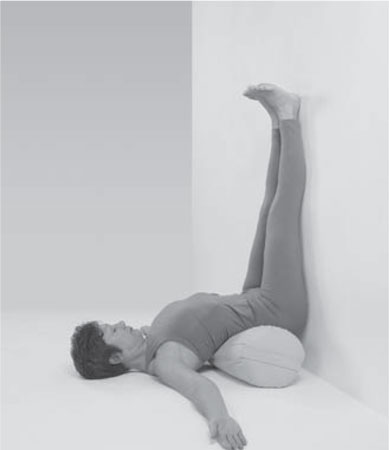
FIG. 4.16
To come out of Active Cleanser, bend your knees one at a time back into your chest, and place your feet on the floor one at a time. Lift your hips up and slide your bolster and/or blankets out. Lie with your back flat on the floor and hug your knees to your chest to gently massage your lower back.
Variation 2: Restorative Cleanser
Lie on your back with your legs vertically up a wall and a bolster, folded blanket, or block nearby. Place your hips and back thighs as close to the wall as possible. Bend your knees and press the soles of your feet into the wall. Lift your hips and place your bolster, blanket, or block horizontally under your hips. Your abdomen should be horizontal and your navel should gently sink down toward your spine (
fig. 4.16
). You can adjust the height under your hips, adding more or taking some away until your back is very comfortable. Press your shoulders down and open your heart to create a slight backbend in your upper chest; maintain the lift in your chest as you relax your shoulders. If you can't rest your thighs on the wall, place a bolster upright behind them. For even more relaxation in your legs, belt your thighs or shins together and let your legs rest into the pressure of the belt.
To come out of Restorative Cleanser, bend your knees and slowly roll over onto one side of your body. Lie flat on the floor and draw your knees to your chest to gently massage your lower back.
Deep Relaxation: Experience Your Body's Softness
Rest | Shavasana Variation 3
This resting position facilitates the release of your lower back while it is in a supported position. It's a good choice for practicing deep relaxation after you've worked to stretch and strengthen your lower back. Remember to ask your mind to stay present, quiet, and focused on your lower back so you notice how your yoga practice has opened, softened, and strengthened it.
Lie down on the floor or on a blanket with your lower legs and heels resting on the seat of a chair. Choose a chair that supports your calves at a height where your thighs feel as though they were pouring easily from the chair into your hips. Your lower back should be comfortable (if it isn't, try placing a rolled towel at any point underneath it) and it should feel quiet and gently elongated. Support your neck and head with a rolled, folded blanket so that it, too, is long and comfortable (
fig. 4.17
). For a soothing feeling in your belly and lower back, lay a folded blanket across your abdomen for gentle but supportive pressure.
Feel your legs, hips, and lower back deeply relaxing. Breathe into your spine. As you inhale, visualize your spine elongating from your hips to the back of your head, and as you exhale, let your body completely rest and be held by the earth. Let your neck rest deeply into its support and visualize all the neck, upper back, and middle back muscles letting go.
Now focus your awareness on where your sacral and lumbar spines meet, at that precious joint between the L5 and S1 vertebrae. Visualize the natural, slightly upward curve of L5 and S1. Visualize the disk between L5 and S1 as soft and spongy, filled with resiliency. As you slowly and mindfully inhale, mentally travel up through each lumbar vertebra from L5 to L1, visualizing each disk with the same qualities; soft, spongy, and elastic. Each time you slowly and mindfully exhale, visualize all the muscles around your lower back draping down and resting along the floor. Let your lower back breathe and relax.