125 Physics Projects for the Evil Genius (63 page)
Read 125 Physics Projects for the Evil Genius Online
Authors: Jerry Silver

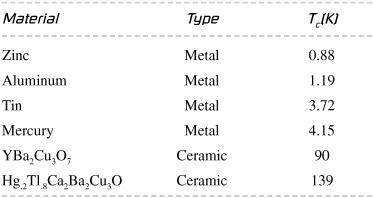
Different materials become superconducting at characteristic temperatures that differ for each material, as shown in the following table:

Notice that all the metals listed must be cooled to below 4.2 K. To accomplish this, it is necessary to use liquid helium, which remains liquid up to that temperature, as shown in the following table. In 1987, a breakthrough was achieved by the discovery that YBa
2
Cu
3
O
7
ceramic became superconducting around 90 K (and below), which can be achieved by immersion in liquid nitrogen. This is far less expensive and easier to work with than liquid helium. Scientists are pursuing materials that can be superconducting at temperatures closer to room temperature, which could open the door to its application in many new areas.

The actual details of how superconductivity works will take us further into quantum mechanics than I think most readers would care to go. The theory known as BCS theory was named after three American physicists: Bardeen, Cooper, and Schrieffer. (Very) basically, the
BCS theory
describes how electrons are able to more easily navigate through the crystal lattice of matter in a manner that is somewhat analogous to a race car encountering less aerodynamic resistance as it closely follows another car in front of it. As the critical temperature is reached, the electrons are able to go through a material by “tunneling” right through an electrical field in its way. As a result, superconductors have zero resistance. If digital electronics were based on superconductors they would function ten times faster than standard semiconductor electronics.
Magnetic fields can pass through and be present in most materials, including superconductors above their critical temperature. However, as a superconducting material is brought
below
its critical temperature, the magnetic field is forced out in a process known as the Meissner effect, which serves as the basis for the effect we saw here. To enable the magnetic field to be pushed out of the superconductor, it becomes necessary for a counter current to flow in the superconductor. With no resistance, electrical currents are induced in the superconducting ceramic, which, in turn, creates a magnetic field that repels against that of the permanent magnet.
Superconductors are being looked at to address some of the following challenges in technology:
- Much of the electrical power transmitted throughout the world’s electrical power grid is dissipated as resistive heat losses. If superconductors could be used for power transmission and generation, some of the losses could be reduced.
- Magnetic resonance imaging (MRI) equipment uses extremely powerful magnets to help create detailed images of the body. Superconductors allow stronger magnets to be built.
- Maglev
trains use superconductors to help produce powerful magnetic fields that raise trains above the track, enormously eliminating friction. - The extremely powerful magnets used to guide beams of subatomic particles in research facilities (such as CERN) use superconductors.
- Superconductors hold the promise of enabling faster processing of digital information in computers.
Some additional experiments include:
Attach a thermocouple to the superconductor to measure the critical temperature. This is the temperature at which the magnet first begins to
levitate about the cooled ceramic disk. The thermocouple should not constrain the magnet from being lifted and should not be immersed in the liquid nitrogen or it will understate the critical temperature.
Basically to do this you will use Ohm’s law (resistance = voltage/current) to measure the resistance of the superconductor as its temperature changes. It is easier to measure these changes as the superconductor warms from the initial immersion into liquid nitrogen until it passes through the critical temperature. Two wires for current and two wires for voltage are attached to the superconductor. This is called a
four-point probe
, which eliminates the effect of contact resistance that would be encountered if both voltage and current were measured using a single set of contacts. The contacts can be formed using very high gauge (thin) silver or copper wire and attaching them to the superconductor using silver paint. A sample with contacts attached can be obtained as part of an experiment kit by superconductor experiment suppliers.
Superconductors
are materials that have no electrical resistance when they are brought below their critical temperature. Superconductors can exert of force on a permanent magnet as a result of the Meissner effect, in which a circulating current is established in response to exclusion of the magnetic field. This current generates a magnetic field that repels the permanent magnet. Superconductors have significant technological applications, including MRIs, maglev trains, subatomic particle research, and ultrafast digital electronics.
Moving electrons produce a magnetic field. Oersted’s experiment. The magnetic field of a current-carrying wire
.
What causes a magnetic field? In 1820, Hans Oersted discovered that electricity flowing in a wire caused a compass needle to be deflected. This established one of the earliest connections between electricity and magnetism. This investigation re-creates some of the things Oersted did.
- DC power supply or battery
- about a meter (a few feet) of insulated wire
- compass, preferably one mounted on a pivot
- ring stand or other support for the wire
- optional: ammeter
- optional: knife switch to complete the circuit. You can activate the circuit simply by completing the final connection to the power supply.
1. Connect one end of the wire to the positive terminal of the power supply (or battery).
2. Route the wire through the support, so a length of about 0.25 m (or about a foot) is running up and down. The current flowing from the positive terminal should flow up through the wire.
3. The other side of the wire should either go to one of the terminals of the switch or be placed ready to attach to the negative terminal. If you are using the knife switch, keep the switch in the open position and attach the other terminal to the negative terminal.
4. Make sure no other magnets are in the immediate vicinity of the apparatus.
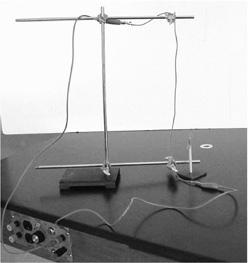
5. Place the compass close to the wire. (The compass will point in the direction of the Earth’s magnetic field. Imagine a circle formed around the wire when viewed from above. To experience the force generated by the magnetic field of the wire, the compass needle should not be at a tangent to that circle, but it should form some angle to the tangent at that point. This is shown in
Figure 107-1
.)

Figure 107-1
Measuring the effect of current on a magnet
.
Expected Results6. Complete the circuit (either by closing the switch or by attaching the wire to the negative terminal). If you are using an adjustable power supply, it may be helpful to put an ammeter in series with the power supply to make sure the current flow doesn’t go much above 1 amp. This can also let you quantify the effect of increasing current on the strength of the generated magnetic field.
With a current flowing through the wire, the compass is deflected. The magnetic field deflects the compass needle in the direction of the tangent of the circle, as shown in
Figure 107-1
.
A magnetic field is produced by moving electric charges.
Measure the effect of increasing the current and moving the compass further from the wire on the response of the compass needle.
An electrical current flowing in a conductor produces a magnetic field.
Faraday’s experiment. Current generated by a magnet
.
Michael Faraday discovered that a moving magnetic field causes an electrical current to flow in a wire. Most of the electricity generated throughout the world today is based upon this historic discovery. Power plants routinely convert mechanical energy into electrical energy. This experiment explores the physical principle that makes this possible.
- bar magnet
- coil of insulated wire—the more coils, the more pronounced the effect. Thin “magnet” wire insulated with clear or colored enamel can work fine.
- galvanometer (a very sensitive ammeter)
- Wrap the insulated wire in a coil around a cylindrical cardboard form. Use the smallest diameter that will enable the bar magnet to pass through. Prewound coils are available.
- Connect the two ends of the wire to the positive and negative terminals of the galvanometer.
- Predict what you think will happen if the magnetic is placed inside the coil. Try it and observe the response on the galvanometer.
- Move the magnet back and forth in the coil. Observe the deflection on the galvanometer.
- Move the magnet back and forth outside the coil and observe the effect. What happens if the coil moves while the magnet is stationary?
- If it is possible to increase or decrease the number of coils, you can evaluate its effect on the amount of current that can be generated.
- Based on your observations, describe how a magnet can produce an electric current.
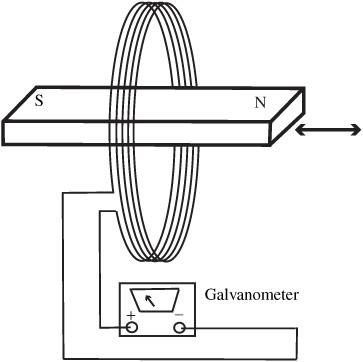
The apparatus is shown in
Figure 108-1
.
A magnet produces a current in a wire only when the magnet is moving. A stationary magnet will not generate a current.
