Help Me! Guide to iPhone 6: Step-by-Step User Guide for the iPhone 6 and iPhone 6 Plus (15 page)
Read Help Me! Guide to iPhone 6: Step-by-Step User Guide for the iPhone 6 and iPhone 6 Plus Online
Authors: Charles Hughes
Tags: #Encyclopedias

You may choose to share your location with a contact or a number of participants in a conversation. To share your location for a specified amount of time:
1. Touch
Details
in the upper right-hand corner of the conversation. The Conversation details appear.
2. Touch
Share My Location
. The Location Sharing menu appears, as shown in
Figure 18
.
3. Touch one of the following options to share your location for the corresponding amount of time:
Share for One Hour
,
Share Until End of Day
, or
Share Indefinitely
. You location is shared. The last option will allow you to share your location until you touch
Stop Sharing My Location
on the Conversation Details screen.
 Figure 18: Location Sharing Menu
The Messaging application provides a convenient way to view all of the pictures, videos, and voice messages attached to a conversation in one neat list. To view all attachments in a conversation, touch
Details
at the top of a conversation. The Conversation details appear, and the list of attachments is shown at the bottom of the screen. To save one of the attachments in the list to a photo album:
1. Touch the attachment that you want to save. The attachment appears in full screen.
2. Touch the center of the screen. The Attachment menu appears.
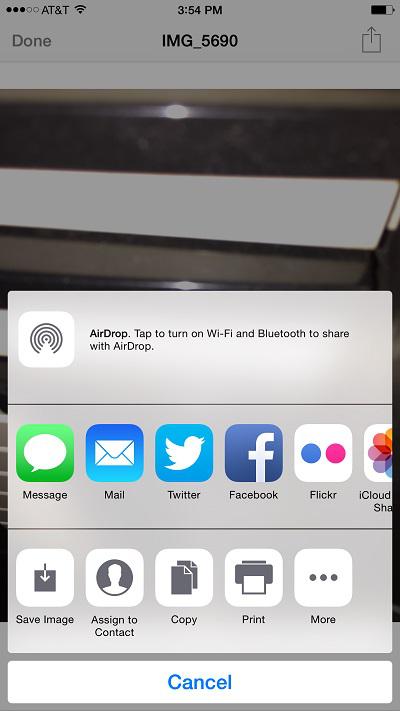
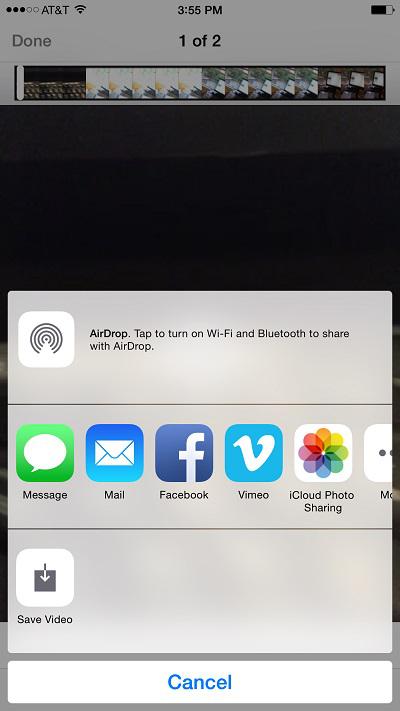
3. Touch the icon at the top of the screen, if it is a photo, or at the bottom of the screen, if it is a video, or if there are two or more attachments. The Save Photo menu appears, as shown in
Figure 19
, or the Save Video menu appears, as shown in
Figure 20
.
4. Touch the icon. The attachment is saved to the Recently Added album on your phone.
 Figure 19: Save Photo Menu
 Figure 20: Save Video Menu
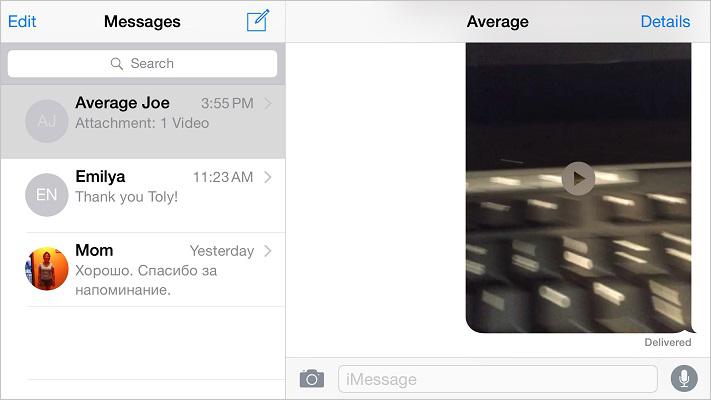
The iPhone 6 and 6 Plus have the ability to display the Messages screen in landscape view. This view allows you to view the list of conversations on the left, and the list of messages of the currently selected conversation on the right. To view the Messages screen in landscape view, you must first set the Display Zoom to 'Standard'. If your phone is already is in 'Standard' zoom, just hold your phone horizontally while it is upright. The Landscape Messages screen appears, as shown in
Figure 21
. Otherwise, refer to
Setting the Display Zoom
to learn how.
 Figure 21: Landscape Messages Screen
________
Go to top
|
Back to Table of Contents
Table of Contents
1. Taking a Picture
2. Capturing a Video
3. Using the Digital Zoom
4. Using the Flash
5. Focusing on a Part of the Screen
6. Browsing Photos
7. Editing a Photo
8. Deleting a Photo
9. Creating a Photo Album
10. Editing a Photo Album
11. Deleting a Photo Album
12. Starting a Slideshow
13. Browsing Photos by Date and Location
14. Searching for a Photo
15. Recording a Time-Lapse Video
16. Recovering Deleted Photos
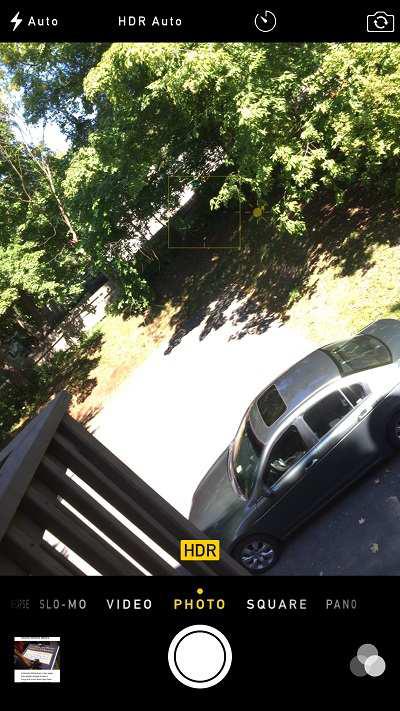
The iPhone 6 has built-in rear-facing and front-facing cameras. To take a picture, touch the icon on the Home screen. The camera turns on, as shown in
Figure 1
. Use the following tips when taking a picture:
- Touch
Square
to take a square picture. Touch
Photo
to activate the default camera.
- Touch the button in the upper right-hand corner of the screen at any time to switch between the cameras.
- Touch the button to take a picture. The picture is captured, and is automatically stored in the 'Recently Added' album. If the surroundings are too dark, refer to
Using the Flash
for help.
Note: Refer to
Tips and Tricks
to learn how to take a picture directly from the Lock screen.
 Figure 1: Camera Turned On