Read iOS Programming: The Big Nerd Ranch Guide, 3/e (Big Nerd Ranch Guides) Online
Authors: Aaron Hillegass,Joe Conway
Tags: #COM051370, #Big Nerd Ranch Guides, #iPhone / iPad Programming
iOS Programming: The Big Nerd Ranch Guide, 3/e (Big Nerd Ranch Guides) (21 page)

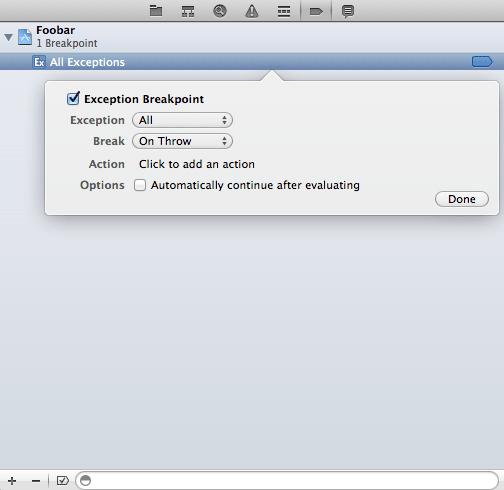
While you can set breakpoints yourself to break on a particular line, it would be nice if the debugger would automatically set a breakpoint on any line that causes your application to crash or that causes an exception to be thrown.
To get the debugger to do this, we need to add a breakpoint for all exceptions. Select the debug navigator. Then, at the bottom of the navigator area, click the
+
icon and select
Add Exception Breakpoint...
. Then, click the
Done
button on the panel that pops up (
Figure 4.13
).
Figure 4.13 Turning on exception breakpoints
Now let’s introduce an exception in
Whereami
. In
WhereamiViewController.m
, delete the entire implementation of
doSomethingWeird
:
{
NSLog(@"Line 1");
NSLog(@"Line 2");
NSLog(@"Line 3");
}
But don’t delete the line in
initWithNibName:bundle:
that sends the
doSomethingWeird
message.
Now
WhereamiViewController
no longer implements
doSomethingWeird
, so when it sends this message to
self
, an unrecognized selector exception will be thrown. Build and run the application.
Immediately after launch, the application will blow up. The debugger will show you where (look for the green execution indicator), and the console will show you why. Notice that the stack trace is a bit longer this time, and the method that caused the exception is not at the top of the stack trace. This will sometimes be the case: your code supplies bad data (like an unrecognized selector) to a method, and then somewhere within that method’s implementation, the application crashes. To find the source of the error, look for the methods you implemented in the stack trace. The culprit may not be at the top, but it will certainly be one of yours.
Also notice that the compiler warned you that the method definition was not found for
doSomethingWeird
(
Figure 4.14
).
Figure 4.14 Unimplemented method warning
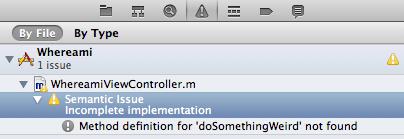
This warning means that you declared a method in the header file but did not implement it. Now remove the declaration of
doSomethingWeird
from
WhereamiViewController.h
.
{
CLLocationManager *locationManager;
}
Build the application again. This time, instead of a warning, you get an error at the point where
doSomethingWeird
is sent to
self
(
Figure 4.15
).
Figure 4.15 Missing method error

Now the compiler is telling you that this method doesn’t exist at all. (If you defined
doSomethingWeird
in
WhereamiViewController.m
above where you called it, the compiler won’t complain. As long as the compiler has seen a declaration or a definition of the method before it is used, the compiler won’t care. However, you should always declare your methods in the class header file so you don’t have to worry about the order of your methods in the implementation file.)
It is important that you can interpret error and warning messages to understand what needs to be fixed. These messages may seem arcane, but it is only because they use terminology that you are still becoming familiar with. A suggestion: Whenever you see a warning or error, write it down somewhere. When you fix it, write down what you did to fix it.
Remove the line of code that sends
doSomethingWeird
to
self
in
WhereamiViewController.m
.
{
self = [super initWithNibName:nibNameOrNil bundle:nibBundleOrNil];
if (self) {
// Create location manager object
locationManager = [[CLLocationManager alloc] init];
Your application should run correctly again. Build and run to make sure before heading to the next chapter.
Change the
CLLocationManager
so that it only updates its
delegate
with a new location if the device has moved more than 50 meters.
To complete this challenge, you’ll need to search in the iOS SDK documentation to find out more about
CLLocationManager
. This is a little ahead of schedule. The next chapter is where you will learn how to use the documentation. In the meantime, here are some some brief instructions: From the
Help
menu in
Xcode
, select the
Documentation and API Reference
item. Then search for
CLLocationManager
.
Using delegation, retrieve the heading information from the
CLLocationManager
and print it to the console. (Hint: You need to implement at least one more delegate method and send another message to the location manager; you must also have a device that has a compass on it. Try searching the documentation for both
CLLocationManager
and
CLLocationManagerDelegate
.)
Building an application in
Xcode
takes several steps. We call these steps
build phases
, and you saw them earlier in this chapter when you added the Core Location framework to the
Whereami
target (
Figure 4.2
). Here is what each build phase does:
Compile Sources
Link Binary With LibrariesThis build phase contains the source code files that are compiled when this target is built. By default, any time you add a source code file to a project, it is added to this build phase.
Copy Bundle ResourcesAfter your source code has been compiled, it is linked with the frameworks (libraries). This allows your code to use classes from these frameworks.
After your code is compiled and linked, an executable is created and placed inside an application bundle, which is really just a folder. Then the resources listed in this phase are added to the bundle alongside the executable. These resources are the data files that your application uses at runtime, like XIB files and any images or sounds that are part of the application. By default, when you add a file to a project that is not source code, it is added to this build phase.
We usually see errors during the
Compile Sources
phase, but sometimes we get errors during the
Link Binary With Libraries
phase. Errors generated during these phases are easier to diagnose and correct if you understand them in more detail.
The
Compile Sources
build phase can be broken into two steps: preprocessing and compiling. The goal of the preprocessing phase is to create an
intermediate file
for each implementation file (
.m
). The intermediate file is still Objective-C code like the implementation file, but, as we will see, the intermediate file can get very large.
To create an intermediate file, the preprocessor resolves all the preprocessor directives in the implementation file. Preprocessor directives are statements prefixed with the pound symbol (#), like
#import
. The resolution of a
#import
statement replaces the import statement with the contents of the imported file. (You can view the contents of an imported file by Command-clicking the import statement.)
For example, consider
WhereamiViewController.m
, which imports
WhereamiViewController.h
. The intermediate file created for
WhereamiViewController.m
contains all the code from
WhereamiViewController.h
and
WhereamiViewController.m
. But, it doesn’t stop there.
WhereamiViewController.h
imports two files,
UIKit.h
and
CoreLocation.h
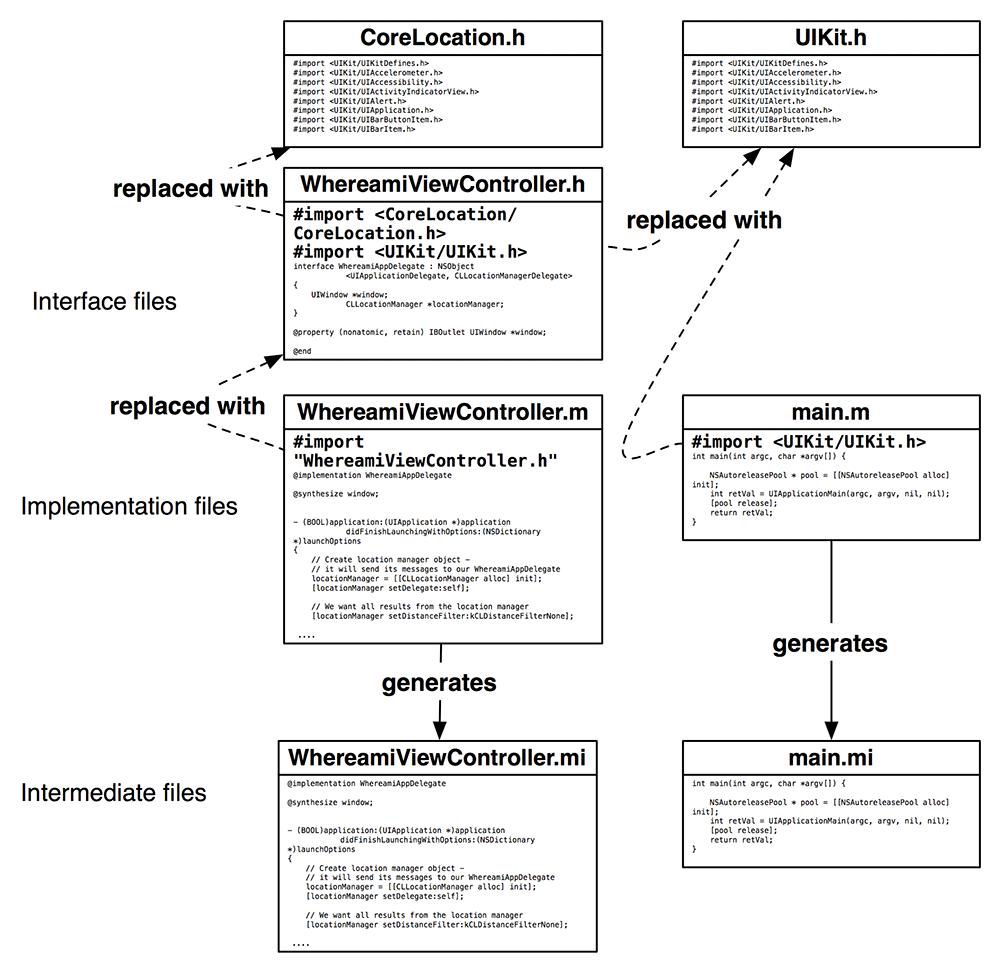
. These two files import more header files, which import more header files, and so on. The intermediate file for
WhereamiViewController.m
is all of the code in all of these files (
Figure 4.16
).
Figure 4.16 Preprocessor creates intermediate files
Once the preprocessor has finished, the generated intermediate files are compiled. Compiling an intermediate file takes the Objective-C code and turns it into machine code. This machine code is stored in an
object file
, one for each intermediate file.
The compiling phase – the transition to machine code – is where we see most of our errors as programmers. When the compiler doesn’t understand our code, it generates an error. We call errors generated during this phase
compile-time errors
or
syntax errors
. Compile-time errors are typically misplaced semicolons, unbalanced square brackets ([]) or curly ones ({}), spelling or capitalization errors.
These types of errors also occur when you use a class that hasn’t been declared. To see an example of a compile-time error, comment out the following line in
WhereamiViewController.h
:
#import
Build the application again, and the compile phase will fail. To see the problem up close, click the icon to open the issue navigator or hit Command-4. This navigator shows you any errors or warnings in your code (
Figure 4.17
). You can click on an individual error to see the line of code that generated the error.
Figure 4.17 Build results with compile-time error
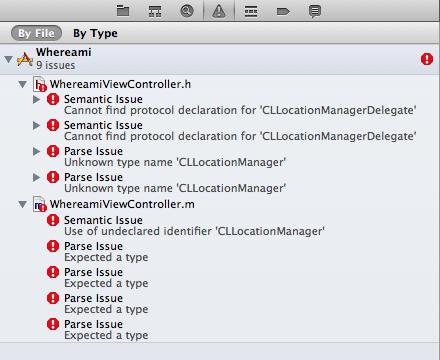
Before you removed the import statement, the intermediate file created from
WhereamiViewController.m
contained the code from
CoreLocation.h
, which contained the interface declaration for
CLLocationManager
and the protocol declaration for
CLLocationManagerDelegate
. Without the import statement, these files do not become part of the generated intermediate file, and the compiler has no idea what to do with these lines of code. Note that the compiler can only read one intermediate file at a time, so even though the class and protocol are in other intermediate files, the compiler still generates an error when they are not declared for
WhereamiViewController.m
.
Uncomment the import statement. You should be able to build again with no errors.
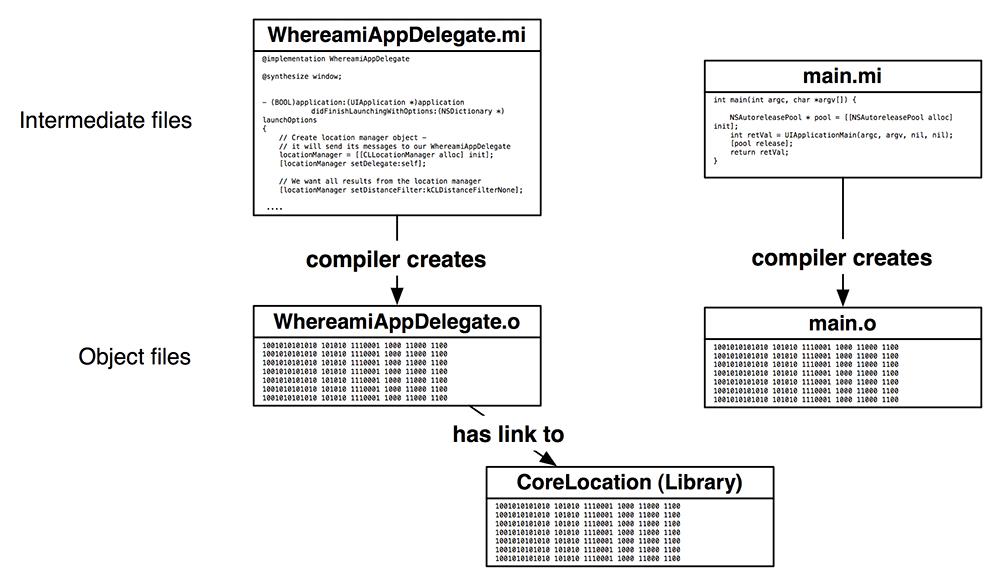
An object file contains the machine code for the methods implemented in the implementation file. However, within an implementation file, you use code from other implementation files. For example,
WhereamiViewController.m
uses the
startUpdatingLocation
method, and the machine code for that method is in the object file generated from
CLLocationManager.m
.
Instead of copying the code for this method into the object file for
WhereamiViewController.m
, the compiler leaves a link to the object file for
CLLocationManager.m
. The
Link Binary With Libraries
phase is where these links are resolved. For short, we just call it the
linking phase.
Recall earlier in the chapter that you
linked
the Core Location framework to your target. A framework is a collection of classes, and a class is defined by two files: a header file and an implementation file. A framework, however, has pre-compiled its implementation files and shoved the resulting object files into one or more
library
files. (That’s why in Objective-C you can’t see the implementation files in a framework – they are already machine code.) Where you used code from the classes in the Core Location framework in your own classes, the compiler put a link in your object files to the Core Location library (
Figure 4.18
).
Figure 4.18 Compiler creates object files; linker resolves links
If a link cannot be resolved (because the object file that contains the code cannot be found or because the object file doesn’t contain the referenced code), you get a
linker error
. Linker errors are more difficult for new developers to understand because they use unfamiliar terms and because there isn’t one line of code that generated the error. So let’s cause a linker error just for practice. Select
CoreLocation.framework
from the project navigator and hit the Delete key. On the window that appears, choose
Remove Reference Only
. Build the application again, and you will see new errors (
Figure 4.19
).
Figure 4.19 Build results with linker error

You can select an error in the issue navigator to see a more detailed description of what is going on. (You can also go to the log navigator and select the most recent
Build Whereami
item and see the same information.) Notice that the errors generated are underneath the item named
Link
. When you see linker errors, it is typically because you did not add the appropriate framework to your target. Add the
CoreLocation.framework
file back to the target in the
Link Binary With Libraries
build phase and build again to confirm that you have fixed the error.