Read iOS Programming: The Big Nerd Ranch Guide, 3/e (Big Nerd Ranch Guides) Online
Authors: Aaron Hillegass,Joe Conway
Tags: #COM051370, #Big Nerd Ranch Guides, #iPhone / iPad Programming
iOS Programming: The Big Nerd Ranch Guide, 3/e (Big Nerd Ranch Guides) (19 page)

The Core Location framework contains the classes that enable applications to determine the device’s geographical location. No matter what type of iOS device is being used, the Core Location code you write does not change.
In addition to adding the Core Location framework to your target, you also have to import the framework’s header file into files that need to know about Core Location classes. Every framework has a header file that imports the header file of every class in that framework. This file is always the name of the framework suffixed with
.h
.
Open
WhereamiViewController.h
and import the Core Location header file at the top. Also, add an instance variable to hold a pointer to an instance of
CLLocationManager
– one of the classes in the Core Location framework.
#import
{
CLLocationManager *locationManager;
}
@end
CLLocationManager
is the class that interfaces with the location hardware of the device. An instance of
CLLocationManager
has a number of properties that specify its behavior. We’re going to set one of them:
desiredAccuracy
.
The
desiredAccuracy
property tells the location manager how accurate the location-finding should be. This is important because there is a tradeoff between the accuracy of the location and the amount of time and battery life required to determine the location. Moreover, the accuracy ultimately depends on the type of device the user has, the availability of cellular towers and satellites, and the availability of known wireless access points.
Open
WhereamiViewController.m
and delete all of the code between
@implementation
and
@end
. The file should now look like this:
@implementation WhereamiViewController
@end
Now in
WhereamiViewController.m
, override
initWithNibName:bundle:
to instantiate a
CLLocationManager
, set the
desiredAccuracy
to request the most accurate location data as often as possible, and then tell the
CLLocationManager
to start working.
{
self = [super initWithNibName:nibNameOrNil bundle:nibBundleOrNil];
if (self) {
// Create location manager object
locationManager = [[CLLocationManager alloc] init];
// And we want it to be as accurate as possible
// regardless of how much time/power it takes
[locationManager setDesiredAccuracy:kCLLocationAccuracyBest];
// Tell our manager to start looking for its location immediately
[locationManager startUpdatingLocation];
}
return self;
}
Once you tell the
CLLocationManager
to start working, it does its thing while the rest of the application continues with other tasks – like accepting user input or updating the interface.
If you build and run this code right now, the location manager will get your current location, but you won’t see this information anywhere. Your application has to retrieve the location from the location manager. You might guess that there is a property on
CLLocationManager
called
currentLocation
that we can access to retrieve the location. It’s a good guess, but there isn’t.
Instead, whenever the location manager finds the current location, it sends the message
locationManager:didUpdateToLocation:fromLocation:
to its
delegate
. What object is the location manager’s delegate? We get to decide.
Every
CLLocationManager
has a
delegate
property, and we can set this property to point to the object that we want to receive the
“
location found
”
message. For
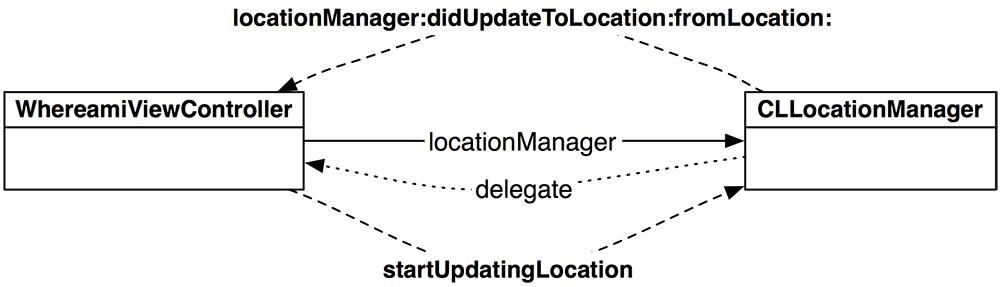
Whereami
, this object is the
WhereamiViewController
(
Figure 4.4
).
Figure 4.4 Whereami object diagram
In
WhereamiViewController.m
, update the
initWithNibName:bundle:
method to set the
delegate
property of the location manager to be the instance of
WhereamiViewController
.
// There will be a warning from this line of code; ignore it for now
[locationManager setDelegate:self];
[locationManager setDesiredAccuracy:kCLLocationAccuracyBest];
Two of the arguments of
locationManager:didUpdateToLocation:fromLocation:
are instances of a class named
CLLocation
. (All of the classes in the Core Location framework are prefixed with
CL
.) When a
CLLocationManager
has enough data to produce a new location, it creates an instance of
CLLocation
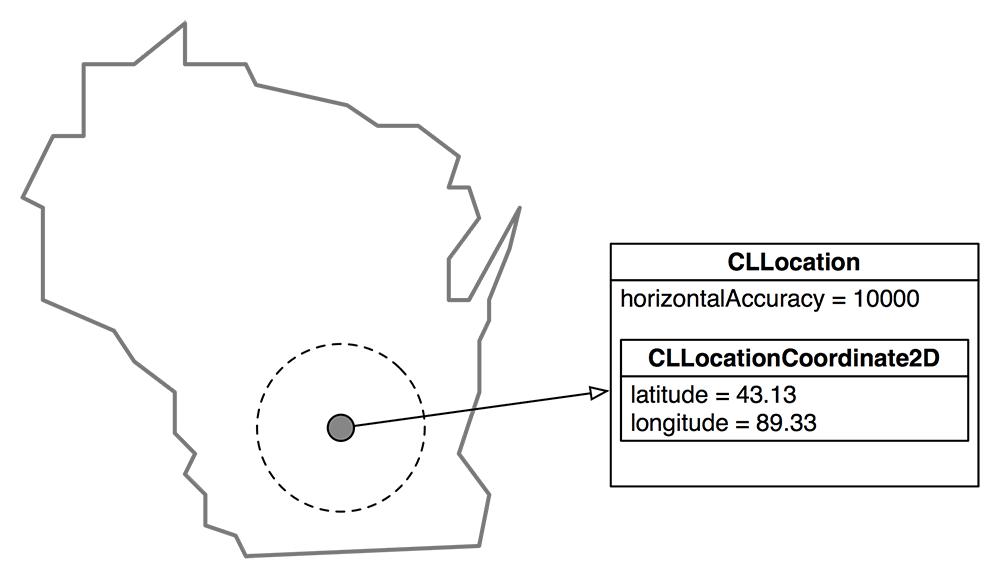
, which contains the latitude and longitude of the device (
Figure 4.5
). It also contains the accuracy of its reading and, depending on the device, the elevation above sea level.
Figure 4.5 A CLLocation object
Because the
CLLocationManager
sends the
locationManager:didUpdateToLocation:fromLocation:
message to its delegate, you must implement this method in
WhereamiViewController.m
. For now, just have this method print the device’s location to the console. (Be very careful that there are no typos or capitalization errors, or the method won’t be called. The selector of the message the location manager sends must exactly match the selector of the method implemented.)
didUpdateToLocation:(CLLocation *)newLocation
fromLocation:(CLLocation *)oldLocation
{
NSLog(@"%@", newLocation);
}
You also need to know if the
CLLocationManager
fails to find its location and why. If it fails,
CLLocationManager
sends a different message to its delegate –
locationManager:didFailWithError:
. In
WhereamiViewController.m
, implement this method.
didFailWithError:(NSError *)error
{
NSLog(@"Could not find location: %@", error);
}
Build and run the application. You can build to the simulator or to a device by selecting the appropriate item from the
Scheme
pop-up button next to the
Run
and
Stop
buttons.
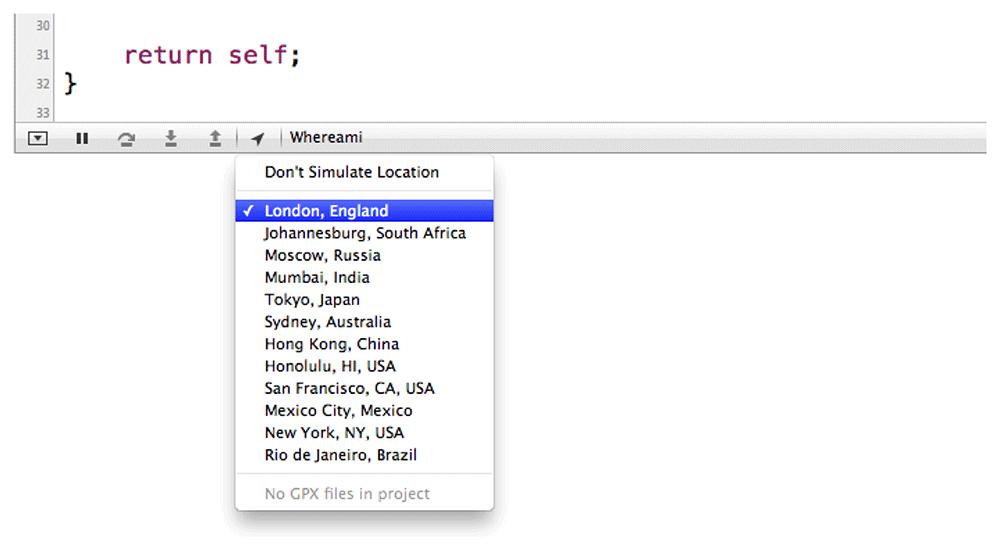
If you are running
Whereami
on the simulator, you’ll have to simulate its location once
Whereami
is running. When you run an application from
Xcode
, a bar appears at the bottom of the editor area with several icons. Click the icon in this bar and then select a location from the drop-down list (
Figure 4.6
).
Figure 4.6 Simulating a location
After giving permission for the application to use location services on the device and waiting a few seconds while the location is found (or simulated), your console will display the description of the location object, which will look something like this:
When you set the
delegate
property of the
CLLocationManager
and implemented the two location-finding methods in
WhereamiViewController
, you were using a design pattern called
delegation
. This is a very common pattern in Cocoa Touch, and many classes have a
delegate
property.
Delegation is an object-oriented approach to
callbacks
. A callback is a function that is supplied in advance of an event and is called every time the event occurs. Some objects need to make a callback for more than one event. For instance, the location manager wants to
“
callback
”
when it finds a new location and when it encounters an error.
However, there is no built-in way for two (or more) callback functions to coordinate and share information. This is the problem addressed by delegation – we supply a single delegate to receive all of the event messages for a particular object. This delegate object can then store, manipulate, act on, and relay the related information as it sees fit.
Let’s compare delegation with another object-oriented approach to callbacks: target-action pairs. You used target-action pairs with the
UIButton
s in your
Quiz
application from
Chapter 1
. In a target-action pair, you have a target object that you send an action message when a particular event occurs (like a button tap). A new target-action pair must be created for each distinct event (like a tap, a double tap, or a long press). With delegation, you set the delegate once and then can send it messages for many different events. The delegate will implement the methods that correspond to the events it wants to hear about (
Figure 4.7
).
Figure 4.7 Target-action vs. delegation

Also, with a target-action pair, the action message can be any message. In delegation, an object can only send its delegate messages from a specific set listed in a
protocol
.
For every object that can have a delegate, there is a corresponding
protocol
that declares the messages that the object can send its delegate. The delegate implements methods from the protocol for events it is interested in. When a class implements methods from a protocol, it is said to
conform to
the protocol.
The protocol for
CLLocationManager
’s delegate looks like this:
// the real declaration of this protocol
// for brevity's sake
@protocol CLLocationManagerDelegate
@optional
- (void)locationManager:(CLLocationManager *)manager
didUpdateToLocation:(CLLocation *)newLocation
fromLocation:(CLLocation *)oldLocation;
- (void)locationManager:(CLLocationManager *)manager
didUpdateHeading:(CLHeading *)newHeading;
- (BOOL)locationManagerShouldDisplayHeadingCalibration:(CLLocationManager *)manager;
- (void)locationManager:(CLLocationManager *)manager
didEnterRegion:(CLRegion *)region;
- (void)locationManager:(CLLocationManager *)manager
didFailWithError:(NSError *)error;
@end
This protocol, like all protocols, is declared with the directive
@protocol
followed by its name,
CLLocationManagerDelegate
. The
NSObject
in angled brackets refers to the
NSObject
protocol and tells us that
CLLocationManagerDelegate
includes all of the methods in the
NSObject
protocol. The methods specific to
CLLocationManagerDelegate
are declared next, and the protocol is closed with an
@end
directive.
Note that a protocol is not a class; it is simply a list of methods. You cannot create instances of a protocol, it cannot have instance variables, and these methods are not implemented anywhere in the protocol. Instead, implementation is left to each class that conforms to the protocol.
We call protocols used for delegation
delegate protocols
, and the naming convention for a delegate protocol is the name of the delegating class plus the word
Delegate
. Not all protocols are delegate protocols, however, and we will see an example of a different kind of protocol in the next chapter.
The protocols we’ve mentioned so far are part of the iOS SDK, but you can also write your own protocols. We’ll do that later in
Chapter 13
and
Chapter 26
.
In the
CLLocationManagerDelegate
protocol, we see two kinds of methods: methods that handle information updates and methods that handle requests for input. For example, the location manager’s delegate implements the
locationManager:didEnterRegion:
method if it wants to hear from the location manager that the device has entered a particular region. This is an information update.
On the other hand,
locationManagerShouldDisplayHeadingCalibration:
is a request for input. A location manager sends its delegate this message to ask if it should display the heading calibration. The method returns a Boolean value, which is the delegate’s answer.
Methods declared in a protocol can be required or optional. By default, protocol methods are required. If a protocol has optional methods, these are preceded by the directive
@optional
. Looking back at the
CLLocationManagerDelegate
protocol, you can see that all of its methods are optional. This is typically true of delegate protocols.
Before sending an optional message, the object first asks its delegate if it is okay to send that message by sending another message,
respondsToSelector:
. Every object implements this method, which checks at runtime whether an object implements a given method. You can turn a method selector into a value that you can pass as an argument with the
@selector()
directive. For example,
CLLocationManager
could implement a method that looks like this:
{
// locationManager:didUpdateToLocation:fromLocation:
// is an optional method, so we check first.
SEL updateMethod = @selector(locationManager:didUpdateToLocation:fromLocation:);
if ([[self delegate] respondsToSelector:updateMethod]) {
// If the method is implemented, then we send the message.
[[self delegate] locationManager:self
didUpdateToLocation:newLocation
fromLocation:oldLocation];
}
}
If a method in a protocol is required, then the message will be sent without checking first. This means that if the delegate does not implement that method, an unrecognized selector exception will be thrown, and the application will crash.
To prevent this from happening, the compiler will insist that a class implement the required methods in a protocol. But, for the compiler to know to check for implementations of a protocol’s required methods, the class must explicitly state that it conforms to a protocol. This is done in the class header file: the protocols that a class conforms to are added to a comma-delimited list inside angled brackets in the interface declaration following the superclass.
In
WhereamiViewController.h
, declare that
WhereamiViewController
conforms to the
CLLocationManagerDelegate
protocol.
Build the application again. Now that you’ve declared that
WhereamiViewController
conforms to the
CLLocationManagerDelegate
protocol, the warning from the line of code where you set the delegate of the
locationManager
disappears. Furthermore, if you want to implement additional methods from the
CLLocationManagerDelegate
protocol in
WhereamiViewController
, those methods will now be auto-completed by
Xcode
.
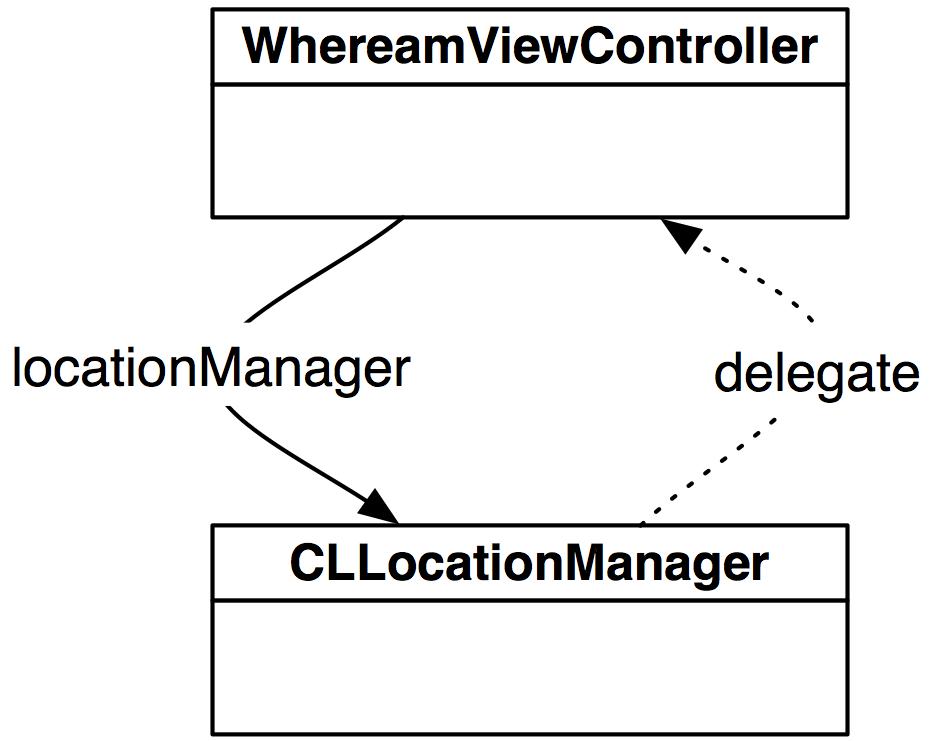
From the perspective of the model-view-controller pattern,
WhereamiViewController
is a controller object. It is typically the case that delegates are controller objects. In addition, a controller object typically owns the objects that are delegating to it. For example,
WhereamiViewController
owns the
CLLocationManager
, and the
CLLocationManager
’s
delegate
is the
WhereamiViewController
.
Figure 4.8 Controllers own objects, objects delegate to controllers
From our discussion in
Chapter 3
, recall that this reciprocal relationship would create a retain cycle if both objects held strong references to each other. To avoid such a cycle, the
CLLocationManager
’s
delegate
property is not a strong reference. But it is not a weak reference, either. To maintain backwards-compatibility with non-ARC versions of iOS,
delegate
properties are
__unsafe_unretained
.
Because
delegate
is unsafe unretained instead of weak, it is not automatically set to
nil
when the object it points to is destroyed. You have to do that yourself in the delegate object’s
dealloc
method.
In
WhereamiViewController.m
, override
dealloc
.
{
// Tell the location manager to stop sending us messages
[locationManager setDelegate:nil];
}
It is a little deceptive on our part to have you implement
dealloc
for
WhereamiViewController
. Why? Because the
WhereamiViewController
will never be destroyed in this application – the
dealloc
method you just implemented will never be called. The
Whereami
application needs the
WhereamiViewController
from beginning to end, so the
WhereamiViewController
always has an owner.
However, many controller objects in your applications will get destroyed, and some of these will be delegates of other objects. As you go through this book, you’ll start to see which controllers in an application get destroyed and which stick around for the life of the application. For now, it is best to be safe, learn the ropes, and implement
dealloc
for
WhereamiViewController
to set the
locationManager
’s
delegate
to
nil
.
In the next chapter, we’ll give
Whereami
a user interface. Right now, let’s take a look at how to work with the debugger that comes with
Xcode
.