Read iOS Programming: The Big Nerd Ranch Guide, 3/e (Big Nerd Ranch Guides) Online
Authors: Aaron Hillegass,Joe Conway
Tags: #COM051370, #Big Nerd Ranch Guides, #iPhone / iPad Programming
iOS Programming: The Big Nerd Ranch Guide, 3/e (Big Nerd Ranch Guides) (18 page)

We should mention an alternative syntax for sending accessor messages to an object called dot syntax:
int value = [item valueInDollars];
int value = item.valueInDollars;
// Following two lines are exactly equivalent
[item setValueInDollars:5];
item.valueInDollars = 5;
We have reservations about Objective-C newcomers using dot syntax. We think it hides the fact that you are actually sending a message and can be confusing. Once you are comfortable with Objective-C, it is totally okay to use dot syntax. But while you are learning, it’s better to use square brackets to make sure you understand what is really going on.
This book will always use square brackets for sending accessor messages.
Before automatic reference counting (ARC) was added to Objective-C, we had
manual reference counting
. With manual reference counting, ownership changes only happened when you sent an explicit message to an object.
[anObject retain]; // anObject gains an owner
This was a bummer: Forgetting to send
release
to an object before setting a pointer to point at something else was a guaranteed memory leak. Sending
release
to an object if you had not previously sent
retain
to the object was a premature deallocation. A lot of time was spent debugging these problems, which could become very complex in large projects.
During the dark days of manual reference counting, Apple was contributing to an open source project known as the Clang static analyzer and integrating it into
Xcode
. You’ll see more about the static analyzer in
Chapter 21
, but the basic gist is that it could analyze code and tell you if you were doing something silly. Two of the silly things it could detect were memory leaks and premature deallocations. Smart programmers would run their code through the static analyzer to detect these problems and then write the necessary code to fix them.
Eventually, the static analyzer got so good that Apple thought,
“
Why not just let the static analyzer insert all of the retain and release messages?
”
Thus, ARC was born. People rejoiced in the streets, and memory management problems became a thing of the past.
(Some people have an irrational fear of letting the compiler do their work for them and say they prefer manual memory management for this reason. If someone says something like that to you, open up one of their
.m
files, go to the
Product
menu, and select
Generate Assembly File
from the
Generate Output
menu item. Tell them if they don’t trust the compiler, then they should be writing the assembly code they see in front of them. )
Another thing programmers had to understand in the days of manual reference counting was the
autorelease pool
. When an object was sent the message
autorelease
, the autorelease pool would take ownership of an object temporarily so that it could be returned from the method that created it without burdening the creator or the receiver with ownership responsibilities. This was crucial for convenience methods that created a new instance of some object and returned it:
{
BNRItem *item = [[[BNRItem alloc] init] autorelease];
return item;
}
Because you had to send the
release
message to an object to relinquish ownership, the caller of this method had to understand its its ownership responsibilities. But it was easy to get confused.
NSString *string = [item itemName]; // Well if I own that, do I own this?
Thus, objects created by methods other than
alloc
and
copy
would be sent
autorelease
before being returned, and the receiver of the object would take ownership as needed or just let it be destroyed after using it within the method in which it was returned.
With ARC, this is done automatically (and sometimes optimized out completely). An autorelease pool is created by the
@autoreleasepool
directive followed by curly brackets. Inside those curly brackets, any newly instantiated object returned from a method that doesn’t have
alloc
or
copy
in its name is placed in that autorelease pool. When the curly bracket closes, any object in the pool loses an owner.
// Get a BNRItem back from a method that created it, method doesn't say alloc/copy
BNRItem *item = [BNRItem someItem];
} // item loses an owner and is destroyed because nothing else took ownership of it
iOS applications automatically create an autorelease pool for you, and you really don’t have to concern yourself with it. But isn’t it nice to know what that
@autoreleasepool
is for?
Delegation and Core Location
In this chapter, we will introduce delegation, a recurring design pattern of Cocoa Touch development, and the Core Location framework, which provides the location-finding features of iOS. In addition, we will see how to use the debugger that
Xcode
provides to find and fix problems in your code.
Also, in this chapter and the next, you will write an application called
Whereami
. This application will find the geographical location of the device, display it on an interactive map, and allow the user to tag the current location with a pin and a title.
From the
File
menu, select
New
and then
New Project...
. On the next window, select
Application
from the
iOS
section and create a
Single View Application
. Configure this project as shown in
Figure 4.1
.
Figure 4.1 Configuring the Whereami project

Let’s look more closely at the what this new project actually is. A
project
is a file that contains a list of references to other files (source code, resources, frameworks, and libraries) as well as a number of settings that lay out the rules for items within the project. Projects end in
.xcodeproj
, as in
Whereami.xcodeproj
.
A project always has at least one target. A
target
uses the files in the project to build a particular product. When you build and run, you build and run the target, not the project. The
product
the target builds is typically an application, although it can be a compiled library or a unit test bundle.
When you create a new project and choose a template,
Xcode
automatically creates a target for you. When you created the
Whereami
project, you selected an iOS application template, so
Xcode
created an iOS application target and named it
Whereami
.
In the project navigator, select the
Whereami
project (the item at the very top). Notice that the
Whereami
project and the
Whereami
target are listed in the editor area. Select the
Whereami
target to see the details and settings that define this target. We won’t discuss all of these now, but we’ll come back to different ones throughout the book as we need them. From the choices at the top of the editor area, select
Build Phases
(
Figure 4.2
). The target’s build phases are a series of steps, and these steps lead, in this case, to an iOS application.
Figure 4.2 Build phases of the Whereami target
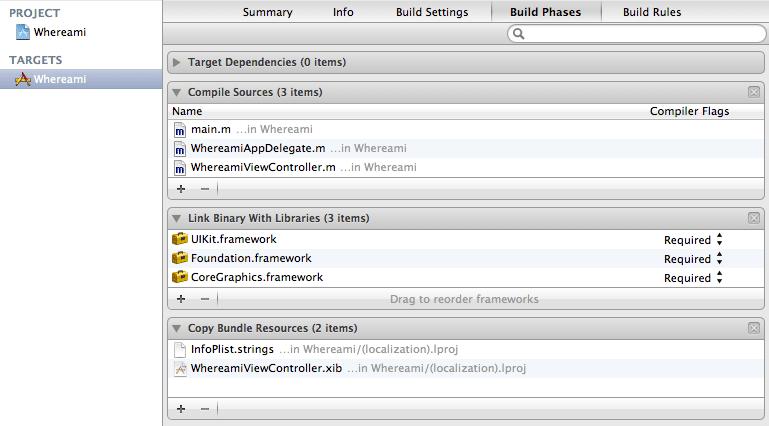
The essential build phases for creating an iOS application are
Compile Sources
,
Link Binary With Libraries
, and
Copy Bundle Resources
. We’ll look at all three in detail at the end of the chapter. For now, let’s focus on
Link Binary With Libraries
and
frameworks
.
A framework is a collection of related classes that you can add to a target. Cocoa Touch is a collection of frameworks. One of the benefits of Cocoa Touch being organized into frameworks is that you only have to add the frameworks that a target needs.
To see what frameworks are already linked to your target, click the disclosure button next to
Link Binary With Libraries
. Right now, there are three: the UIKit framework contains classes that make up the iOS user interface, the Foundation framework includes classes like
NSString
and
NSArray
, and Core Graphics enables the graphics library that we will dig into starting in
Chapter 6
.
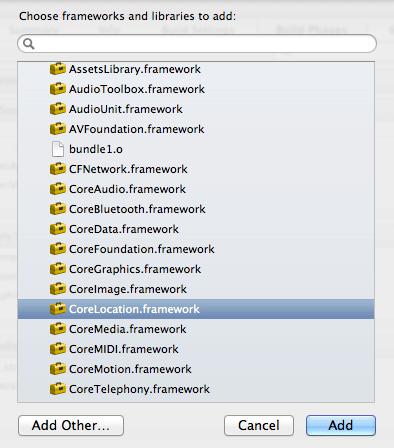
Whereami
also needs the Core Location framework, which includes the classes related to finding a device’s location. To add this framework to your target, click the plus (+) button in the bottom left corner of the
Link Binary With Libraries
section. A sheet that displays the available frameworks will appear (
Figure 4.3
). Select
CoreLocation.framework
from this list and click
Add
.
Figure 4.3 Adding the Core Location framework
CoreLocation.framework
will now appear in the
Link Binary With Libraries
phase and in the project navigator. In the project navigator, you can move the framework to the
Frameworks
group to keep your project tidy, but you don’t have to.
Make sure you remember how to add a framework to a project – you will be doing it often!