Read iOS Programming: The Big Nerd Ranch Guide, 3/e (Big Nerd Ranch Guides) Online
Authors: Aaron Hillegass,Joe Conway
Tags: #COM051370, #Big Nerd Ranch Guides, #iPhone / iPad Programming
iOS Programming: The Big Nerd Ranch Guide, 3/e (Big Nerd Ranch Guides) (22 page)

MapKit and Text Input
In this chapter, you will finish the
Whereami
application using the MapKit framework, the
UITextField
class, and more delegation. We will also dive into the Apple documentation.
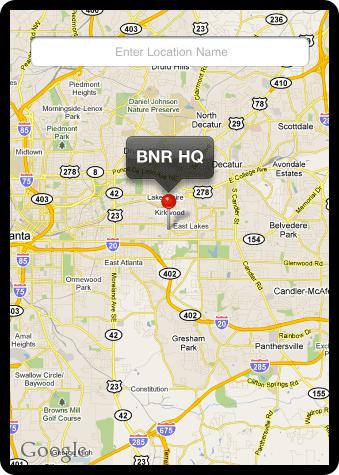
Right now, your
Whereami
application finds the location and prints it to the console. At the end of this chapter, the application will show a map of the current location instead. In addition, the user will have the option to tag and name the current location with a MapKit
annotation
. The default MapKit annotation appears as a red pin on the map (
Figure 5.1
).
Figure 5.1 Completed Whereami application
iOS applications can get very large and use many classes and methods. One way to keep your head wrapped around a project is to draw an
object diagram
. Object diagrams show the major objects in an application and any objects they have as instance variables. (At Big Nerd Ranch, we use a program called
OmniGraffle
to draw our object diagrams.) Most exercises in this book will show you an object diagram to give you the big picture of the application you are developing.
Figure 5.2
shows the object diagram for the complete
Whereami
application.
Figure 5.2 Whereami object diagram
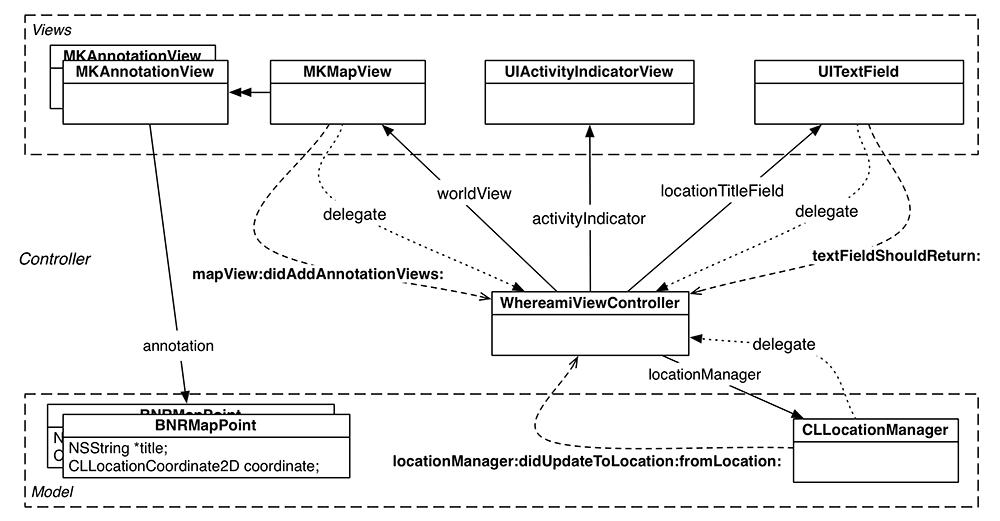
Let’s go through this diagram. At the top are the view objects:
- Several instances of
MKAnnotationView
appear as icons on the
MKMapView
.
- An
MKMapView
displays the map and the labels for the recorded locations.
- A
UIActivityIndicatorView
indicates that the device is working and not stalled.
- A
UITextField
allows the user to input text to label the current location on the map.
The model objects are on the bottom. One is an instance of
CLLocationManager
, which interacts with the device’s hardware to determine the user’s location. The other model objects are instances of a class called
BNRMapPoint
, which you will create later in this chapter.
In the middle of everything is the controller object,
WhereamiViewController
.
WhereamiViewController
is responsible for processing updates and requests from objects and for updating the user interface. It is the delegate for the
MKMapView
, the
UITextField
, and the
CLLocationManager
.
Take a look at the messages these objects send to their delegate, the
WhereamiViewController
.
MKMapView
sends
mapView:didAddAnnotationViews:
when a view (or views) is added.
UITextField
sends
textFieldShouldReturn:
when the user has finished entering text.
CLLocationManager
sends
locationManager:didUpdateToLocation:fromLocation:
to inform
WhereamiViewController
of a location update.
The Core Location framework tells us where we are in the world; the MapKit framework shows us that world. Most of MapKit’s work is done by the class
MKMapView
. Instances of this type display a map, track touches, and display annotations. (They can do more, but that’s all you will need for this application.)
First, add the MapKit framework to your project. (If you’ve forgotten how, flip back to the beginning of
Chapter 4
to refresh your memory.)
You must also import the MapKit header file into files that will use MapKit classes. At the top of
WhereamiViewController.h
, import the MapKit header.
#import
#import
To determine the necessary instance variables for the
WhereamiViewController
, review the object diagram in
Figure 5.2
. You’ll need an
MKMapView
, a
UITextField
, and a
UIActivityIndicatorView
. (We’ll handle the
MKAnnotationView
s in a later section.) Declare these instance variables in
WhereamiViewController.h
.
{
CLLocationManager *locationManager;
IBOutlet MKMapView *worldView;
IBOutlet UIActivityIndicatorView *activityIndicator;
IBOutlet UITextField *locationTitleField;
}
@end
Recall that
IBOutlet
means you will create objects in a XIB file. In the project navigator, select
WhereamiViewController.xib
to open it in the editor area. Then select the
View
object in the outline view to show the
UIView
instance on the canvas, and we can begin building the user interface.
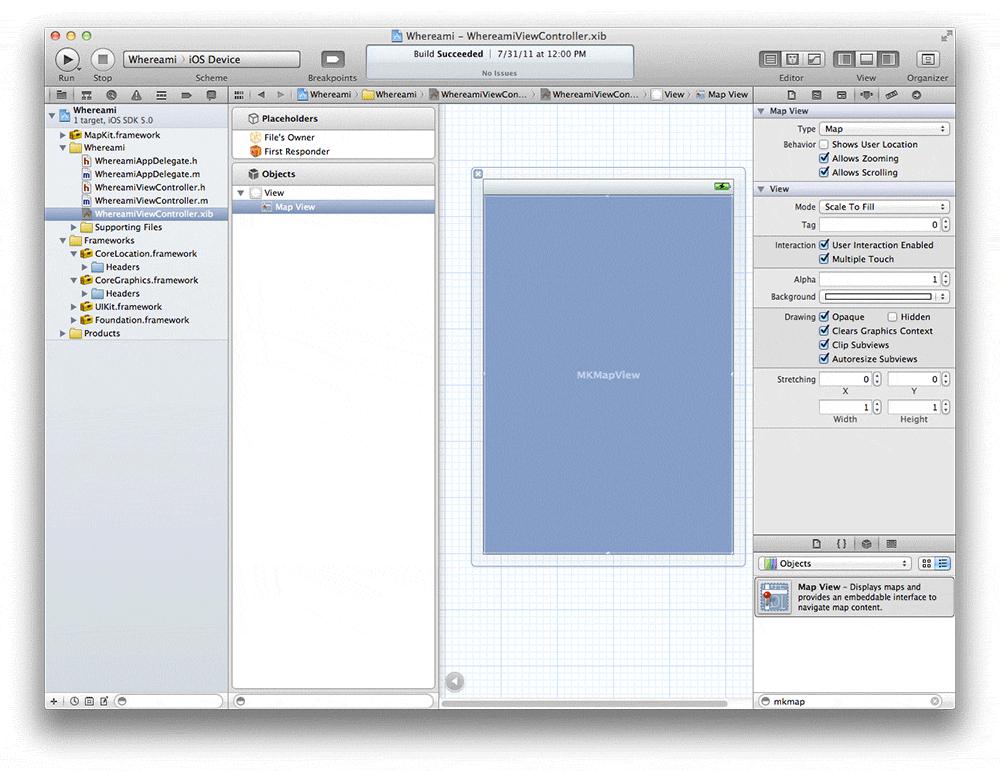
In the object library, use the search box at the bottom of the library pane to find an
MKMapView
(
Figure 5.3
). Then drag the map view onto the
UIView
. (Remember – the object library is at the bottom of the utilities area. To show the utilities area, click the right button in the
View
segmented control in the top right corner of the workspace. The keyboard shortcut is Command-Option-0. Then, select the icon from the library selector.)
Figure 5.3 Dropping MKMapView
Now drag a
UITextField
and a
UIActivityIndicatorView
onto the
MKMapView
. Resize, position, and set their connections, as shown in
Figure 5.4
. To make a connection, first right-click (or Control-click) on the object with the instance variable to bring up its connection panel. Then drag from the circle by the instance variable to the object you want it to point to. The arrows in
Figure 5.4
show the direction to drag when making connections.
Figure 5.4 Whereami XIB layout
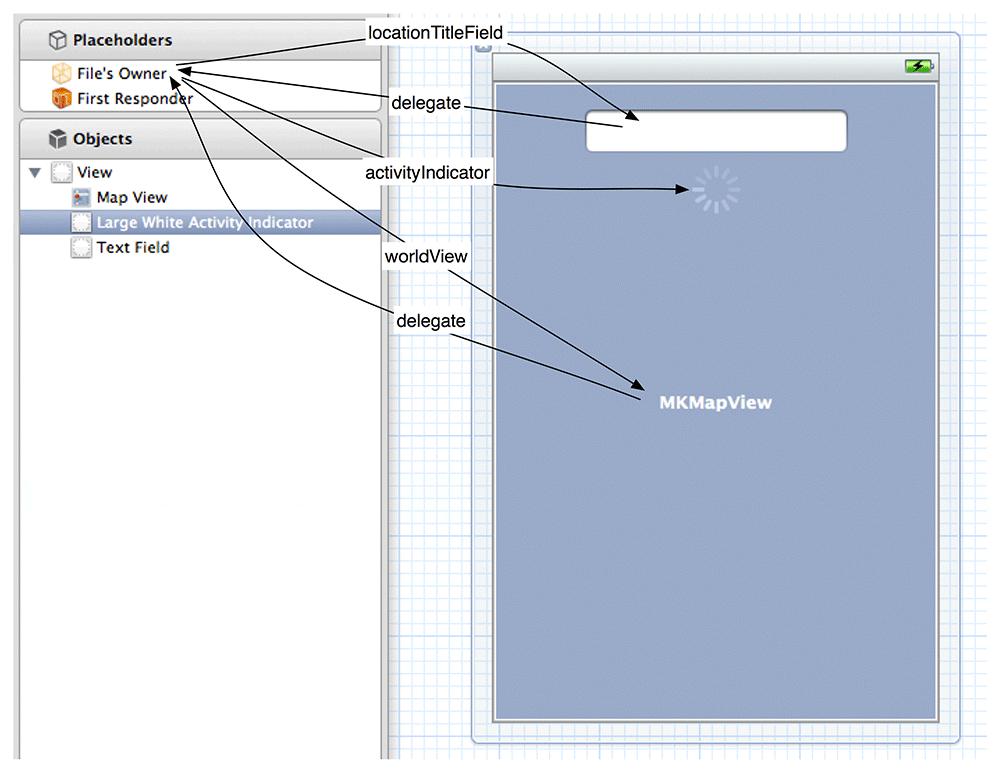
Notice that you made five connections. Three of those connections are from the
File's Owner
to the
UIActivityIndicatorView
,
MKMapView
and
UITextField
. The other two connections are from the
UITextField
and
MKMapView
to the
File's Owner
.
The direction of the connection is the same as the direction in which messages are sent. Therefore, these connections allow the
WhereamiViewController
to send messages to the activity indicator, the map view, and the text field and allow the text field and the map view to send messages back to the
WhereamiViewController
.
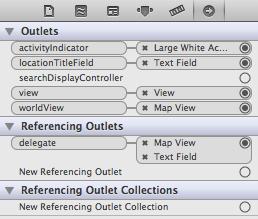
After making the five connections, select the
File's Owner
and check the connections inspector. (Click the icon in the inspector selector.) Your connections should look like
Figure 5.5
. (The
view
connection was established by the template.)
Figure 5.5 Finished connections
Now let’s adjust the properties of the
UITextField
. First, we want the
UITextField
to have helpful placeholder text, like
Enter Location Name
. Next, consider the keyboard. When a
UITextField
is activated, a keyboard appears on the screen. (We’ll see why this happens later in this chapter.) The keyboard’s appearance is determined by a set of the
UITextField
’s properties called
UITextInputTraits
. One of these properties is the type of the keyboard’s return key. For this application, we want the return key to read
Done
.
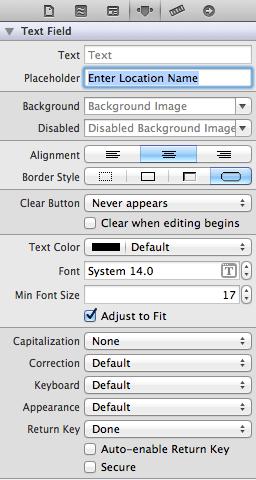
Make these changes in the attributes inspector of the utilities area. Select the
UITextField
and then, from the inspector selector, select the icon to reveal the attributes inspector. Change the values for
Placeholder
and
Return Key
to match what is shown in
Figure 5.6
.
Figure 5.6 UITextField attributes
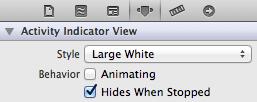
While we’re here, let’s change an attribute for the
UIActivityIndicatorView
. Wouldn’t it be nice if the activity indicator hid itself when it is not spinning? Select the
UIActivityIndicatorView
to reveal its attributes in the attribute inspector. Then check the box labeled
Hides When Stopped
, as shown in
Figure 5.7
.
Figure 5.7 UIActivityIndicator attributes