Read iOS Programming: The Big Nerd Ranch Guide, 3/e (Big Nerd Ranch Guides) Online
Authors: Aaron Hillegass,Joe Conway
Tags: #COM051370, #Big Nerd Ranch Guides, #iPhone / iPad Programming
iOS Programming: The Big Nerd Ranch Guide, 3/e (Big Nerd Ranch Guides) (44 page)

Now that
Homepwner
has a fully functional navigation bar, you can get rid of the header view and the associated code. In
ItemsViewController.m
, delete the following methods.
Also remove the following code from
ItemsViewController.h
.
{
You can also remove the file
HeaderView.xib
from the project navigator.
Build and run again. The old
Edit
and
New
buttons are gone, leaving you with a lovely
UINavigationBar
(
Figure 11.16
).
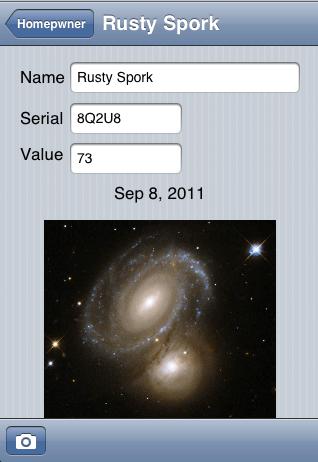
Figure 11.16 Homepwner with navigation bar

The keyboard for the
UITextField
that displays a
BNRItem
’s
valueInDollars
is a QWERTY keyboard. It would be better if it was a number pad. Change the
Keyboard Type
of that
UITextField
to the
Number Pad
. (Hint: you can do this in the XIB file using the attributes inspector.)
After completing the bronze challenge, you may notice that there is no return key on the number pad. Devise a way for the user to dismiss the number pad from the screen.
Right now,
BNRItem
s cannot have their
dateCreated
property changed. Change
BNRItem
so that it can, and then add a button underneath the
dateLabel
in
DetailViewController
with the title
Change Date
. When this button is tapped, push another view controller instance onto the navigation stack. This view controller should have a
UIDatePicker
instance that modifies the
dateCreated
property of the selected
BNRItem
. Also, have it display text that warns the user against insurance fraud.
Camera
In this chapter, you’re going to add photos to the
Homepwner
application. You will present a
UIImagePickerController
so that the user can take and save a picture of each item. The image will then be associated with a
BNRItem
instance, stored in an image store, and viewable in the item’s detail view. Then, when the insurance company demands proof, the user will have a visual record of owning that 70" HDTV.
Figure 12.1 Homepwner with camera addition
Because we want the image to appear in the item’s detail view, our first step is to have the
DetailViewController
get and display an image. An easy way to display an image is to put an instance of
UIImageView
on the screen. Open
Homepwner.xcodeproj
and
DetailViewController.xib
. Then drag an instance of
UIImageView
onto the
view
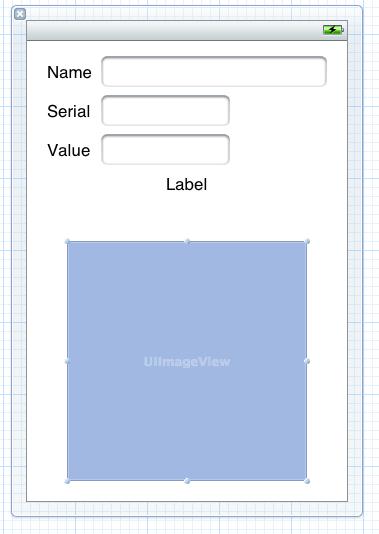
, as shown in
Figure 12.2
.
Figure 12.2 UIImageView on DetailViewController’s view
A
UIImageView
displays an image according to its
contentMode
property. This property determines where to position and how to resize the content within its frame.
UIImageView
’s default value for
contentMode
is
UIViewContentModeScaleToFill
, which will adjust the image to exactly match the bounds of the image view. If you keep the default, the image taken by the camera will be contorted to fit into the square
UIImageView
. You have to change the
contentMode
of the image view so that it resizes the image with the same aspect ratio.
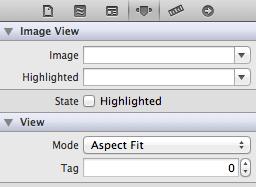
Select the
UIImageView
and open the attributes inspector. Find the
Mode
attribute and change it to
Aspect Fit
, as shown in
Figure 12.3
. This will resize the image to fit within the bounds of the
UIImageView
.
Figure 12.3 Image view attributes
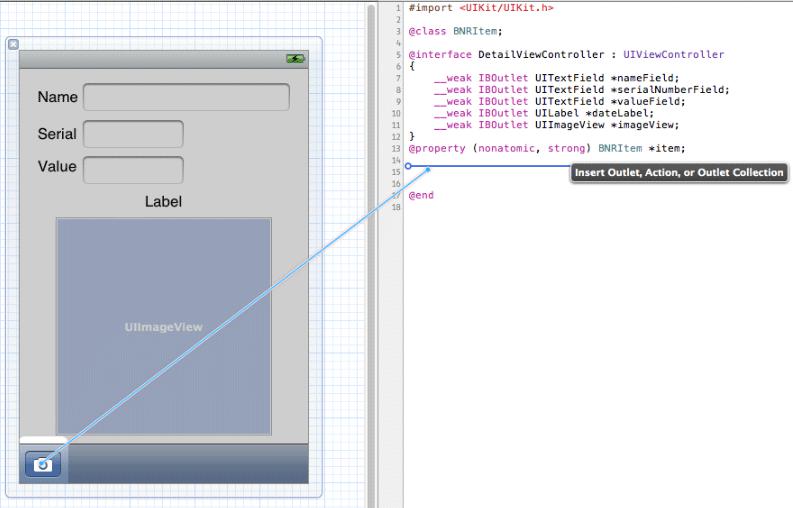
Now, Option-click
DetailViewController.h
in the project navigator to open it in the assistant editor. Control-drag from the
UIImageView
to the instance variable area in
DetailViewController.h
. Name the outlet
imageView
and choose
Weak
as the storage type. Click
Connect
.
DetailViewController
’s instance variable area should now look like this:
{
__weak IBOutlet UITextField *nameField;
__weak IBOutlet UITextField *serialNumberField;
__weak IBOutlet UITextField *valueField;
__weak IBOutlet UILabel *dateLabel;
__weak IBOutlet UIImageView *imageView;
}
Now you need a button to initiate the photo-taking process. It would be nice to put this button on the navigation bar, but we will need the navigation bar for another button later. Instead, we will create an instance of
UIToolbar
and place it at the bottom of
DetailViewController
’s
view
. In
DetailViewController.xib
, drag a
UIToolbar
onto the bottom of the
view
.
A
UIToolbar
works a lot like a
UINavigationBar
– you can add
UIBarButtonItem
s to it. However, where a navigation bar has two slots for bar button items, a toolbar has an array of bar button items. You can place as many
UIBarButtonItem
s in a toolbar as can fit on the screen.
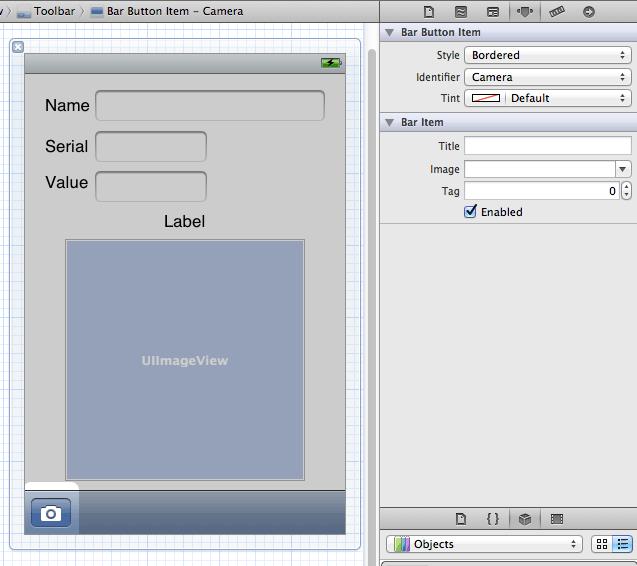
By default, a new instance of
UIToolbar
created in a XIB file comes with one
UIBarButtonItem
. Select this bar button item and open the attribute inspector. Change the
Identifier
to
Camera
, and the item will show a camera icon (
Figure 12.4
).
Figure 12.4 UIToolbar with bar button item
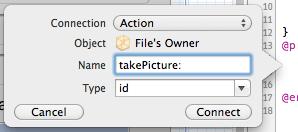
The camera button will need to send a message to the instance of
DetailViewController
when it is tapped. In previous exercises, you connected action methods in two steps: declaring them in the header file and then hooking them up in the XIB file. Just like you did with outlets, you can do both steps at once by opening a source file in the assistant editor and Control-dragging from a XIB file to the file. Option-click
DetailViewController.h
in the project navigator to open it in the assistant editor .
In
DetailViewController.xib
, select the camera button and Control-drag from the button to the method declaration area in
DetailViewController.h
(
Figure 12.5
).
Figure 12.5 Creating and connecting an action method from a XIB
Let go of the mouse, and a window will appear that allows you to specify the type of connection you are creating. From the
Connection
pop-up menu, choose
Action
. Then, name this method
takePicture:
and click
Connect
(
Figure 12.6
).
Figure 12.6 Creating the action
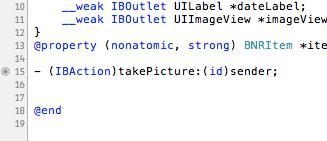
Now the action method is declared in the header file, and the
UIBarButtonItem
instance in the XIB is hooked up to send this message to the
DetailViewController
when tapped. Connecting an action method in this way also automatically adds a stub implementation in
DetailViewController.m
:
{
}
The interface for
DetailViewController
now looks like this:
{
__weak IBOutlet UITextField *nameField;
__weak IBOutlet UITextField *serialNumberField;
__weak IBOutlet UITextField *valueField;
__weak IBOutlet UILabel *dateLabel;
__weak IBOutlet UIImageView *imageView;
}
@property (nonatomic, strong) BNRItem *item;
- (IBAction)takePicture:(id)sender;
@end
If you made any mistakes while making this connection and later realize it (or realize it now), make sure you open
DetailViewController.xib
and disconnect any bad connections. (Look for yellow warning signs in the connections inspector.)
Also, notice that
Xcode
is smart enough to tell you when an action method is connected in the XIB file. See that little circle within a circle in the gutter area next to
takePicture:
’s method name (
Figure 12.7
)? When this circle is filled in, this action method is connected in a XIB file; an empty circle means it still needs connecting.
Figure 12.7 Source file connection status
In the
takePicture:
method, you will instantiate a
UIImagePickerController
and present it on the screen. When creating an instance of
UIImagePickerController
, you must set its
sourceType
property and assign it a delegate.
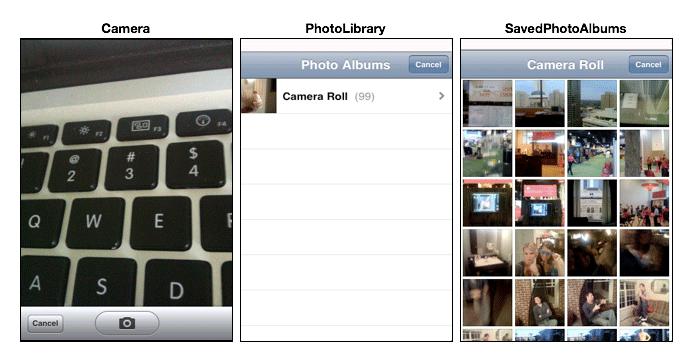
The
sourceType
is a constant that tells the image picker where to get images. It has three possible values:
- UIImagePickerControllerSourceTypeCamera
– The user will take a new picture.
- UIImagePickerControllerSourceTypePhotoLibrary
– The user will be prompted to select an album and then a photo from that album.
- UIImagePickerControllerSourceTypeSavedPhotosAlbum
– The user picks from the most recently taken photos.
Figure 12.8
shows the results of using each constant.
Figure 12.8 UIImagePickerControllerTypes
The first source type,
UIImagePickerControllerSourceTypeCamera
, won’t work on a device that doesn’t have a camera. So before using this type, you have to check for a camera by sending the message
isSourceTypeAvailable:
to the
UIImagePickerController
class. Sending this message to
UIImagePickerController
with one of the source type constants returns a Boolean value for whether the device supports that source type.
In addition to a source type, the
UIImagePickerController
instance needs a delegate to handle requests from its view. When the user taps the
Use Photo
button on the
UIImagePickerController
’s interface, the delegate is sent the message
imagePickerController:didFinishPickingMediaWithInfo:
. (The delegate receives another message –
imagePickerControllerDidCancel:
– if the process was cancelled.)
In
DetailViewController.m
, add the following code to
takePicture:
. (Remember – there’s already a stub for this method, so locate the stub in
DetailViewController.m
and add the following code there.)
{
UIImagePickerController *imagePicker =
[[UIImagePickerController alloc] init];
// If our device has a camera, we want to take a picture, otherwise, we
// just pick from photo library
if ([UIImagePickerController
isSourceTypeAvailable:UIImagePickerControllerSourceTypeCamera]) {
[imagePicker setSourceType:UIImagePickerControllerSourceTypeCamera];
} else {
[imagePicker setSourceType:UIImagePickerControllerSourceTypePhotoLibrary];
}
// This line of code will generate a warning right now, ignore it
[imagePicker setDelegate:self];
}
Once the
UIImagePickerController
has a source type and a delegate, it’s time to put its
view
on the screen. Unlike other
UIViewController
subclasses you’ve used, an instance of
UIImagePickerController
is presented
modally
. When a view controller is
modal
, it takes over the entire screen until it has finished its work.