SM 101: A Realistic Introduction (25 page)
Read SM 101: A Realistic Introduction Online
Authors: Jay Wiseman

I can’t relax unless I’m really tied up.
One important safety consideration is that tying someone in this position may increase the amount of work they must do in order to breathe. In a worst-case situation, this extra work could exhaust them and they could die of respiratory failure. (This is one cause of what’s known as “positional asphyxia.”) Breathing difficulty may become apparent almost immediately, or may develop slowly over time.
The hogtie usually causes no problems, particularly if the dominant closely monitors the submissive. However, it can be dangerous if the submissive is significantly overweight or inflexible, and/or if the surface they are lying on is exceptionally hard or soft. The submissive can usually ease the work of breathing by rolling onto their side for a while, with their dominant’s help if needed.
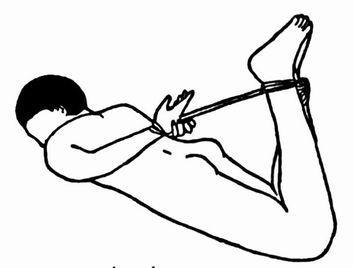
basic hogtie

How far back should you pull the ankles? That depends on how immobilized you want your submissive to be. The farther back you pull the ankles, the more you immobilize the submissive. Asubmissive whose ankles are pulled “all the way back,” for example, cannot do much except lie on their stomach. On the other hand, a submissive whose ankles are only pulled back about halfway (forming a 90-degree angle with the ground) can - with assistance-lie on their back or stomach, roll onto their side, kneel, and sit cross-legged. This is especially true if the ankles were bound using cinch loops.
Beware of sneaky submissives. If the ankles are tied side-by-side, the submissive may be able to defeat the tie by crossing their ankles. This allows their ankles to be brought closer to their fingers. One way to defeat this is to tie the submissive’s knees together, thus preventing them from spreading their knees apart. Another way is to order the submissive to spread their knees apart before you tie their ankles.
The “military” hogtie.
A hogtie variant widely taught in military and martial arts circles involves using one long rope or several short ropes to tie the captive’s hands behind them, then pushing their hands high up on their back and wrapping the rope around their neck to hold their arms in place. The rope is then run back down to their wrists and wrapped a few times. The submissive is then told to bend their feet back up toward their buttocks and the last of the rope ties their ankles together.
The basic argument in favor of this tie is that it is escape-proof because the captive’s struggles to free themselves produce very uncomfortable pressure on their neck. If they struggle too hard, they could choke themselves unconscious. In extreme cases, they could even choke themselves to death. They therefore don’t struggle and lie still. Obviously and unfortunately, this tie can kill if the pressure around the submissive’s neck becomes too great.
Complete immobility really turns me on.
I have been on both ends of this tie several times. After much experience, thought, and debate, I have concluded the risks of this bondage technique outweigh its advantages to the point where it should not be used. (I noticed that the rope running from wrists to ankles seems the source of most neck tightness, and therefore most danger.) It is most certainly not a technique for beginners.
Footnote: Any form of neck bondage is considered too dangerous by most practitioners. About as far as most will go would be a leash attached to a collar and held in the dominant’s hand.
Hogtie alternatives.
Alternative approaches exist that are as secure, and avoid such severe risks.
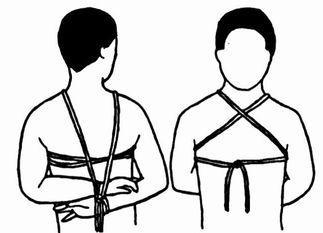
The first alternative works well when using a single 20 to 24 foot rope. Secure the wrists with one end of the rope, then run it under an armpit, up and over the submissive’s collarbone, and across the back of their neck. Then run the rope across the opposite collarbone, back through the opposite armpit, and back to the wrists. Loop the rope once or twice between the wrists, then go to the ankles.
The second alternative approach calls for a 12-foot rope. Have the submissive position their wrists as you order. Starting with the middle of the rope, wrap and cinch-loop their wrists, perhaps finishing in a surgeon’s knot. Then run the two ends under the submissive’s armpits and up across their collarbones to the back of their neck. Knot the ends together there with a surgeon’s knot. Dominants need to be careful that a nimble submissive doesn’t work their fingers up to the knot at the back of their neck, and thus defeat at least that much of the tie. Other than that, this is a secure, safe, and effective tie.
hogtie alternative I

A third, even more secure, approach calls for an 18-foot rope. Use the rope’s middle to tie the submissive’s wrists behind their back. Then run the two ends over the submissive’s back near the base of their neck, cross the ends in front of their neck and run the ends under their armpits. Pull the ends through, cross them over their back, and again run them through the armpits toward the front of the body. Finish the tie by bringing the two ends together in front of the submissive high on their chest. Tie the ends with a surgeon’s knot. (I have never had any reports of uncomfortable or unsafe neckpressure from the use of this tie.) In this position, the submissive can see the knot that holds them but cannot reach it - always a nice touch.
A fourth approach: tie the wrists together using the middle of the rope, then run the two ends around the submissive’s waist. Pull the ends tight enough to make the waist loop narrower than the submissive’s hipbones, and knot in front. This is simple, safe, and secure.
Hogtie leg variations. Sometimes the wrists are tied behind the back and the ankles are drawn up toward the buttocks but not actually tied to the wrists. Such a “split-level” hogtie maintains much of the inescapability while allowing the submissive a bit more flexibility.
hogtie alternative 3, back & front

One way of hogtying the submissive’s legs is to order them to kneel back on their heels with their toes drawn in. Tell them to spread their knees about 45 degrees apart. Wrap a 12-foot length of rope around both the ankle and thigh then, if you wish, cinch-loop it. Repeat this with the other leg.
With their legs tied this way, the submissive can lie on their back, or lie on their stomach, or kneel. The legs can be placed together, or separated. The position allows excellent access to the genitals. Depending on the submissive’s body (and yours), anal or vaginal intercourse may be possible.
An alternative method is to use the middle of a 24-foot length of rope to tie the ankles, then have the submissive kneel with their knees together and wrap the rope around both thighs. Finish by cinch-looping between the legs.
It’s a nice touch to place the knot on the front of the ankles - away from the submissive’s hands. Some nimble submissives can reach their ankles, and this position keeps the knot as far as possible from their fingers.
Footnote: When turning a hogtied submissive over, you may find that it works best to start with their ankles. A little experimentation here will help.
In summary, the hogtie, if properly and safely applied, is a powerful bondage technique with much potential. Just make sure you understand the risks and benefits of each variant and, as always, keep your paramedic scissors handy.
I’d like to do a scene where I tie a loop of sewing thread around his thumbs, attach it to a thumb tack in the wall, and that s the bondage and he’d better not break it.
Usiang a Bar as Bondage Implement
Using a rigid bar, usually made of metal or wood, to reinforce the submissive’s immobility is a measure about halfway between permitting them the relative freedom of only binding them with rope or similar materials and the more complete immobility of binding them to a fixed object such as a chair or bed. Because bars are popular devices for holding ankles or knees apart, they are often called “spreader bars.”
Bars can be of many lengths. I have seen them as short as six inches - usually as an adjunct for elbow bondage. I’ve also seen them as long as ten feet - serving as a “portable rack.” Commercially available bars that can be adjusted in length are popular.
Bars may be flared at the ends to help prevent ropes from slipping off. They also may have eyebolts placed into them or holes drilled through them for ropes to pass through.
Bars need not necessarily be round. I’ve seen them with flat rectangle shapes. (The edges and corners of such bars were sanded smooth as a safety measure.)
A bar (or bars - combinations can be created) should be avoided for first bondage sessions. Again, too much immobility is involved.
How to lash wrists to a bar.
Place the wrist (usually its back) on the bar with the wrist bones extending slightly beyond it. Place the midpoint of a six-foot rope on part of the wrist opposite the bar on the side closest to the shoulder. Run the ends behind the bar and in opposite directions over the wrist. Make sure the ropes pass each other and do not overlap. Pull the ends back around the bar. Cross the rope on the little-finger side over the wrist and bring the ends together on the back of the wrist at the thumb side.
wrist laehed to bar

Cross the ends and run them between the back of the wrist and the bar, creating a cinch-loop. Finish by bringing the two ends back together and knotting them on the back of the hand, away from the fingers. The resultant lashing is secure, very difficult to escape, and eye-pleasing. It can easily be loosened slightly if necessary.
A similar procedure can be used to bind ankles, knees, and elbows to a bar. A very short bar can be placed between the submissive’s elbows. A very long bar - ten feet or so - can be used as a portable rack with the submissive’s feet lashed to one end of it and their wrists lashed toward its other end.
Did you remember to buy more rope?
A bar can also be lashed under a submissive’s hips to prevent them from rotating from side to side. In this position it can also be tied to a submissive man’s genitals.