How to Build a Fire: And Other Handy Things Your Grandfather Knew (17 page)
Read How to Build a Fire: And Other Handy Things Your Grandfather Knew Online
Authors: Erin Bried
Tags: #Crafts & Hobbies, #Personal & Practical Guides, #House & Home, #Reference, #General

Cheer On
• • •
“To be a good fan, you’ve got to know the game. Know the game!”
—A
NGEL
R
ODRIGUEZ
H
OW TO
B
E A
G
OOD
F
AN
Step 1:
Stay positive. Your team needs you, so cheer them on when something goes well and cheer them up when something goes wrong. Heckling from the stands, against the players (on your team or the opposing team), coaches, fans, or, yes, even referees, only poisons the atmosphere and makes the day miserable for everyone, including you. Keep your words positive, and a good day will be had by all.
Step 2:
Be loyal. You’re not a good fan if you’re only in the stands when the team is on top. Underdogs need some love, too, and watching players grow year after year is one of the greatest pleasures in spectator sports. Along those lines, unless it’s absolutely necessary, never leave a game early, no matter what the score.
Step 3:
Mind your manners. Just because you’re at a sporting event doesn’t mean all social graces fall by the wayside. If you find yourself screaming until you’re red in the face, you’re probably yelling too much. Be considerate of those around you, which also means keeping your mouth clean, both physically and verbally. Nobody wants you spitting nachos all over them, and nobody wants to hear you curse a blue streak, especially if there are kids around.
More Handy Tips
- Stay sober. Go ahead and enjoy a few ice-cold ones. Just don’t overdo it, or you may get yourself into trouble.
- Wear your team colors on your back (in the form of a shirt, not body paint, unless, of course, you’re superfit, in college, it’s warm out, and you don’t have a date later).
- Stay in your seat, so the fans behind you can see the game as well as you can. And never run onto the field or court.
- Know when to keep your mouth shut. If you’re at your kid’s game, leave the coaching to the coaches and the refereeing to the refs. Your
only
job is to support and encourage your child.
Make a Splash
• • •
“I was an excellent swimmer, and we had a diving platform out in the bay. We did backflips, double flips, full gainers. We didn’t even know there was such a thing as proper form. You’d do it and that was it. Just don’t do a belly flopper.”
—B
UCK
B
UCHANAN
H
OW TO
D
O A
B
ACKFLIP
Step 1:
Get a crowd. It’s fun doing backflips on your own, but it’s even more fun when you’ve got a bunch of people watching you, especially if some of those people are good-looking.
Step 2:
Walk the plank. Suck in your gut and march yourself out to the end of the diving board. When you get there, turn around so your bum is facing the water. Extend both arms in front of you for balance, and scoot yourself to the very edge, so only the balls of your feet are on the board while your heels are hanging off.
Step 3:
Say a little prayer. Something along the lines of “Please do not let me wipe out in front of all these people” usually works well.
Step 4:
Jump. Gently bounce on the board, feeling light, happy, and hopeful. When you’re ready to go, rise up onto your toes, then bend your knees, bringing your arms to your sides or slightly behind you. Now, in one fluid motion, spring upward and backward, throwing your arms overhead.
Step 5:
Tuck. At the peak of your jump, tuck your knees to your chest, wrapping your arms around them for style points.
Step 6:
Enter the water. Once your body has made one full rotation, extend your legs toward the water, bring your arms to your sides, and lean forward slightly. All of those moves will help you slow your rotation, so you don’t overspin and end up with a bright red back. The smaller the splash, the better your flip.
Step 7:
Come up smiling.
More Handy Tips
- As long as you jump up
and
back, you won’t hit your head on the board. Confidence is your friend when it comes to doing a backflip. - Make sure the water you’re jumping into is deep enough. Duh.
- If you under-rotate and belly flop, you may be tempted to stay underwater for a few extra seconds before surfacing in hopes that your crowd will forget about your failed flip. Fat chance. You know that sucker’s going on YouTube. You might as well embrace it, so come up big and show off your red tummy.
Control Your Balls
• • •
“Don’t knock anybody. They might be bad one day but good the next.”
—A
L
S
ULKA
H
OW TO
P
LAY
B
OCCE
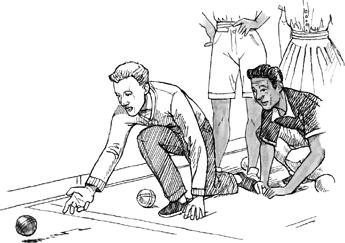
Step 1:
Find a court. Or make one. All you need is a long flat stretch of grass, sand, dirt, or pavement, and a set of balls. Regulation courts are about eighty-seven feet long by thirteen feet wide and edged with wooden boards, but you can use whatever space you’ve got. Draw a line to mark half-court, if there’s not one already.
Step 2:
Choose teams. You’ll need two teams with one, two, or four players on each. Bocce is a game of finesse and strategy, so don’t overlook the wimpy-looking guys or gals. They may be ringers for all you know. Divide the balls by color, accordingly, four to each side.
Step 3:
Throw the pallino, which is the little ball. To decide who gets to do it, flip a coin. The winner gets the toss and the pallino must pass the half-court line and rest twelve inches or more from the edge of the court. If it doesn’t, the pallino goes to the opposing team, which may try again.
Step 4:
Throw the first bocce ball. Any member of the team who originally tossed the pallino, successfully or not, gets the first shot at it. The goal: Get your bocce ball as close as possible to the pallino. Since no other balls have been thrown yet, the first ball is considered “inside,” because it is the closest ball to the pallino. Who cares if it’s by default! Yay, you! At the end of the game, your team will get a point for every inside ball, or every ball you’ve landed closer to the pallino than your opponent.
Step 5:
Hold your breath and allow the other team to throw. They’re going to try to do one of three things: (1) Land their bocce ball closer to the pallino than yours; (2) use their ball to knock yours away; (3) use their ball to knock the pallino away from yours. If they’re successful at any of these, and their ball is closer to the pallino than yours, then play reverts to you. If your ball is still inside, the opposing team continues to throw until they’ve used all their balls. Bottom line: Whichever team is outside continues to throw until they either run out of balls or land inside.
Step 6:
Rack up points. If the inside team has any balls left after the outside team has thrown all of theirs, they must play their balls now. You’ll get a point for each ball you land inside, but don’t get too cocky or you may knock away the pallino or your team’s closest ball and lose the game.
Step 7:
Score the match. After all eight bocce balls have been played, a representative from each team must assess the court. Each team gets one point for every bocce ball it has landed closer to the pallino than their opponents, with a maximum score of four points per round.
Step 8:
Play again, switching sides of the court. The first team to win twelve or fifteen points, your choice, wins the game.
More Handy Tips
- Bocce
rhymes with
splotchy
, not
gross
. - Though all balls must be lobbed or rolled underhand, you may grip them underneath or overtop (to create a backspin).
- Whenever a bocce ball hits the backboard without first hitting any other balls, it’s considered dead and removed from play. The same team should throw again.
- For more information on bocce, visit the United States Bocce Federation at
www.bocce.com
. - Bocce is best played while sipping a Bocce Ball cocktail: Pour 1½ ounces of vodka, ½ ounce of amaretto, and fresh orange juice over ice; shake. Add a splash of club soda and garnish with an orange slice.
8
Dressing
• • •
When you look in the mirror and feel proud, you’ll have the confidence to take on the world
.
Be Dapper
• • •
“It’s sometimes tough to find self-confidence. As far as dressing correctly in public, you’ve got to feel good about yourself. If you feel like you look well, you can fit into the crowds and become an extrovert. If you feel like you look bad, it’s tough to assimilate.”
—B
OB
K
ELLY
H
OW TO
T
IE
F
OUR
T
IE
K
NOTS
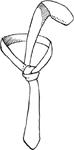
The Windsor
The biggest, most powerful knot (perfect for job interviews or Senate confirmation hearings), it works well on a shirt with a wide collar.
Step 1:
Pop your collar. Standing in front of a mirror, give yourself a wink, be sure nobody just saw you do that, then turn up your collar and drape the tie around your neck with the fat end on your right and the skinny end on your left. Tug the fat end down so it’s a good eighteen inches or so below the skinny end.
Step 2:
Cross the fat end over the skinny end. Then bring it up through the neck loop and drop it down the front. So far, so good.
Step 3:
Swing the fat end to the left, then pass it under the skinny end to the right. Now bring the fat end in front and drop it down through your neck loop. You’ll know you’ve done it right if the skinny end of your tie is now on top and the fat end is underneath and facing the wrong way.
Step 4:
Swing the fat end to the left once more, pass it over the skinny end to the right, and bring it up through the neck loop, tucking the fat end through the resulting triangle-shaped knot. Tighten, and scoot it up to your neck.
Step 5:
Turn your collar down and test your swagger. You’ll need it with that knot.
The Half-Windsor
As the Windsor’s little brother, this knot gets along with every shirt, especially lighter ones, and goes with every occasion.
Step 1:
Pop your collar, and drape the tie around your neck with the fat end on your right and the skinny end on your left. Tug the fat end down so it’s a good twelve to fifteen inches below the skinny end.
Step 2:
Swing the fat end over the skinny end to the left and pass it up through the neck loop, allowing the fat end to drop down in the front.
Step 3:
Swing the fat end to the left, then pass it under the skinny end to the right, back over the skinny end to the left, and up through the neck loop.
Step 4:
Tuck the fat end of your tie through the resulting knot. Tighten it, scoot it up, unpop your collar, point to yourself in the mirror, and make that cheek-sucking sound that horse trainers make when they want their horses to run. You look like a stallion.
The Four-in-Hand
The Four-in-Hand is the skinny jeans of tie knots: It’s super hip, but you’ve got to have the right look to pull it off.
Step 1:
Pop your collar and drape the tie around your neck so the fat end hangs on your right, about ten inches below the skinny end.
Step 2:
Cross the fat end over the skinny end to the left, back under the skinny end to the right, and back over the skinny end to the left.

Step 3:
Pass the fat end up through the neck loop, and carefully tuck it through the resulting knot in the front. Put on your silver kicks and live it up.
The Bow Tie
The perfect knot for a black-tie event, a White House dinner, or a hipster potluck.
Step 1:
Drape the bow tie around your neck with one end hanging about 1½ inches below the other.
Step 2:
Cross the long end over the short end, bring it up through the neck loop, and pull both ends so it’s tight against your neck.
Step 3:
Grasp the short end of the tie (now the end lying against your shirt), then fold it like an accordion so the bow of the tie is pressed against the center of your neck. Hold it there with the thumb and forefinger of your right hand.
Step 4:
Drape the top end of your tie over your newly formed bow. Then squeeze both ends of your bow together, like butterfly wings, leaving the top end draped between them.

Step 5:
Pull your butterfly wings gently away from your neck, and you’ll see a hole open up behind them. Tuck the top (not the bottom) of the dangling end of the bow tie through that hole.
Step 6:
Cinch and straighten. You’ve got to be really elegant or super smart to pull off this tie. Bonus points if you’re both.
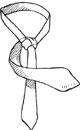
More Handy Tips
- Always fasten the top button of your collar before tightening your tie.
- A good knot creates a dimple in the center of your tie. Look for one.
- Even though you may be tempted to leave your tie knotted after you take it off, don’t do it. You’ll look like a wrinkled mess next time you put it on, and, really, how hard was it to tie? Instead, roll up your tie, starting at the skinny end, and lay it seam-side down in a drawer until your next fancy occasion.